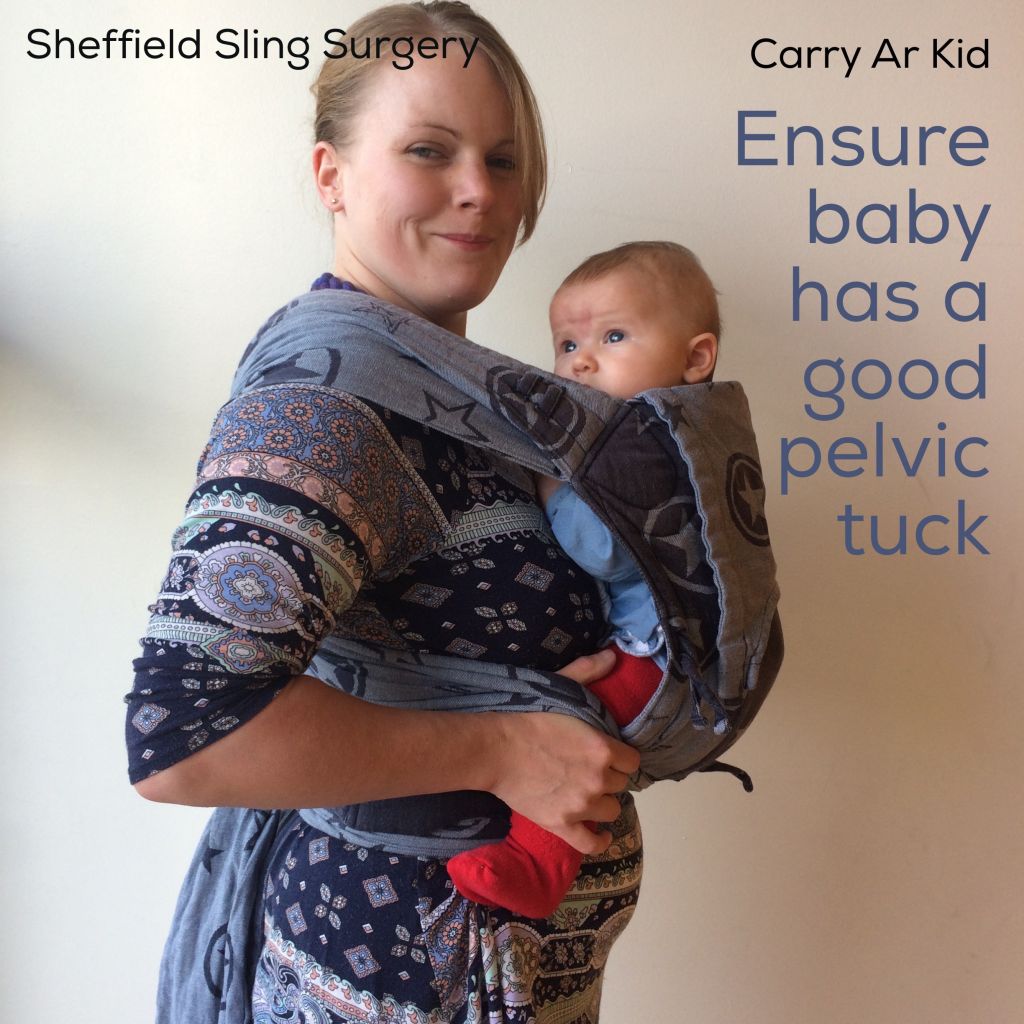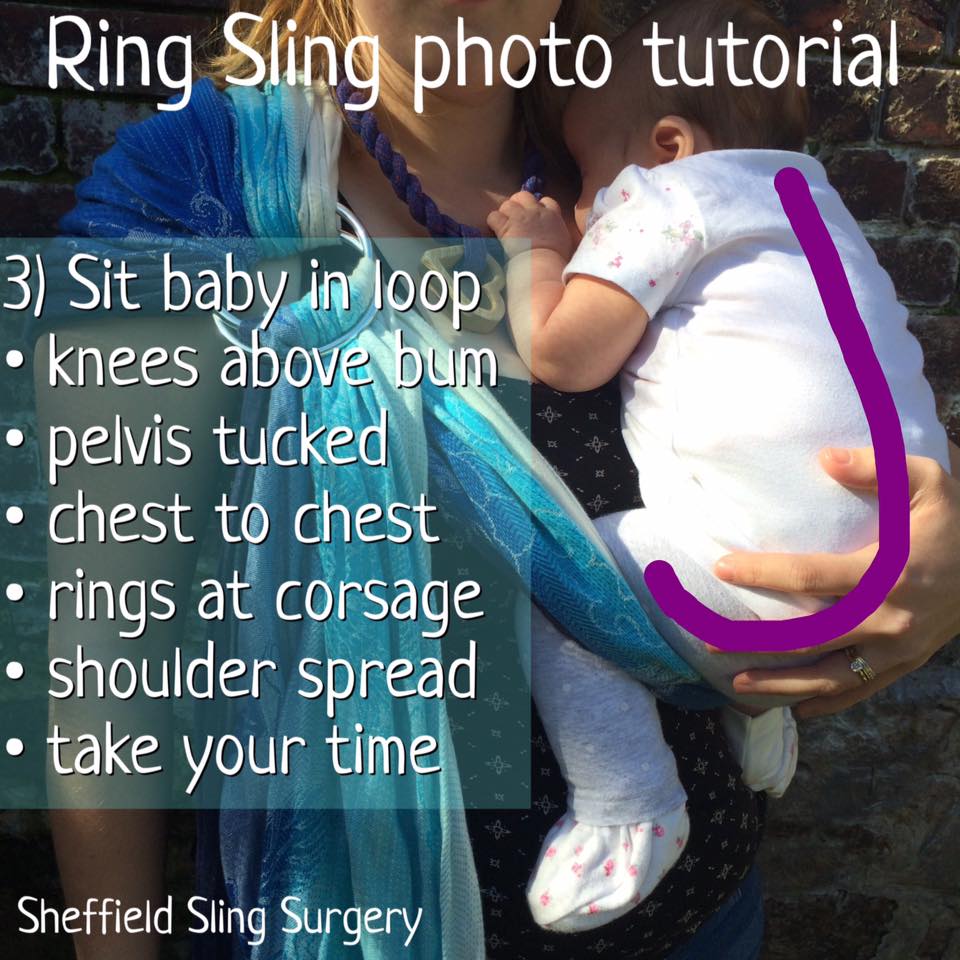

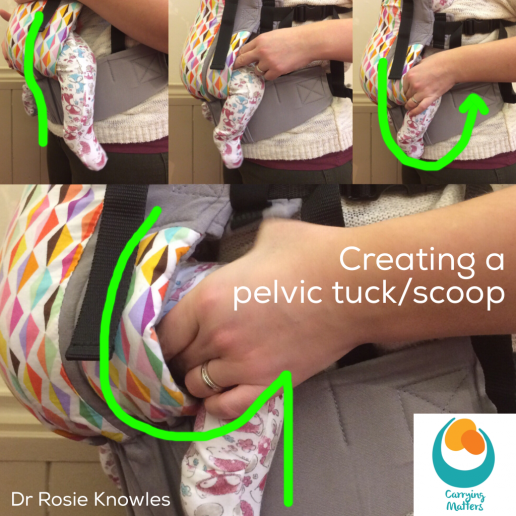
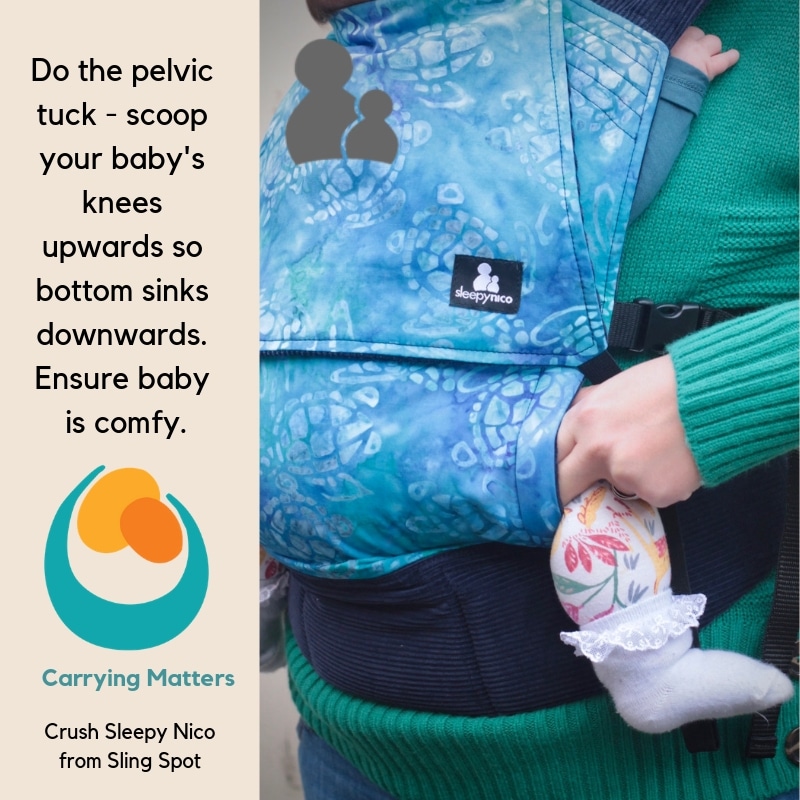
The Pelvic Tuck
What is the pelvic tuck or scoop?
I am often asked by carers who want to carry their children safely and comfortably “what is a pelvic tuck and how do I do it?”
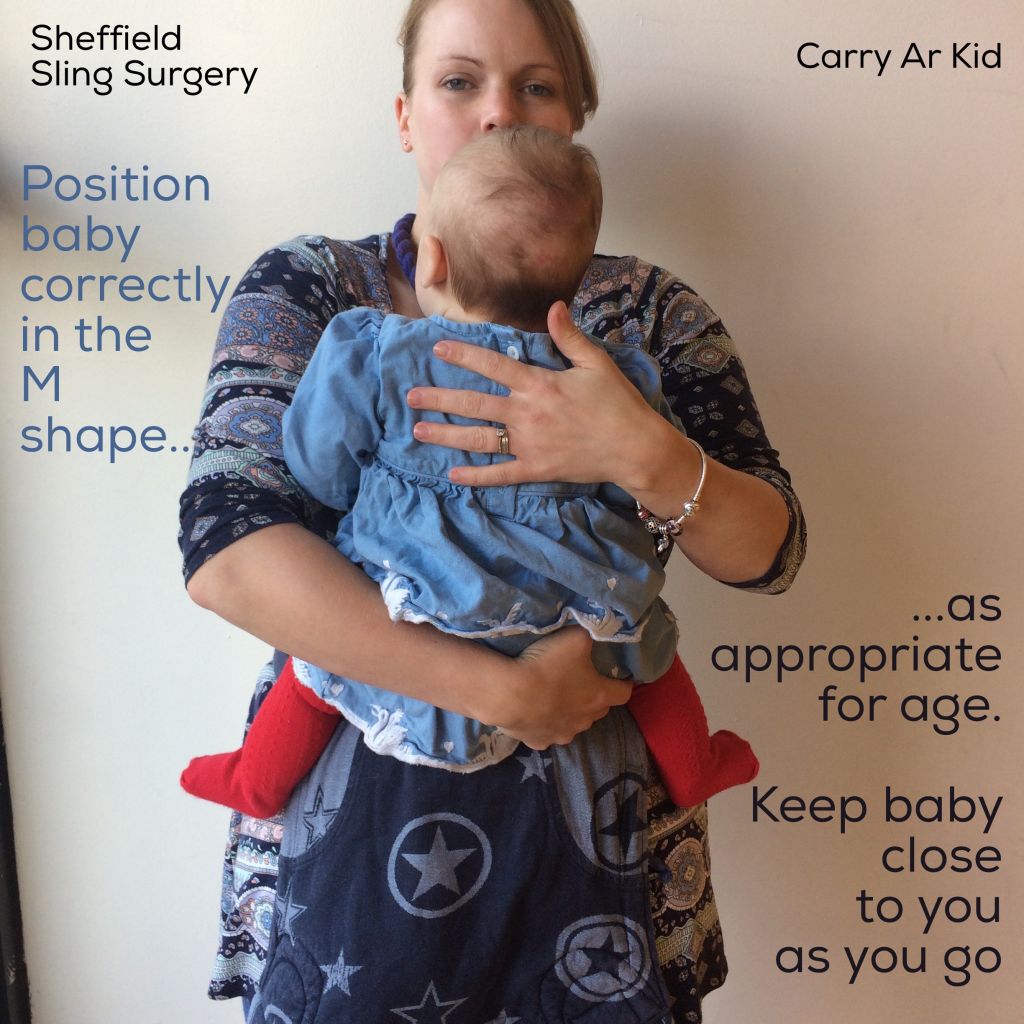
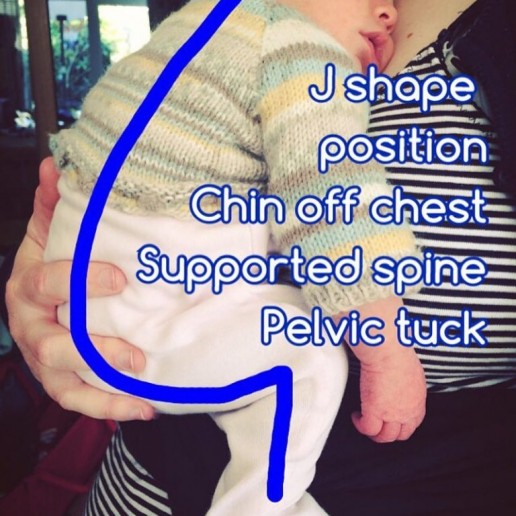
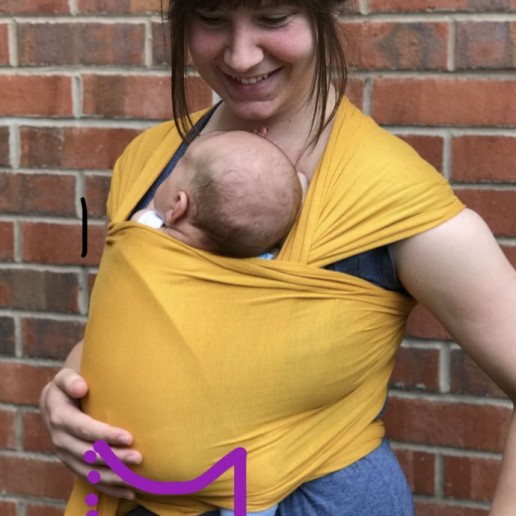
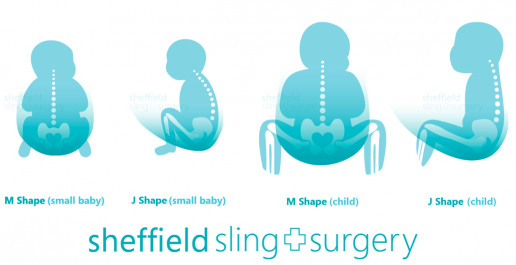
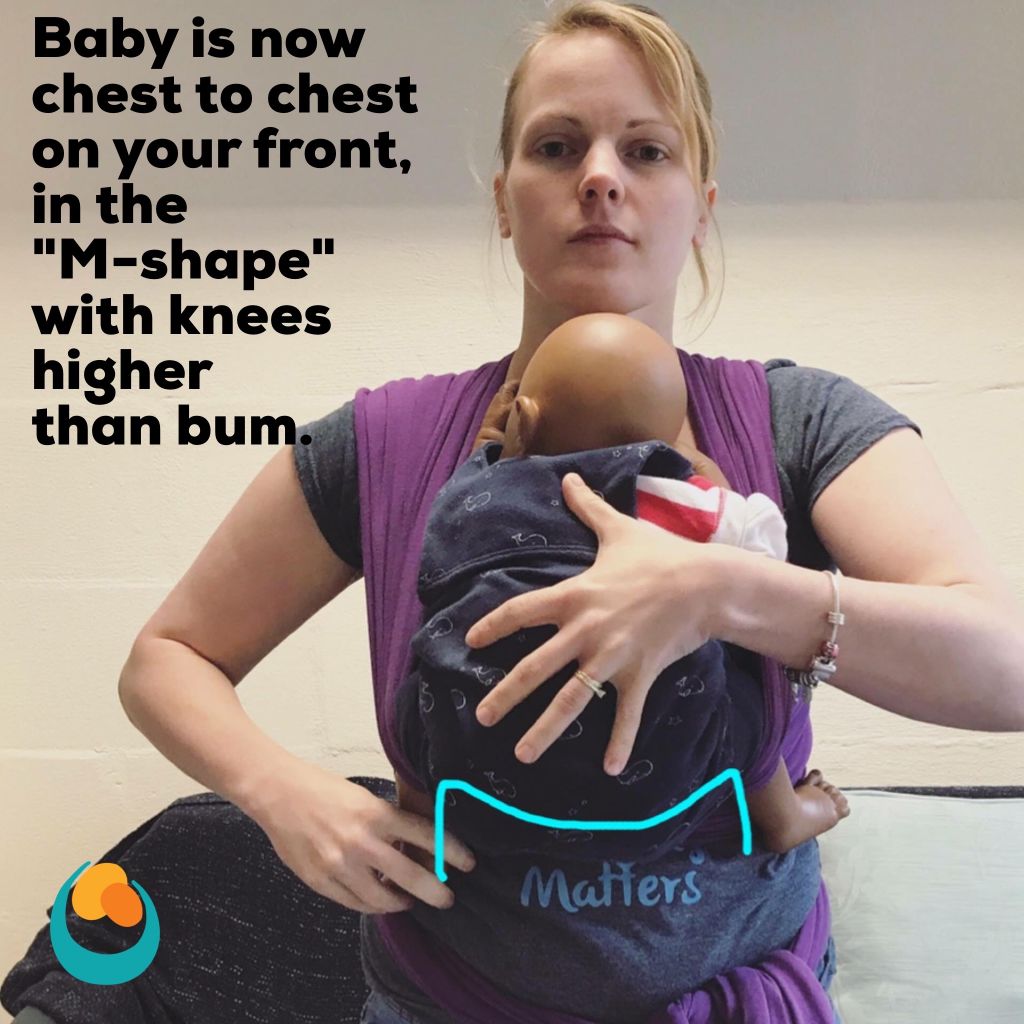
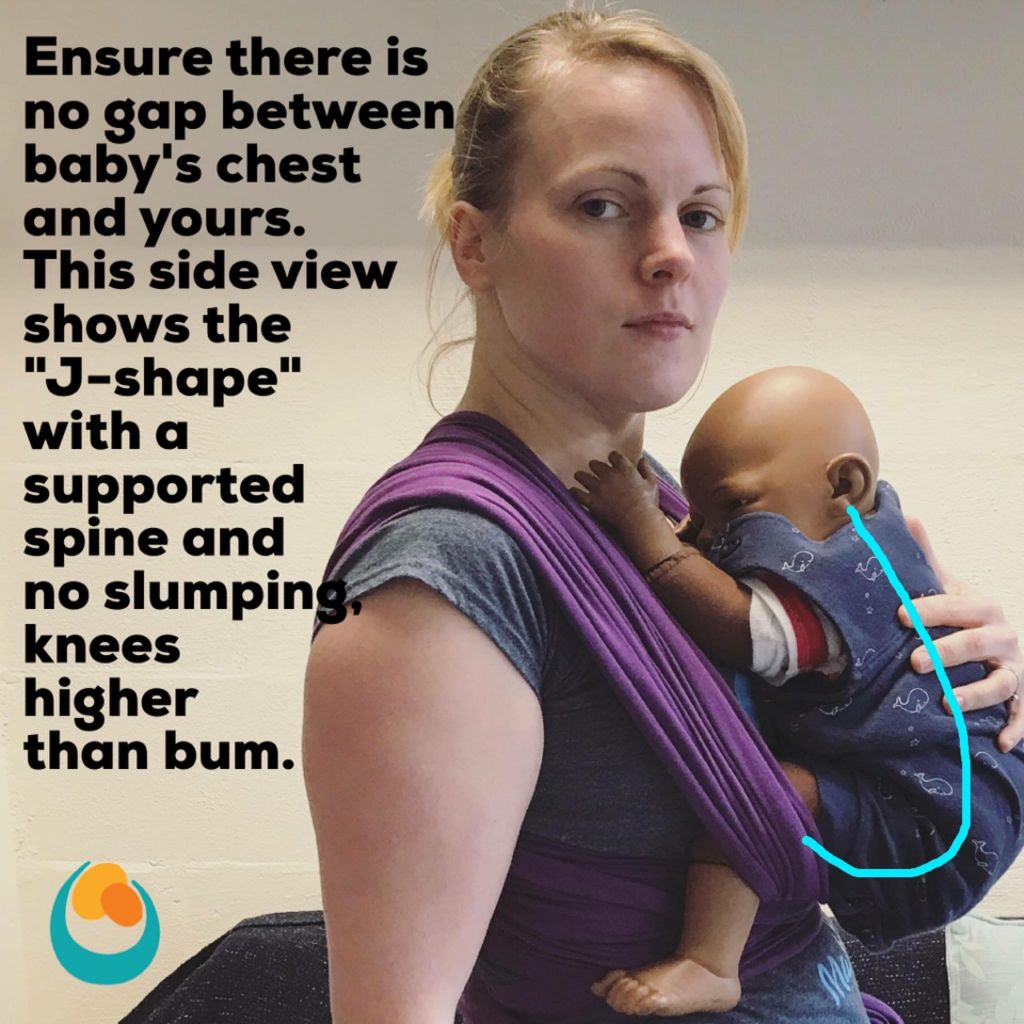
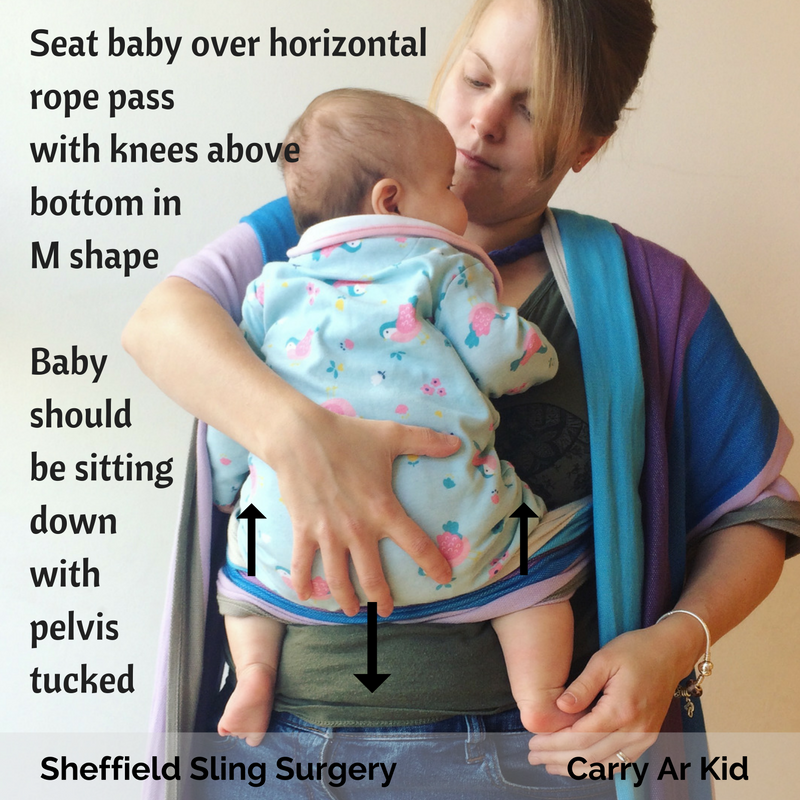
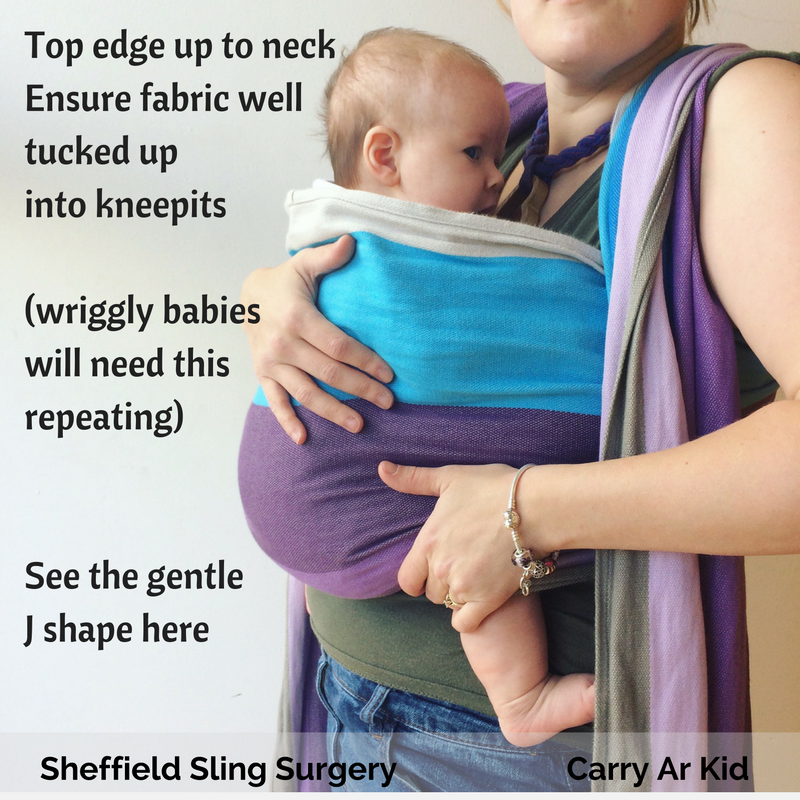
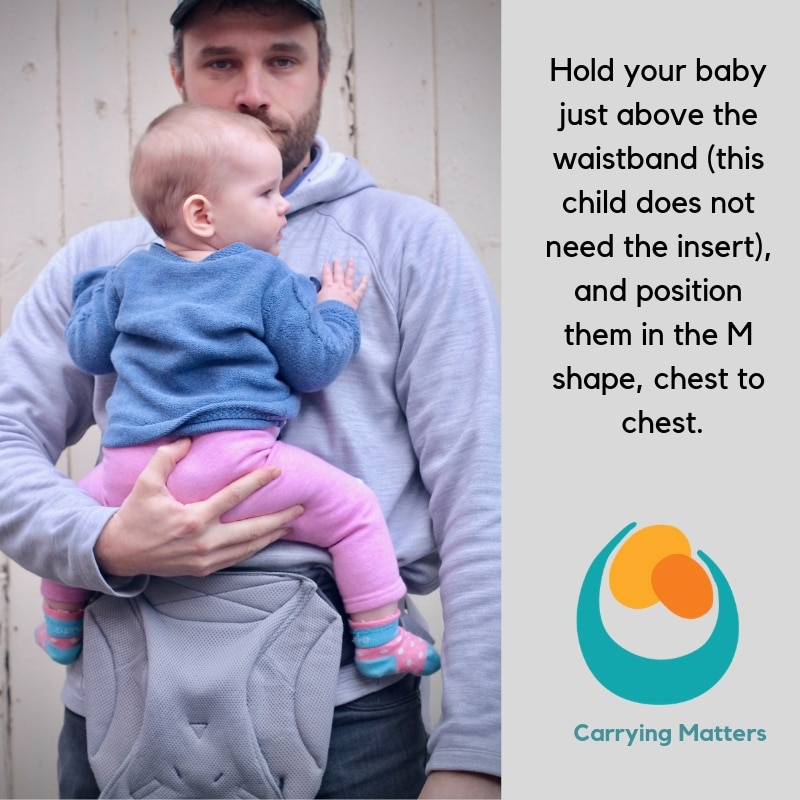
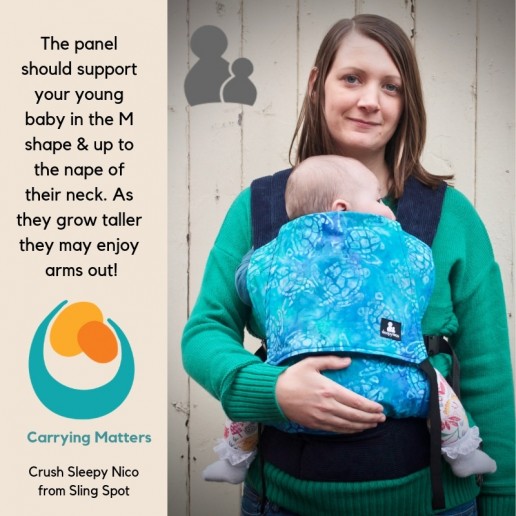
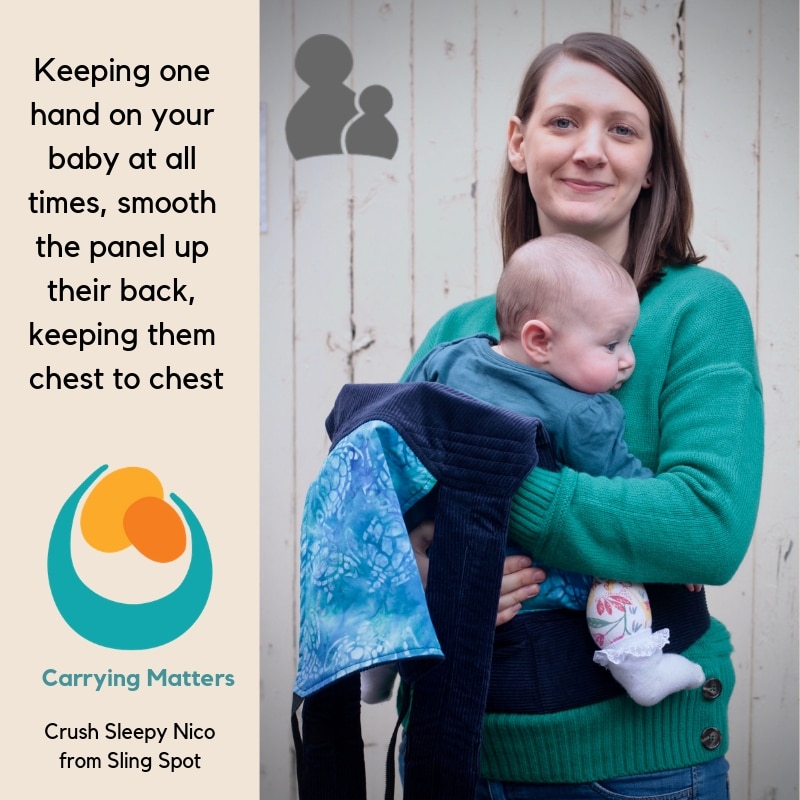
Babies are born with gently curved spines, and usually prefer to rest in this tucked posture when they are relaxed. Arching the spine and “starfishing” can (for some) be an attempt to communicate discomfort or distress. Sleeping and relaxed babies can usually be found with their knees drawn up into a comfortable “M shape”; this is normal behaviour, and it is how most babies rest on their parents, perching on the broad secure base of the carer’s forearm. From this broad base, babies’ chests can be properly supported against the parent’s body, thereby avoiding slumping over and restricting airways.
This “squat” positioning also helps to encourage healthy hip development. Studies have shown that the rates of hip dysplasia are lower in communities that carry children on the hip or back frequently, as the posture adopted for this promotes optimum growth of the hip joint. (see here for more information on hip dysplasia and slings).
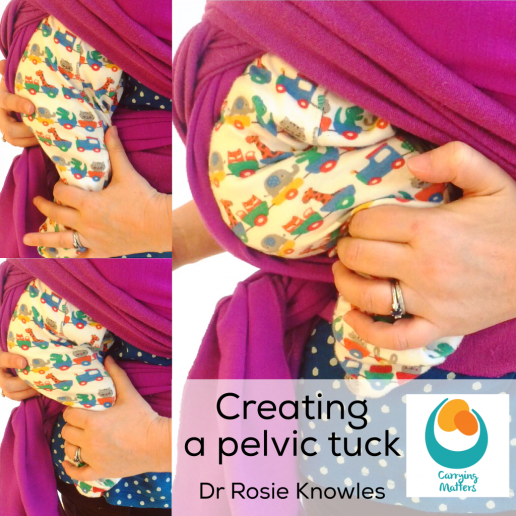
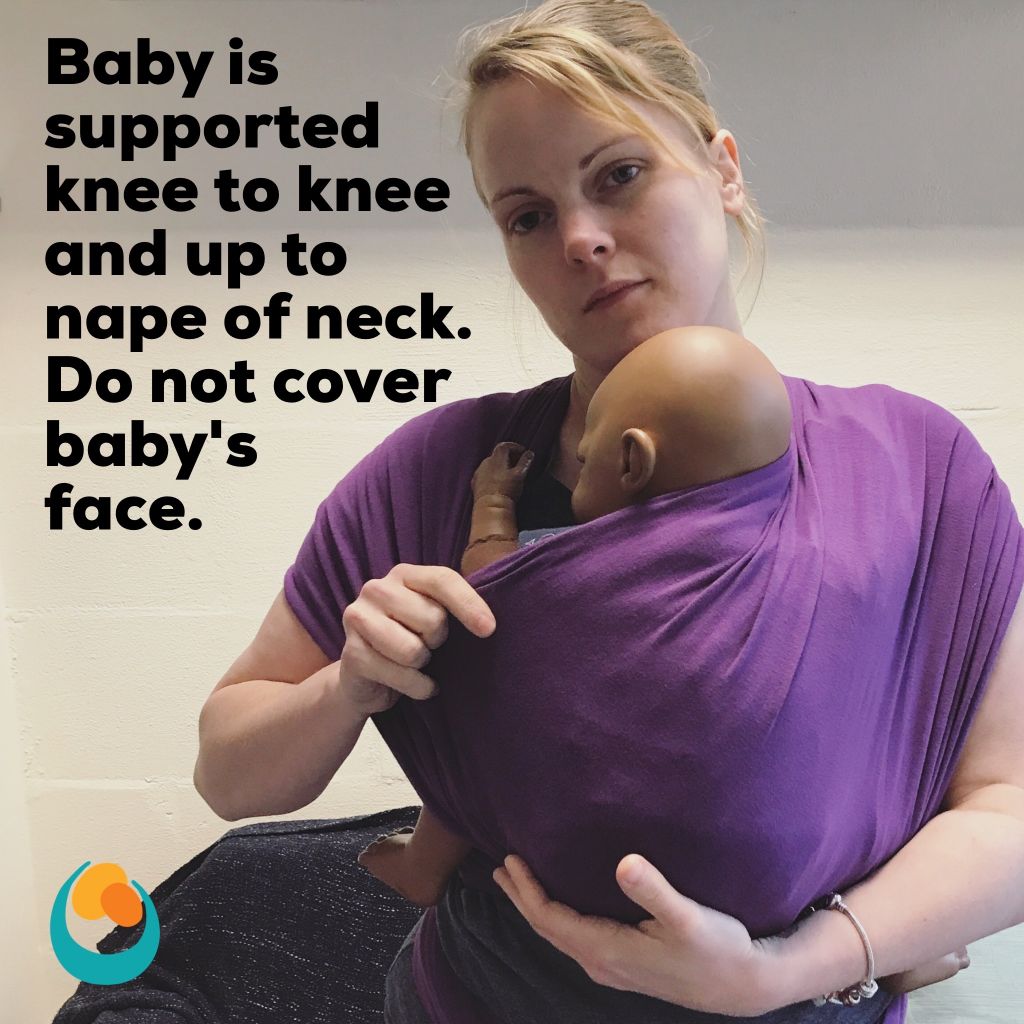
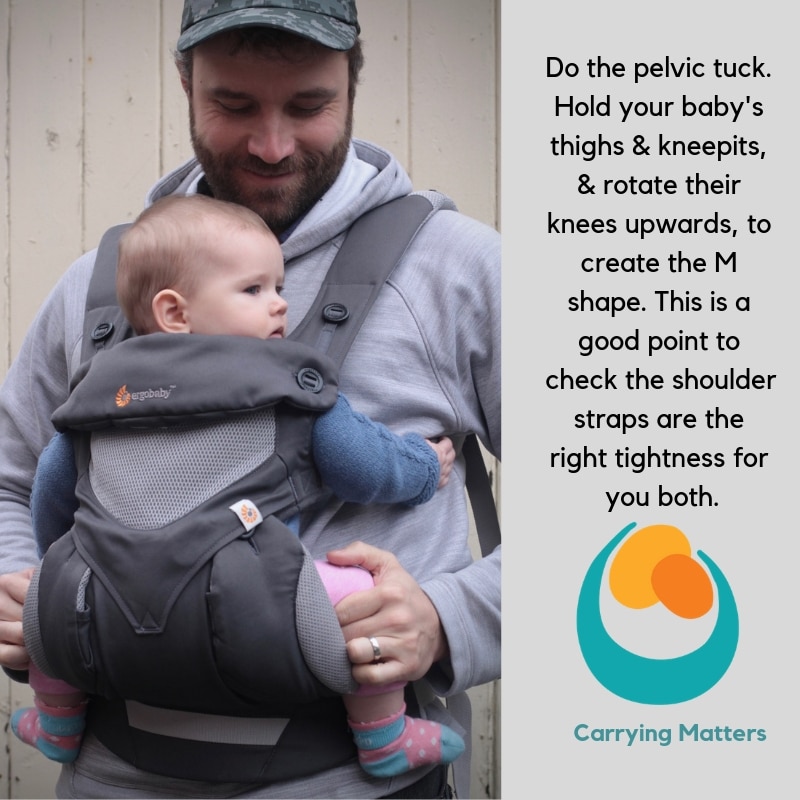
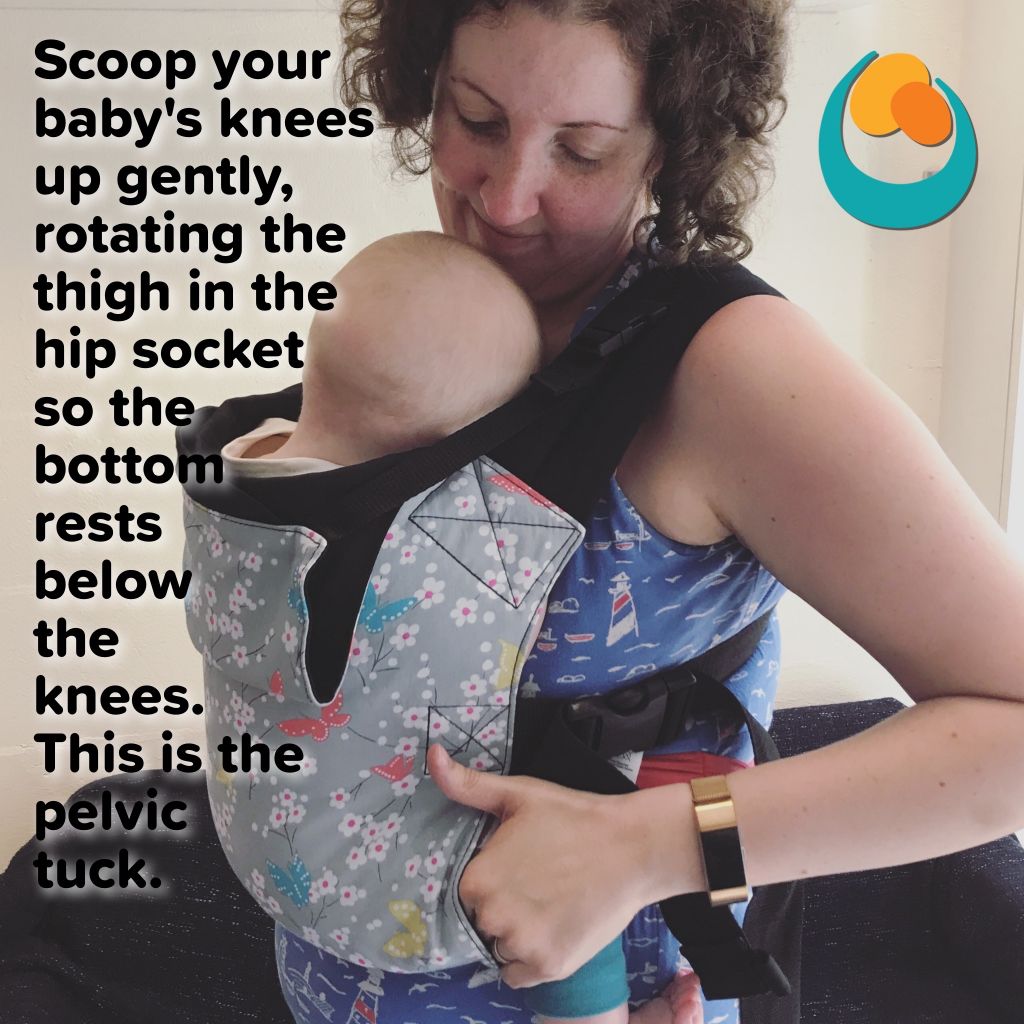
The pelvic tuck/scoop technique of encouraging a child to sit in a position that creates a “J shape” (from the side) or an “M shape” (from the front) in a carrier is therefore very helpful. Such positioning is more comfortable, more respectful of anatomy, and also helps preserve open airways. The aim is to raise the knees up, allowing the bottom to settle downwards into the classic “M shape”.
When demonstrating, I suggest that carers imagine they are scooping two curls of ice-cream towards themselves with both hands; and then repeat this action as they hold their child’s thighs gently between thumb and fingers. Another way of thinking about it is to imagine they are holding two glasses of water in front of themselves, and then pour the water out away from them.
This rotates baby’s femoral head in the socket. The photos and videos below show this in action.
Creating this broader base seat for a younger child will also help to make a narrow base carrier more comfy and feel more stable and supportive. A simple scarf can be used to support the legs in this “M shape” once the pelvis has been tilted and knees raised above bottom.
The pelvic tuck is less important for older babies and toddlers; as children get older, the ability to actively move around in the sling becomes more important while they are awake. The key thing is to ensure they are comfortable and their legs are not dragging down or tiring them; the carrier no longer needs to be knee to knee for older children.

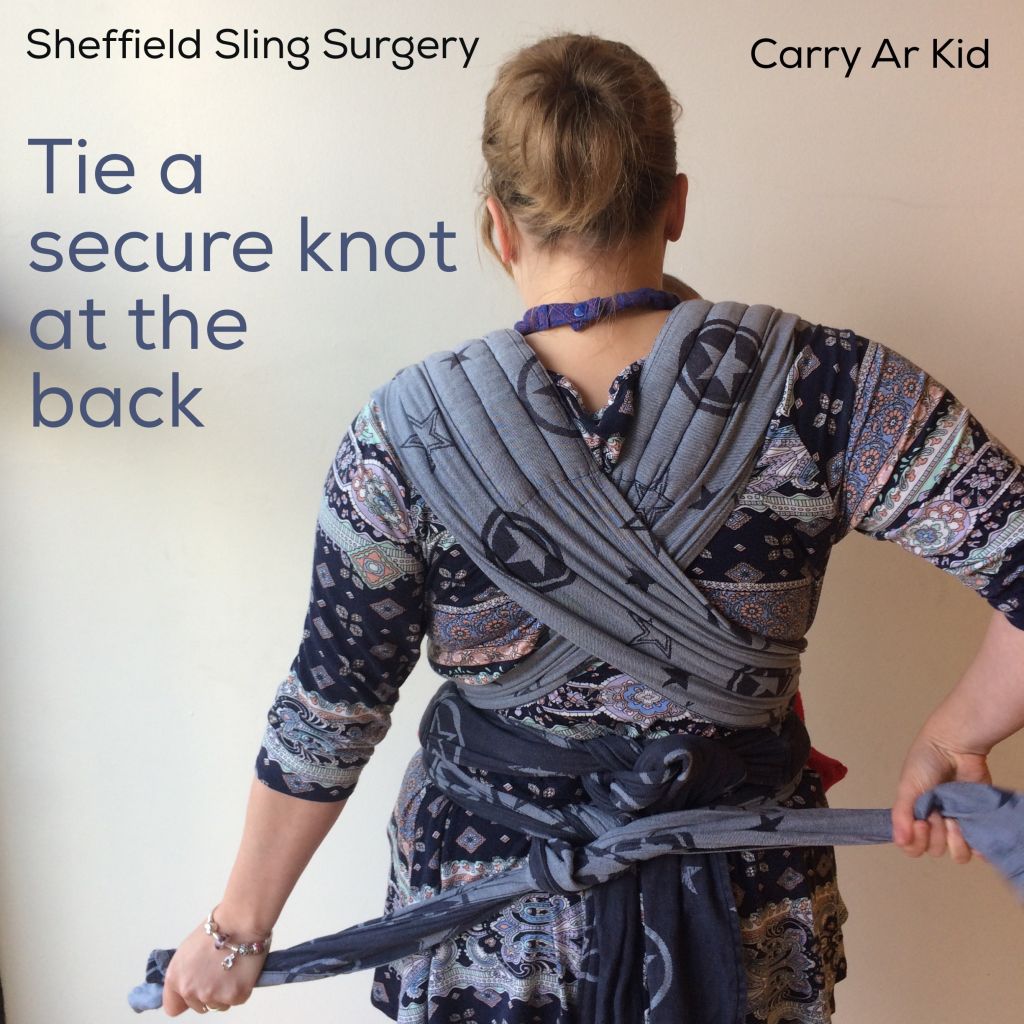
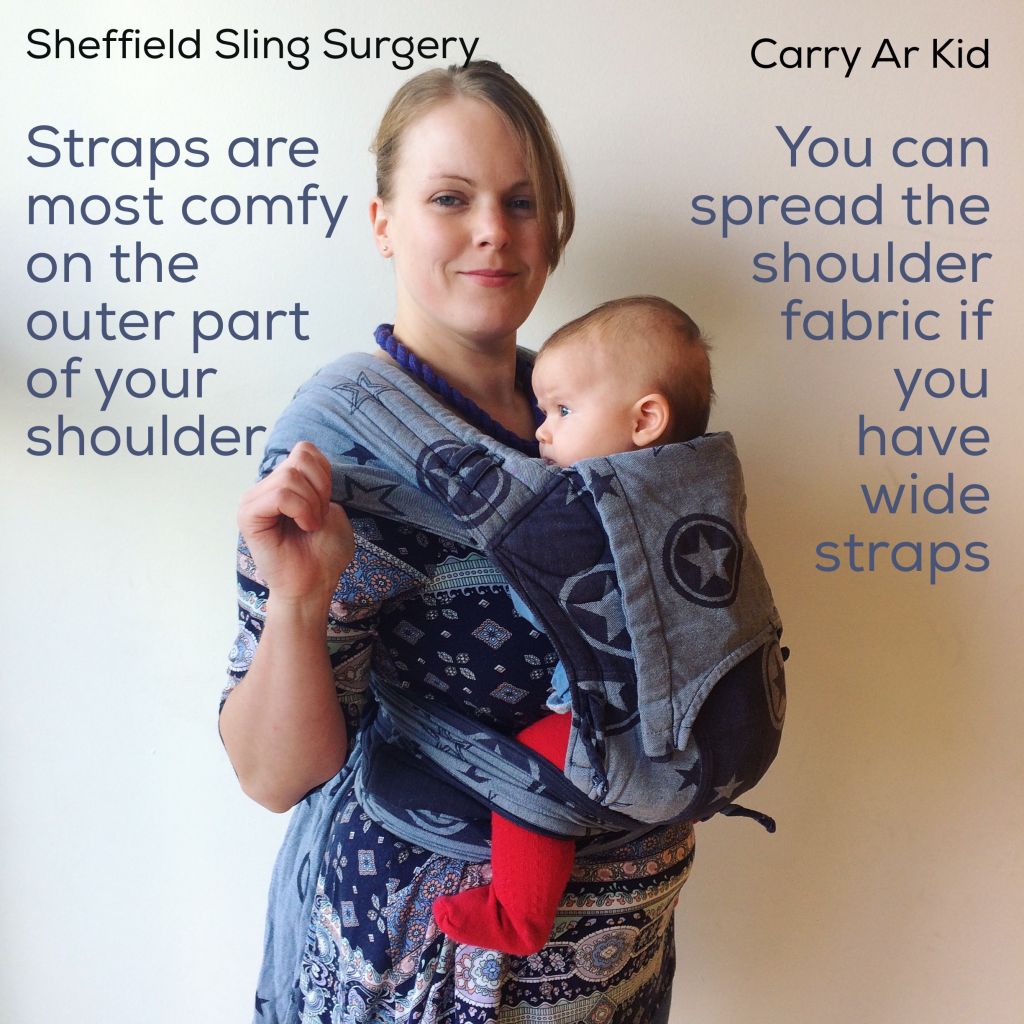
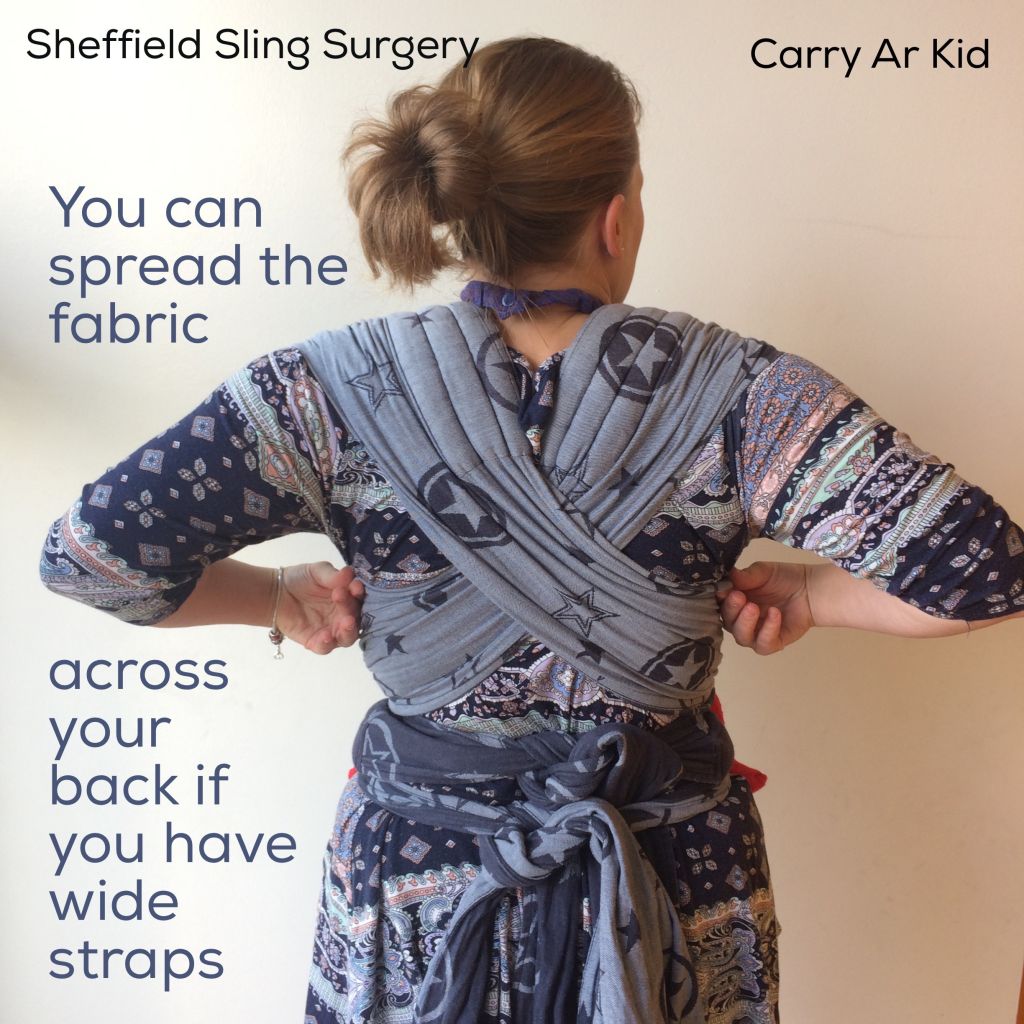
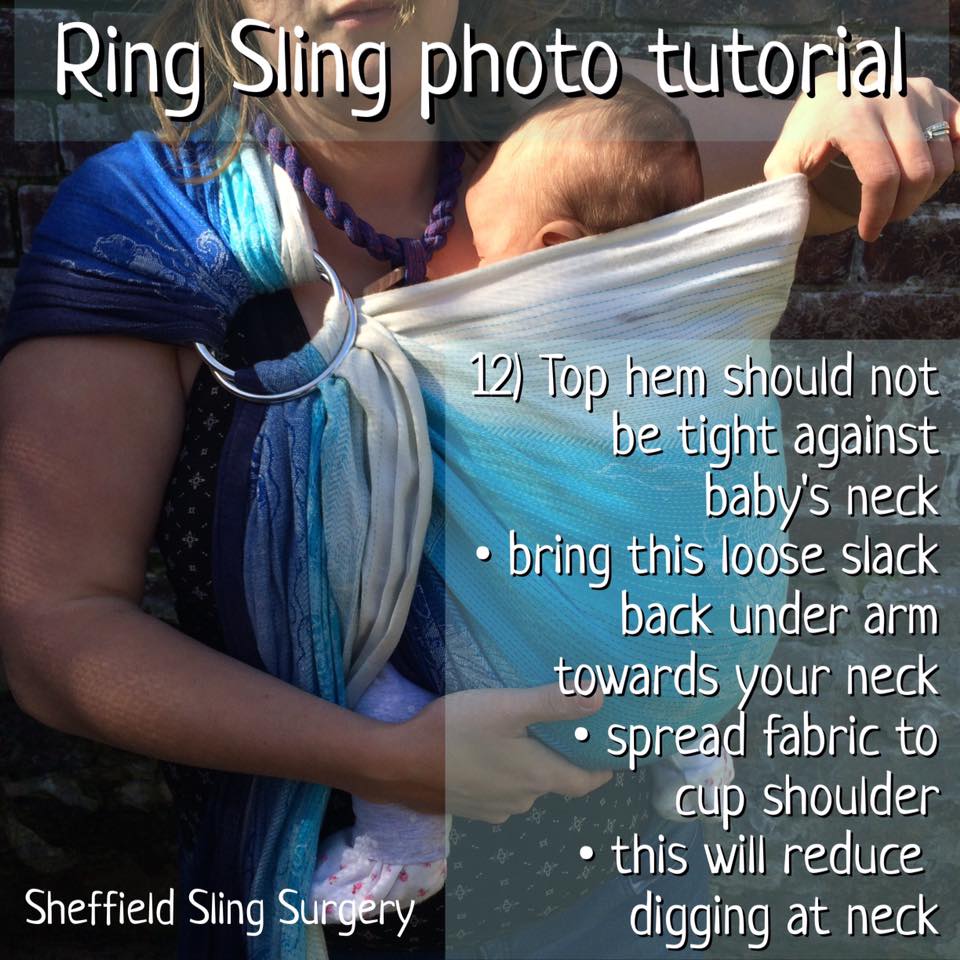
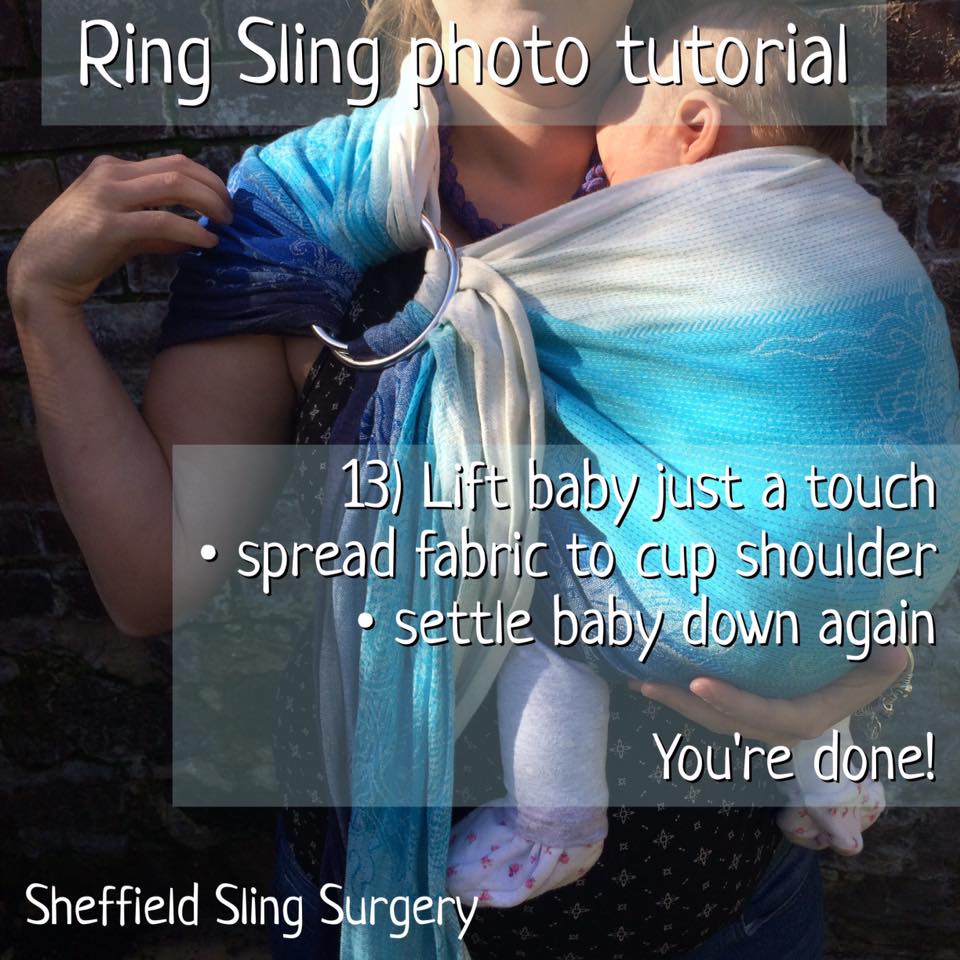
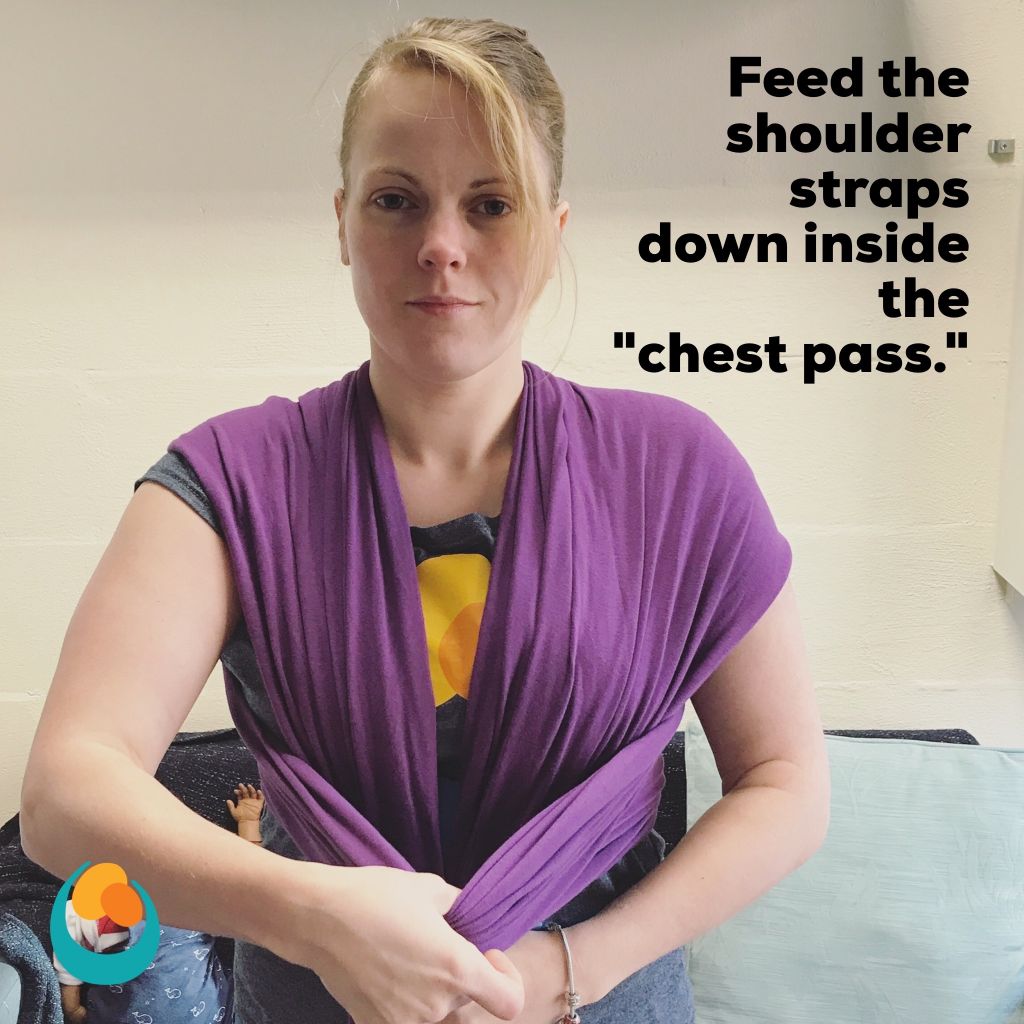
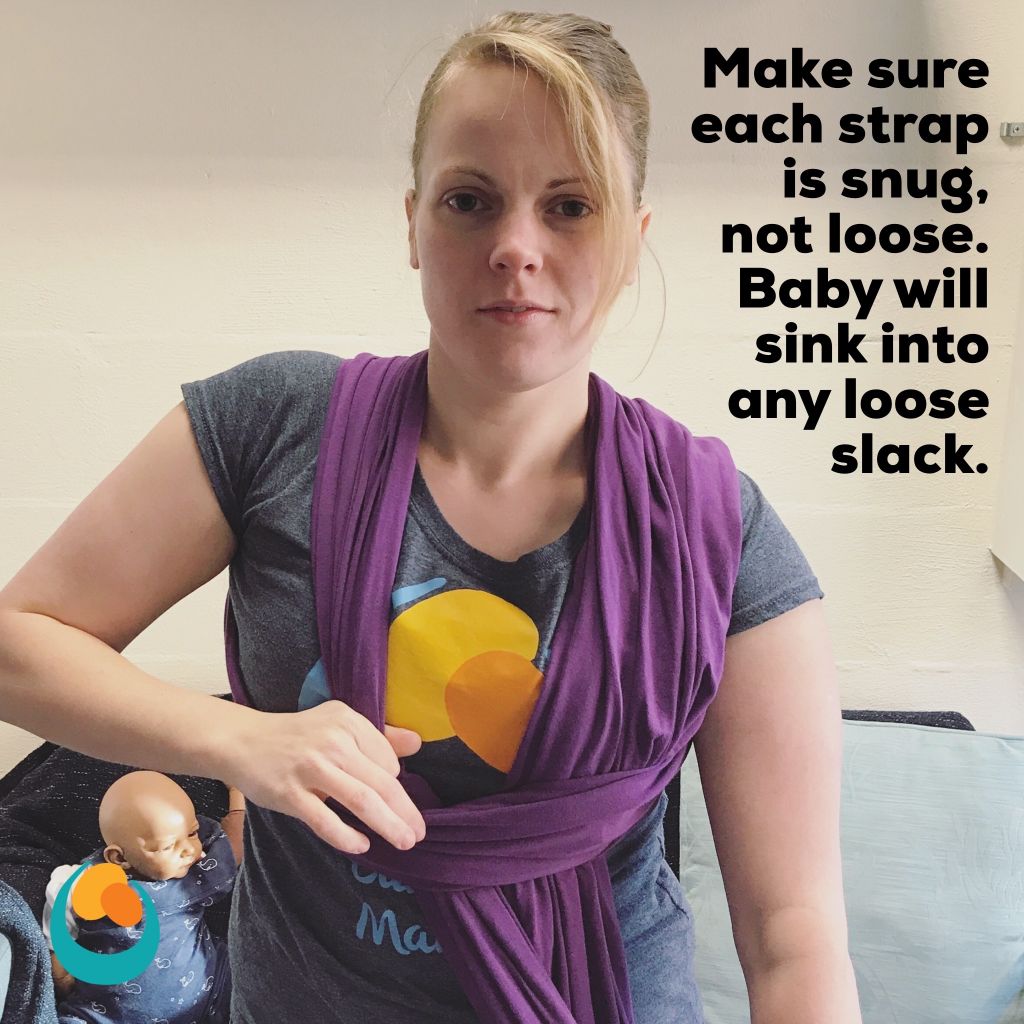
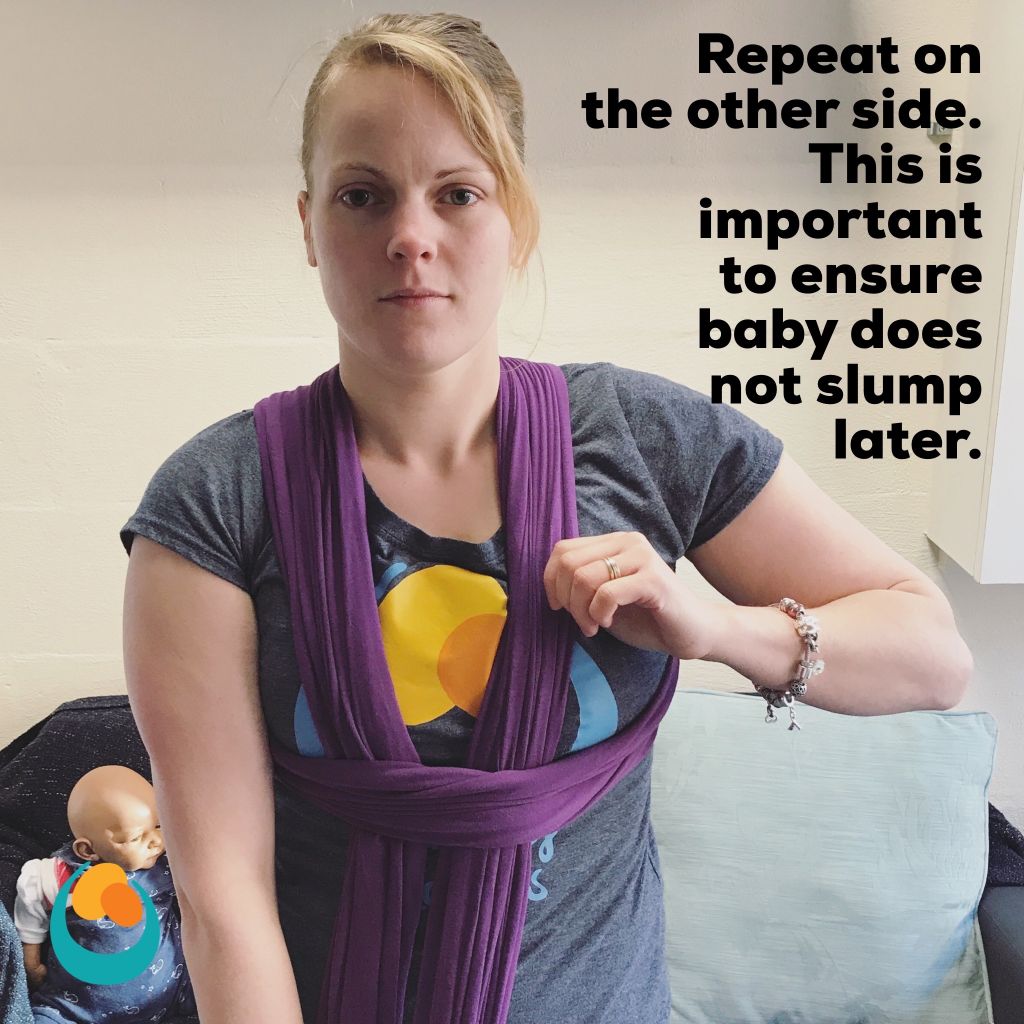
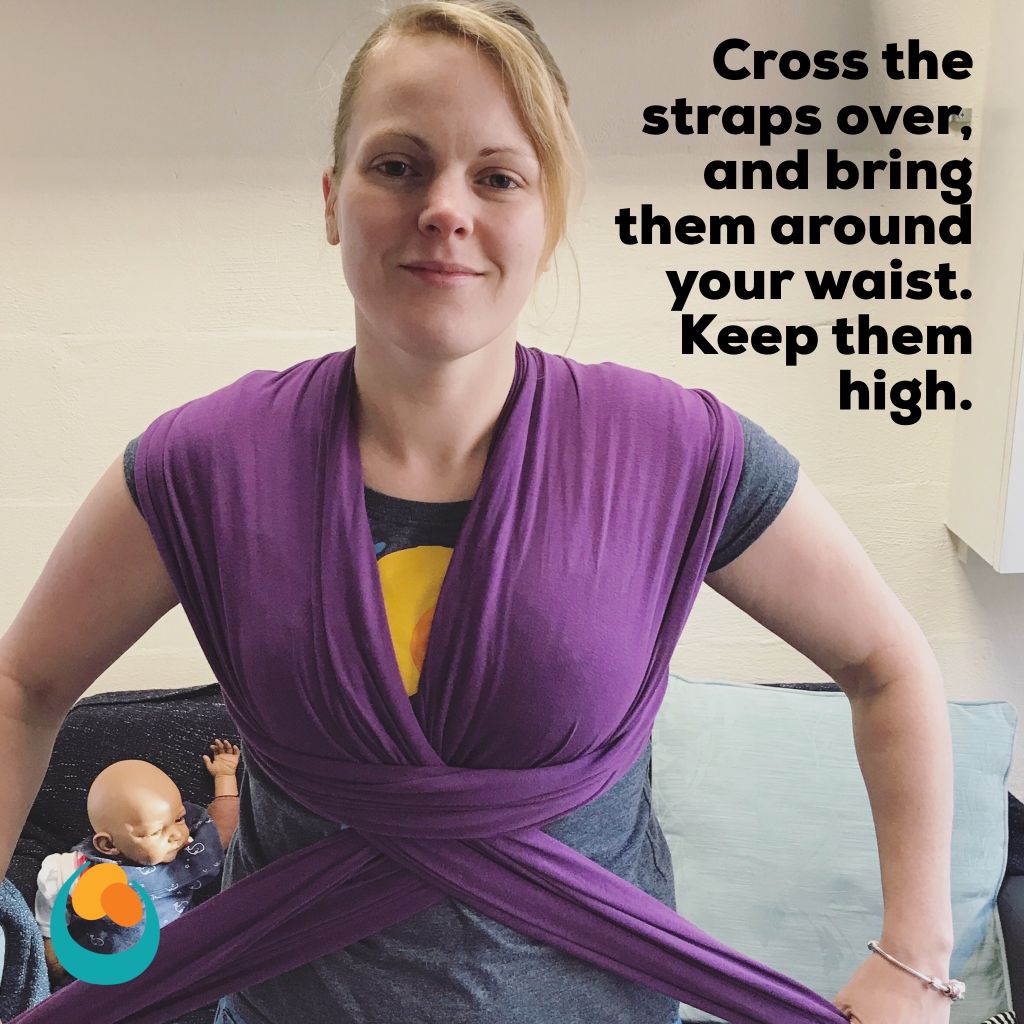
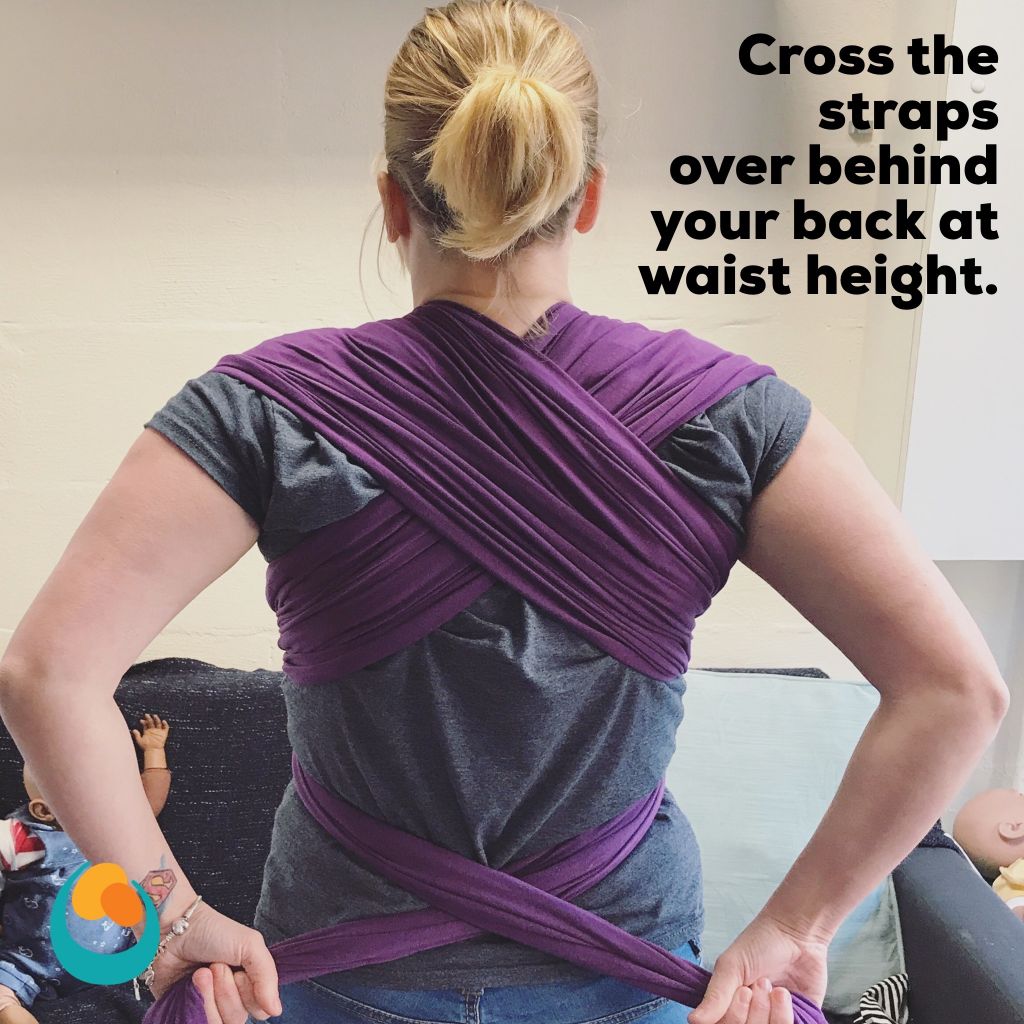
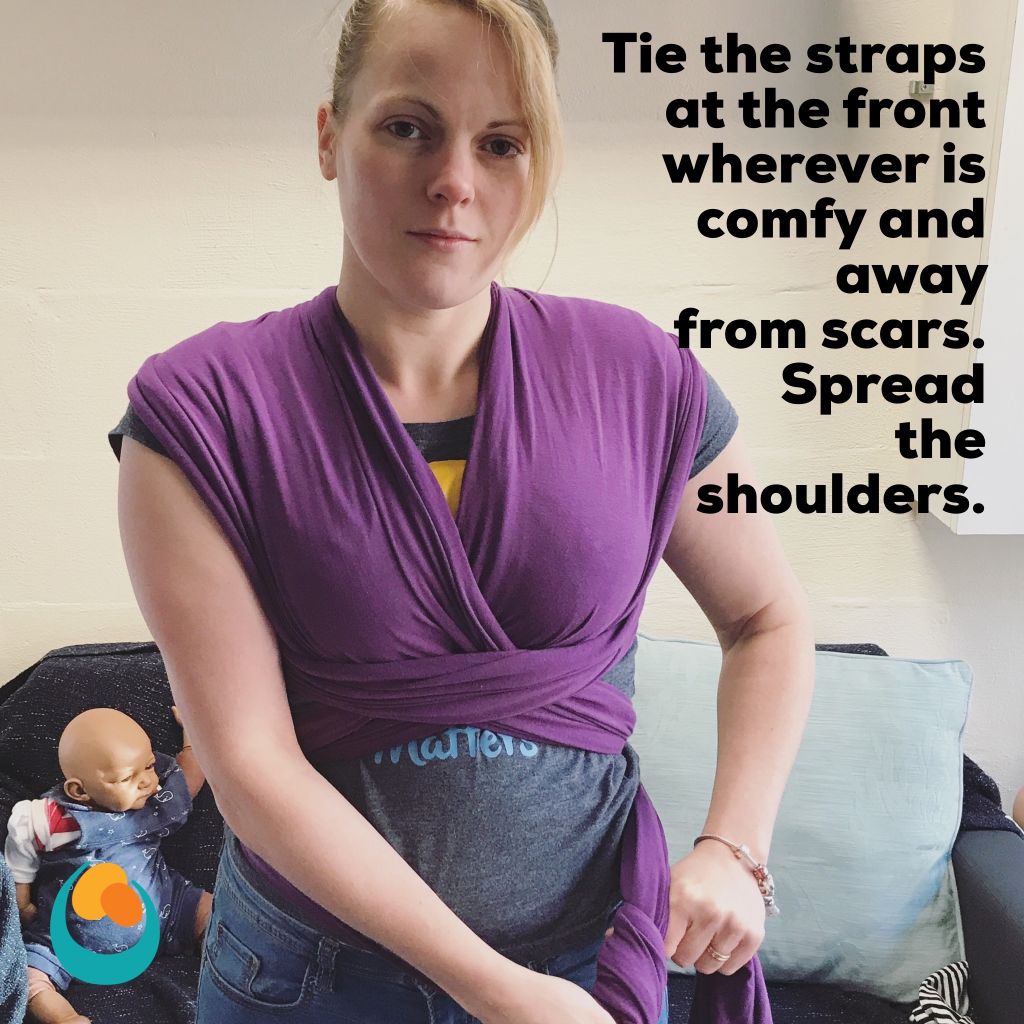
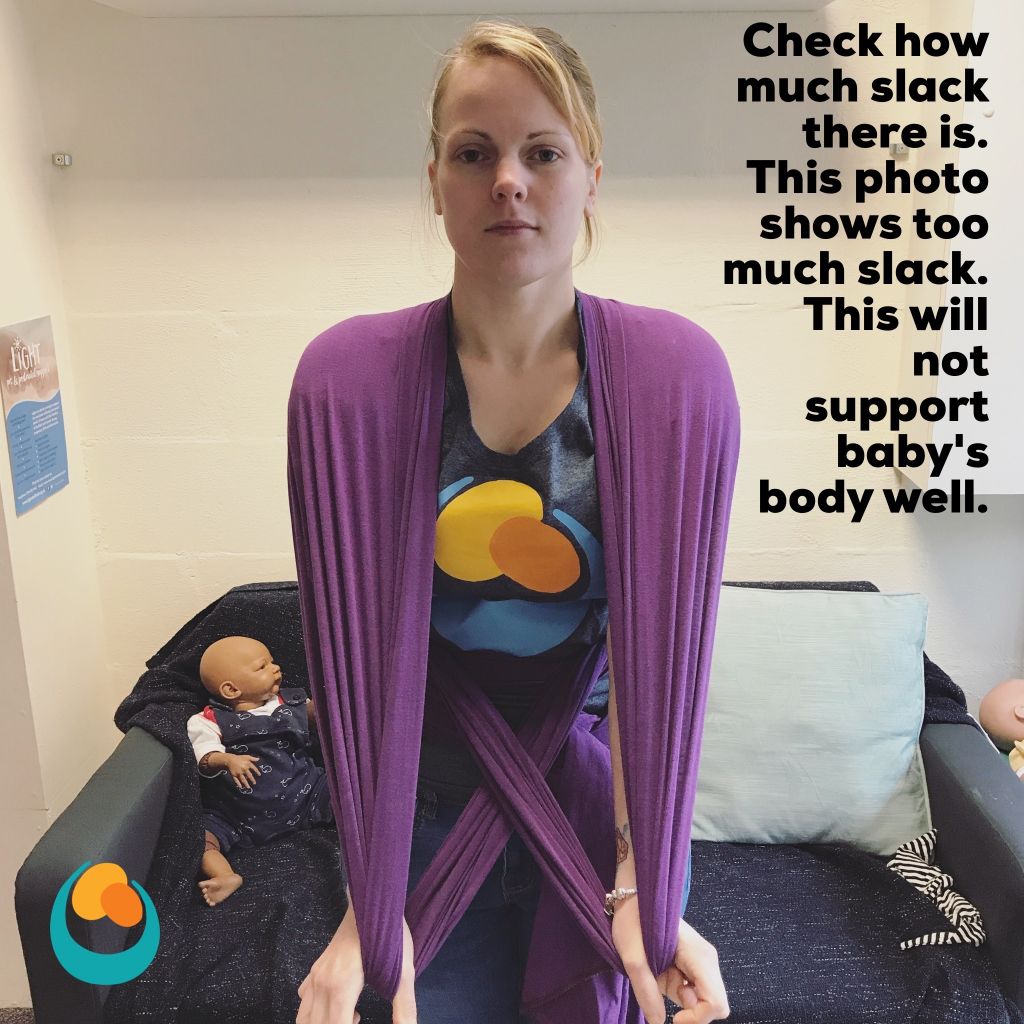
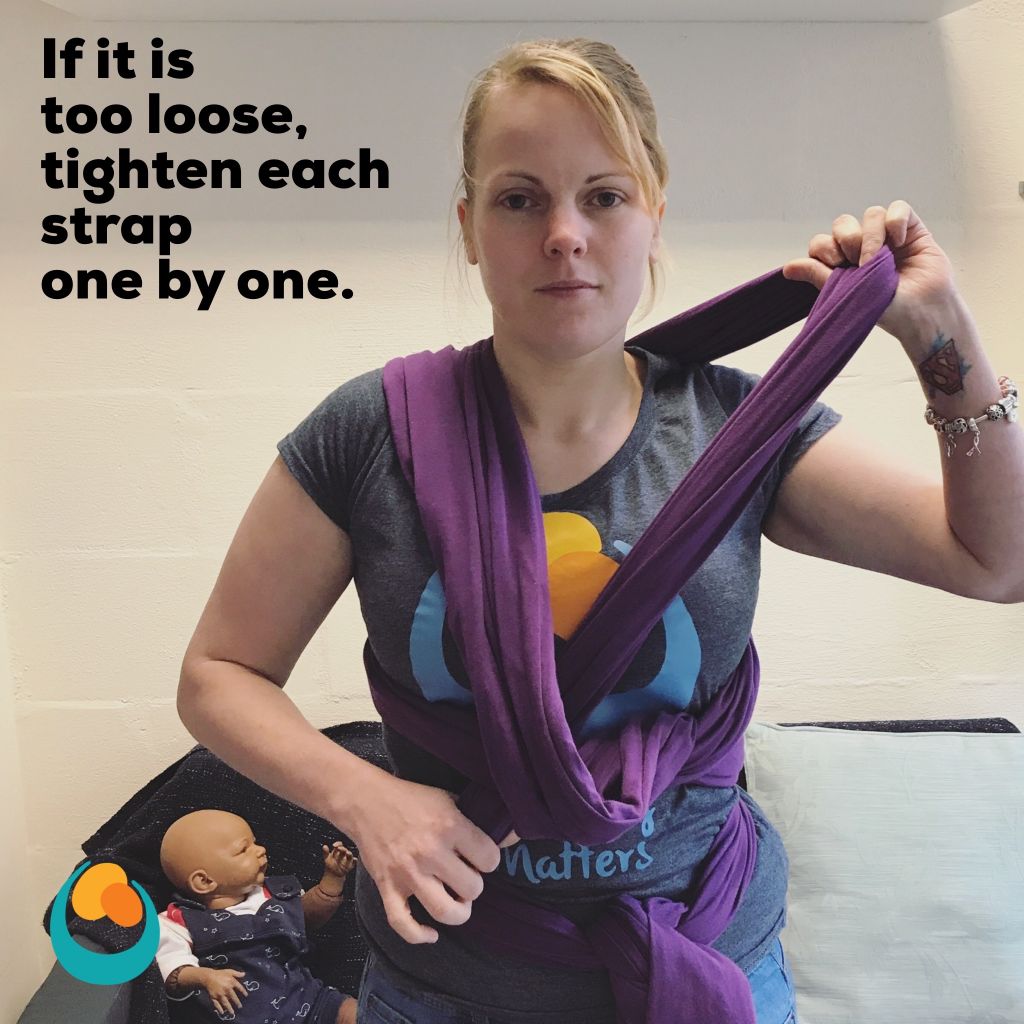
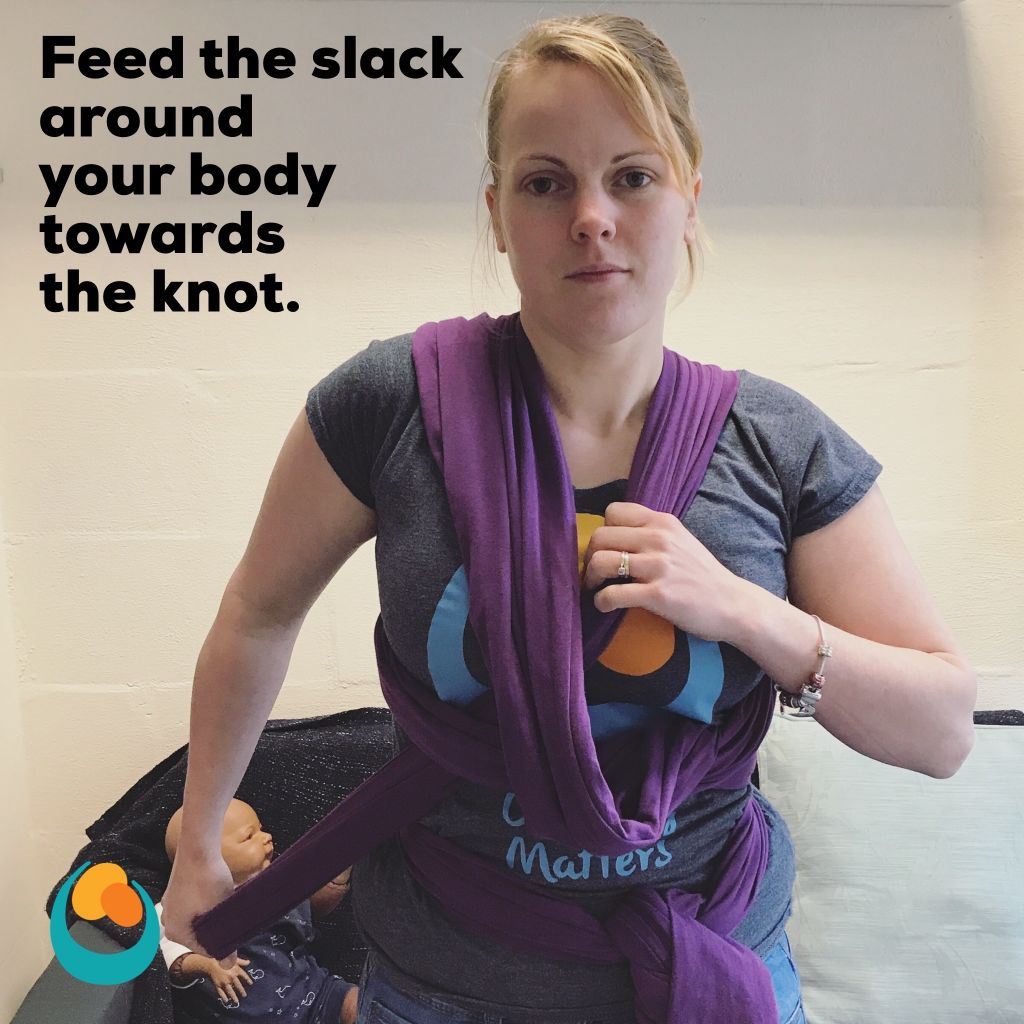
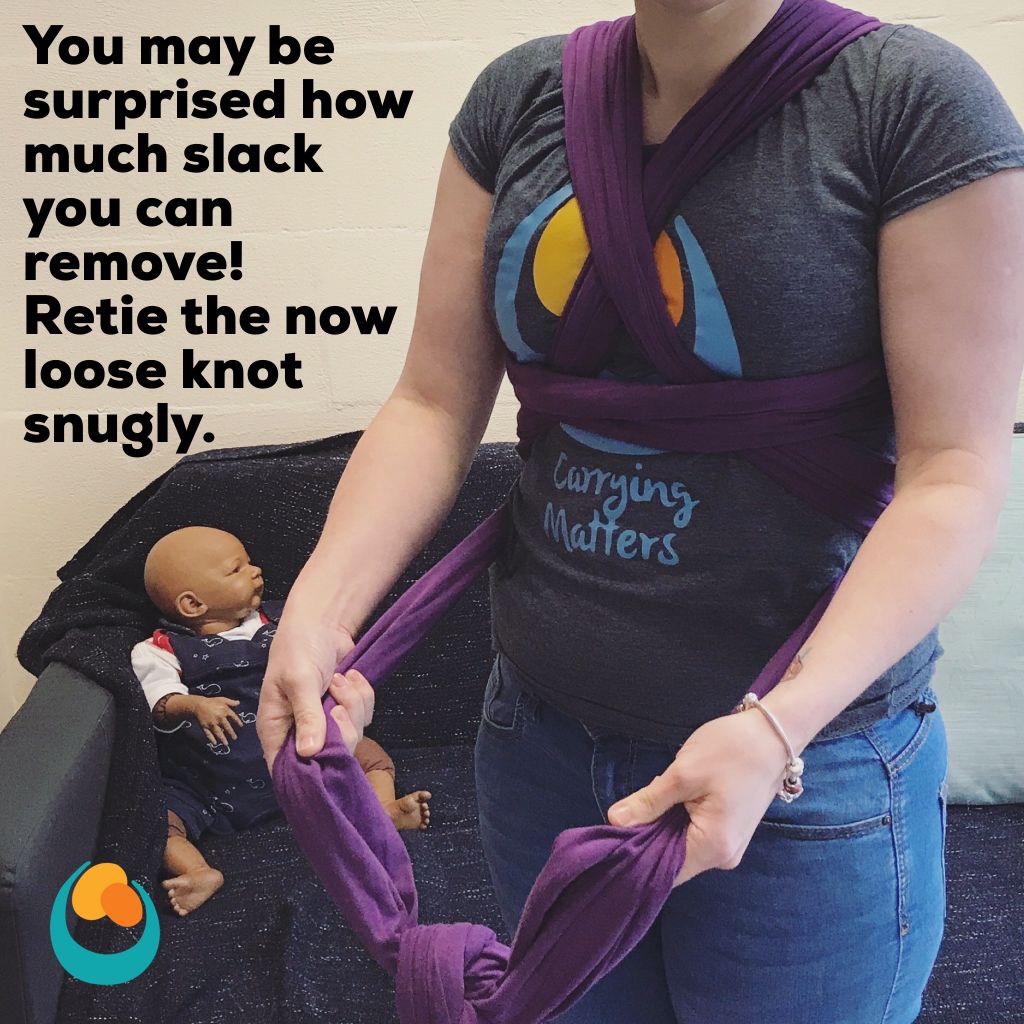
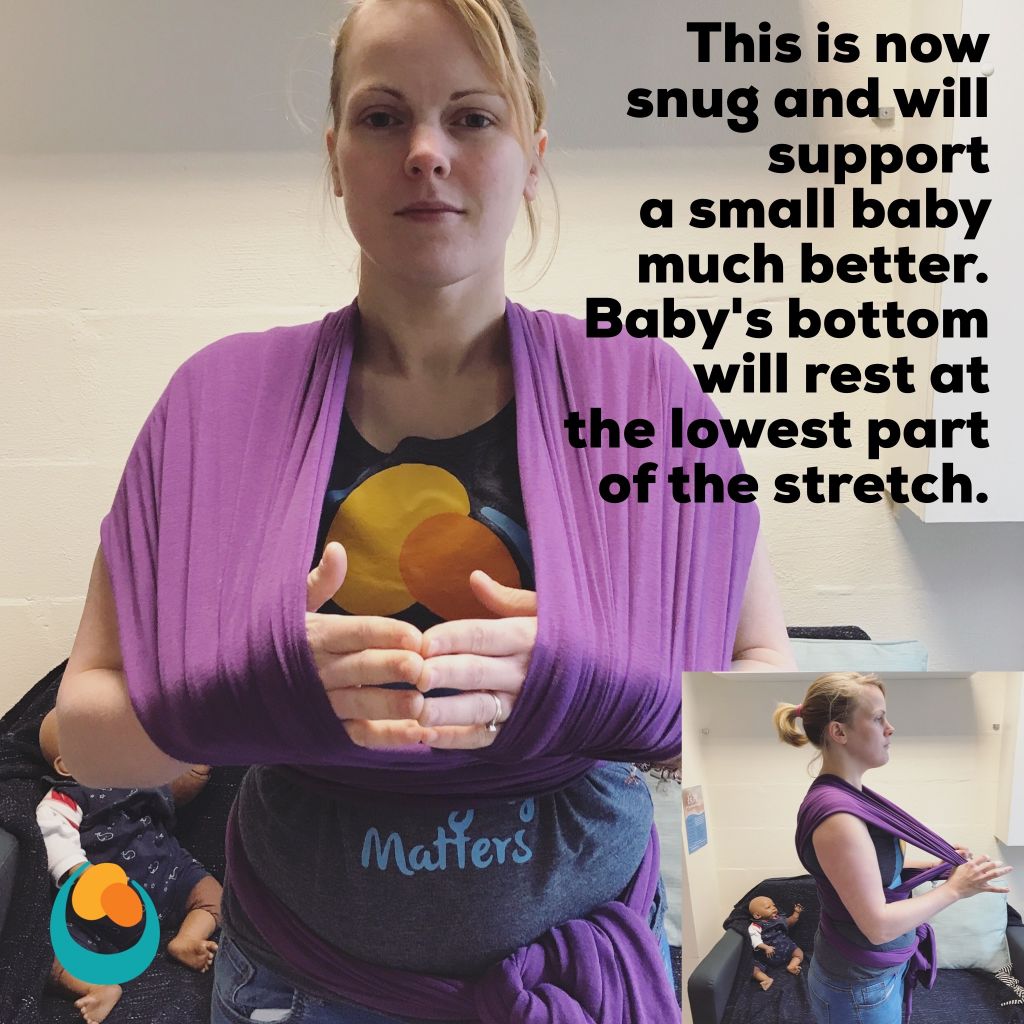
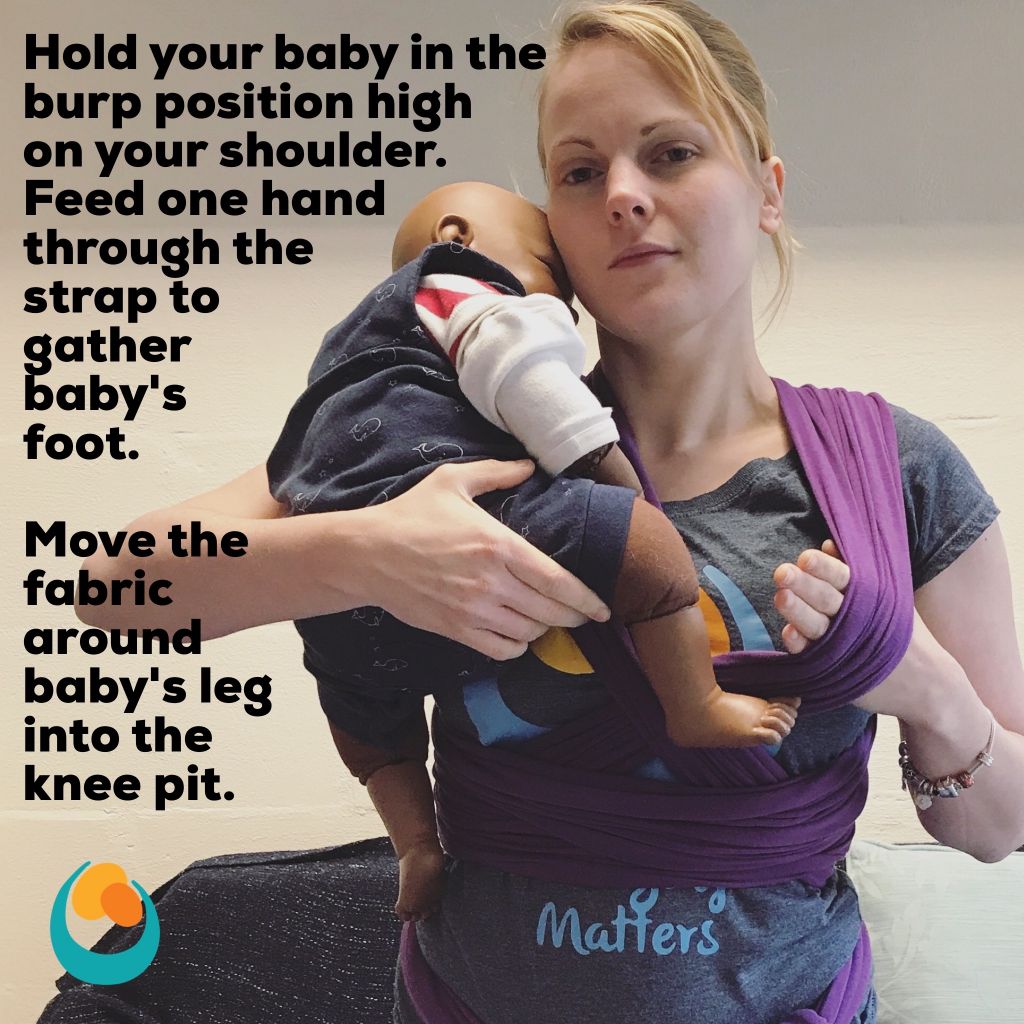
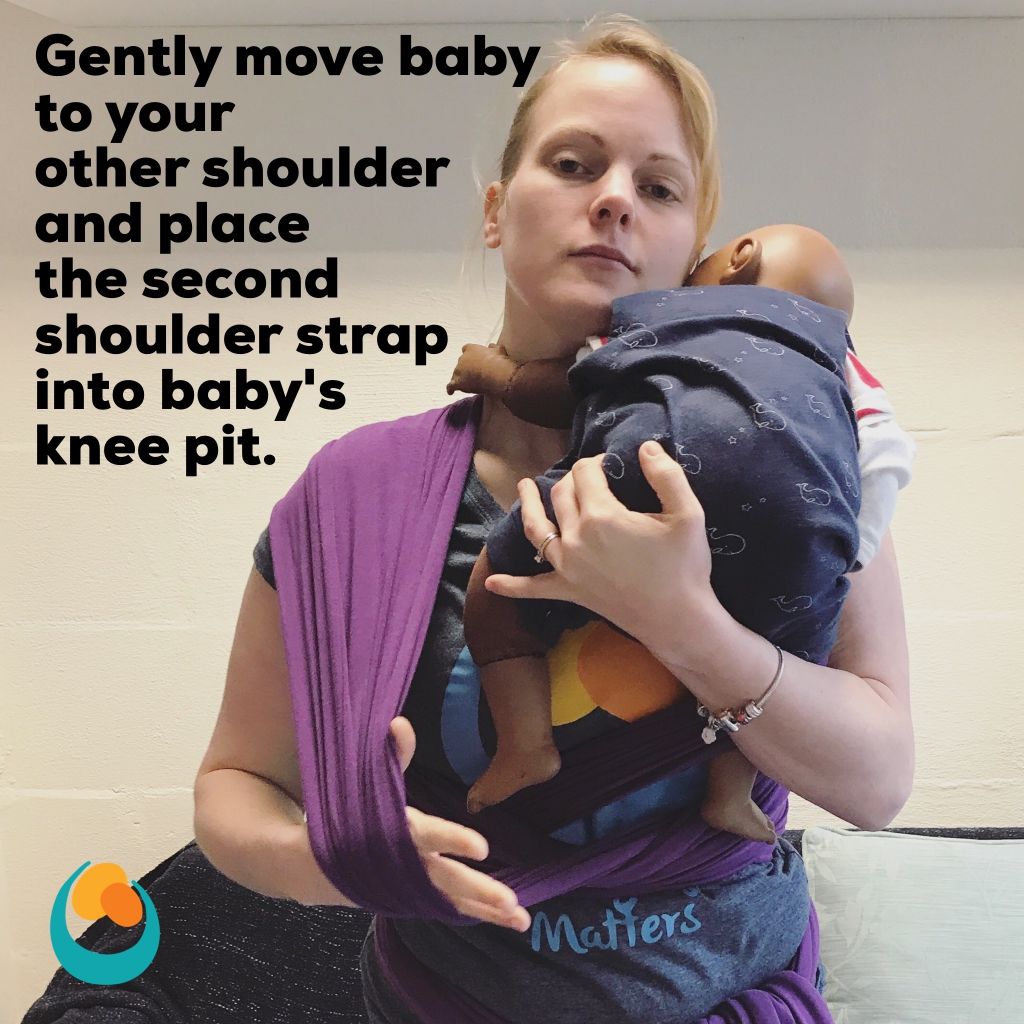
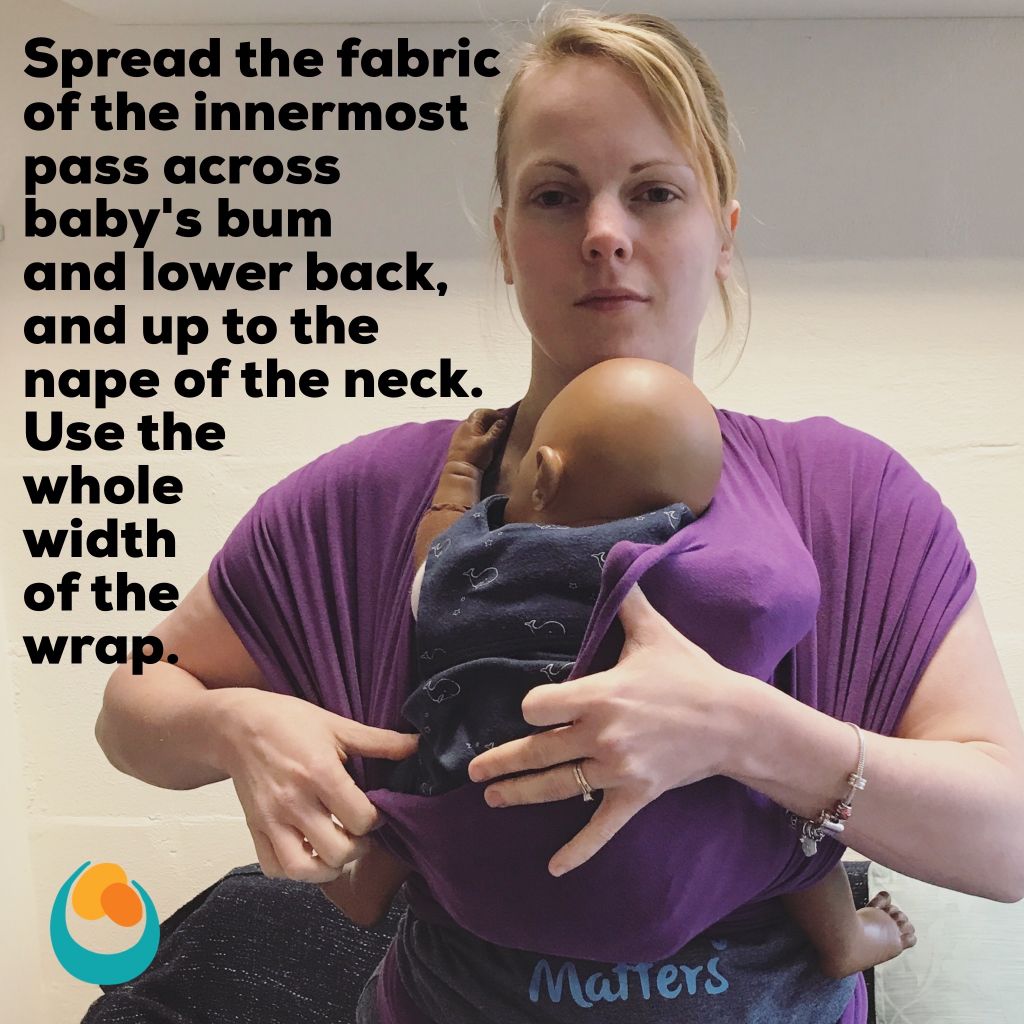
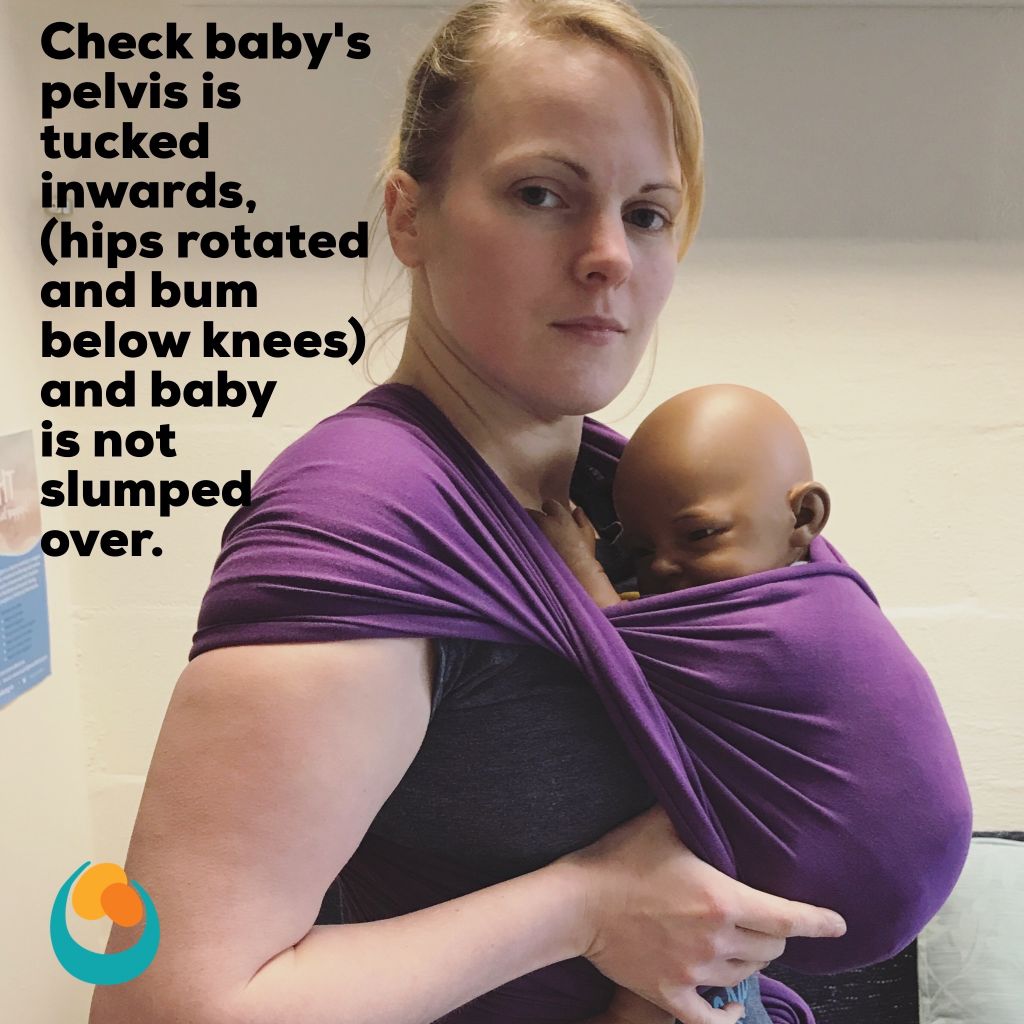
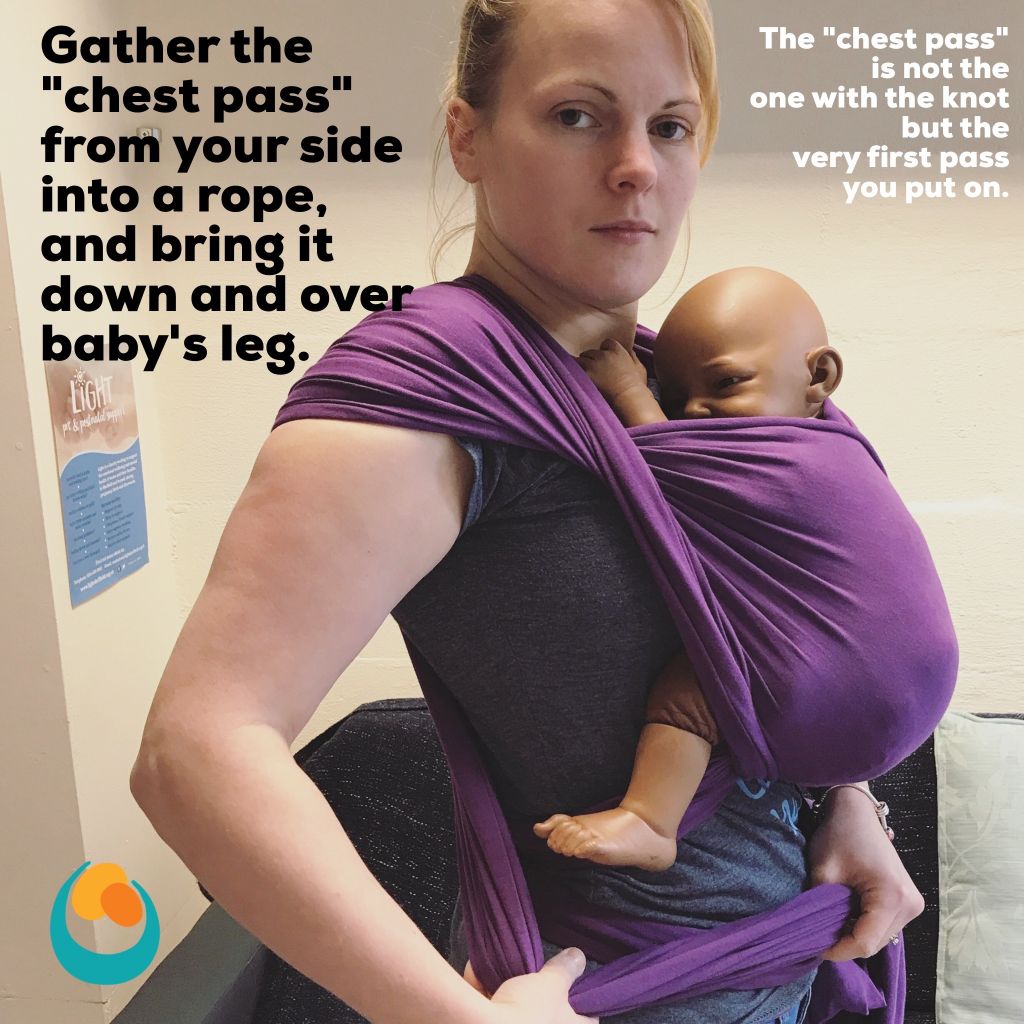
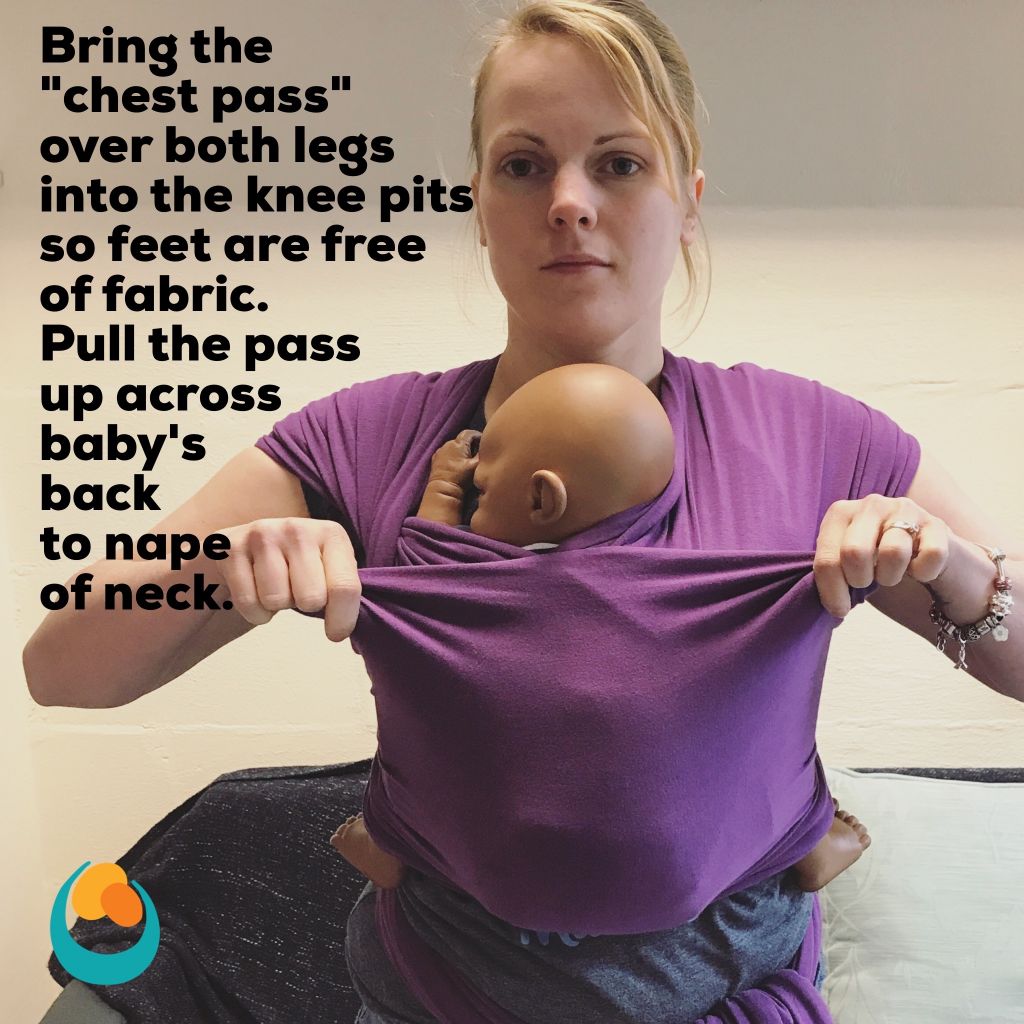
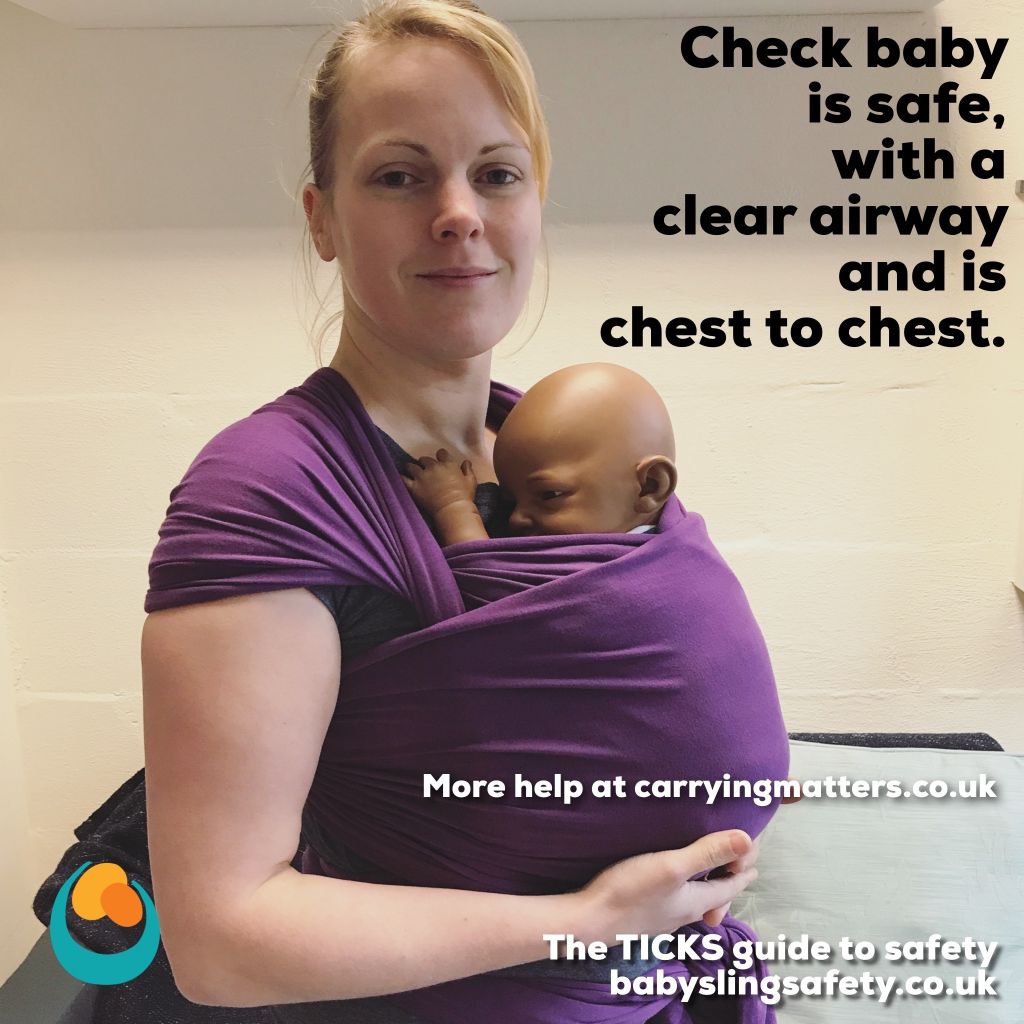
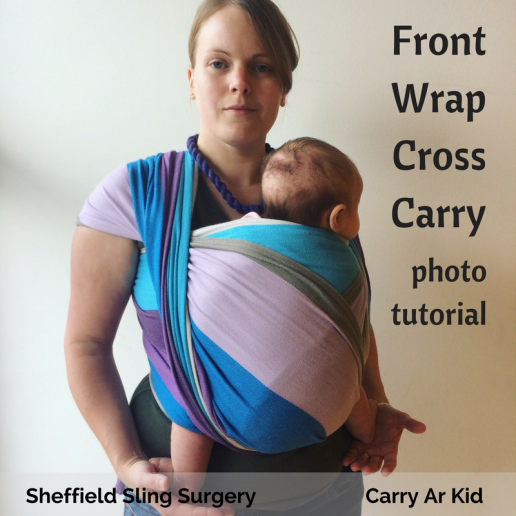
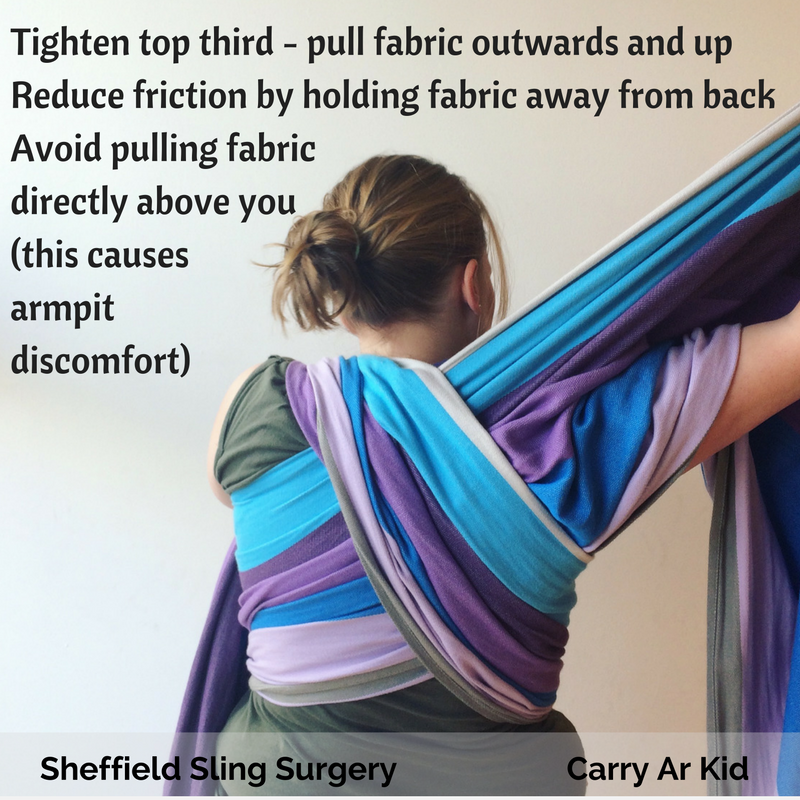
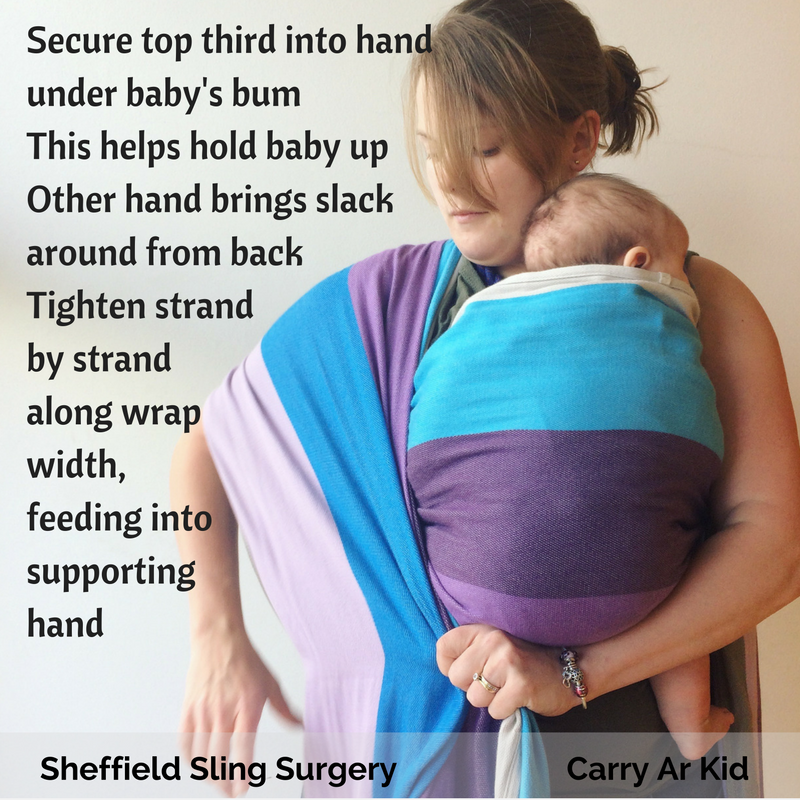
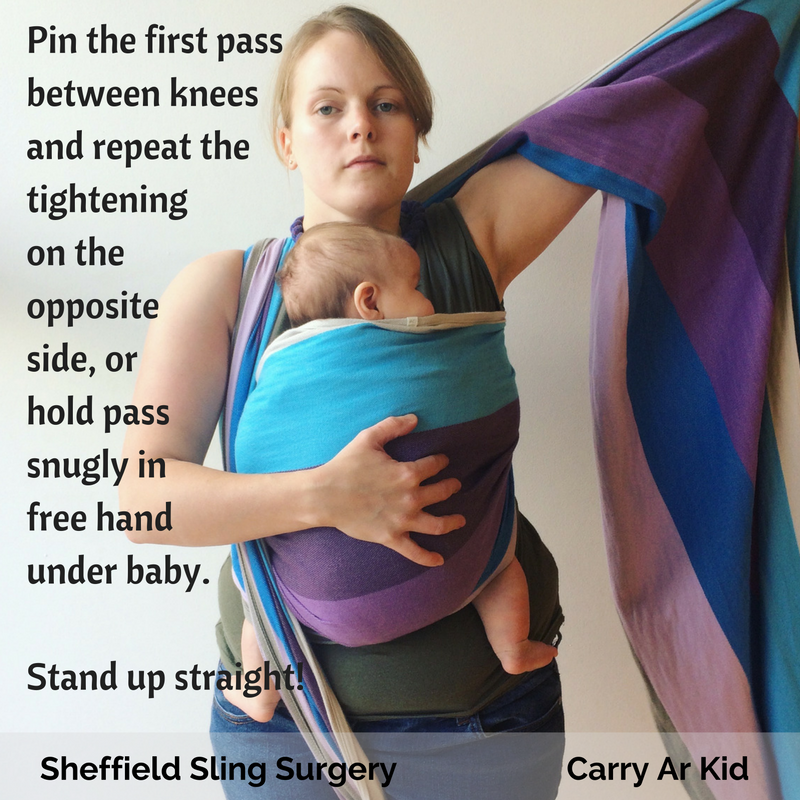
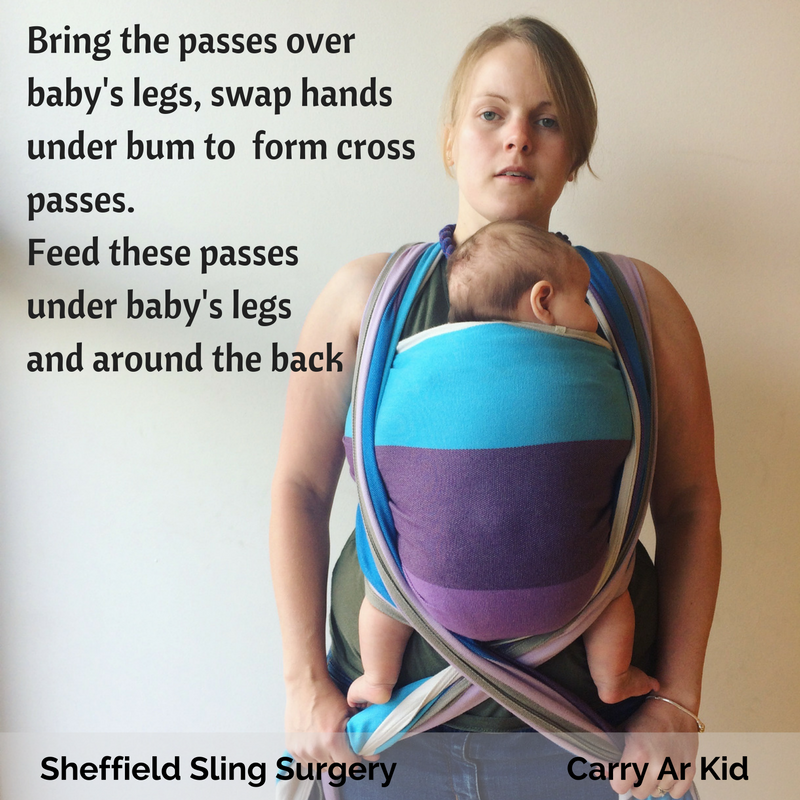
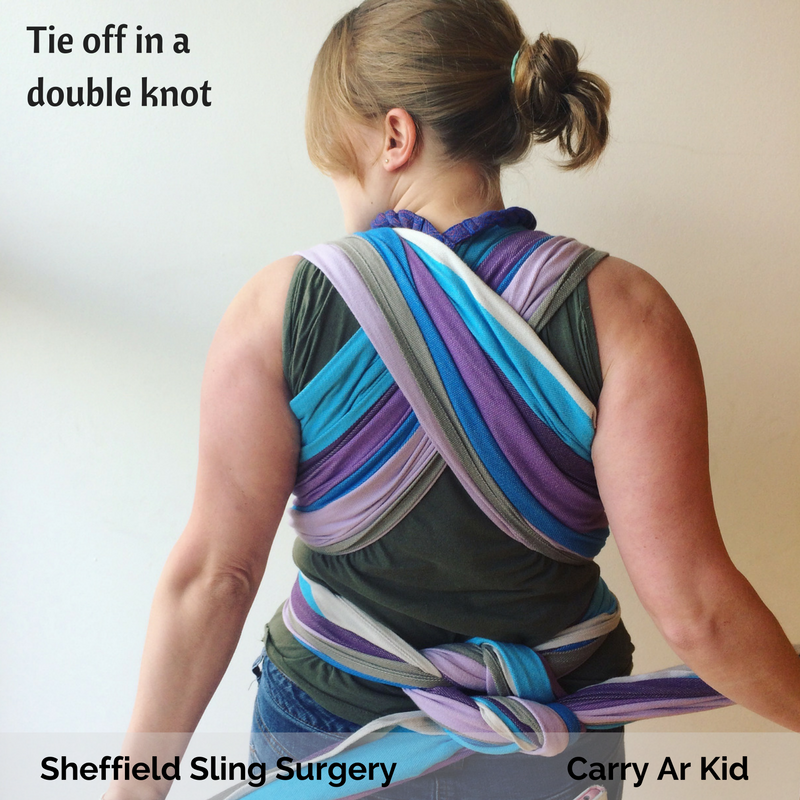
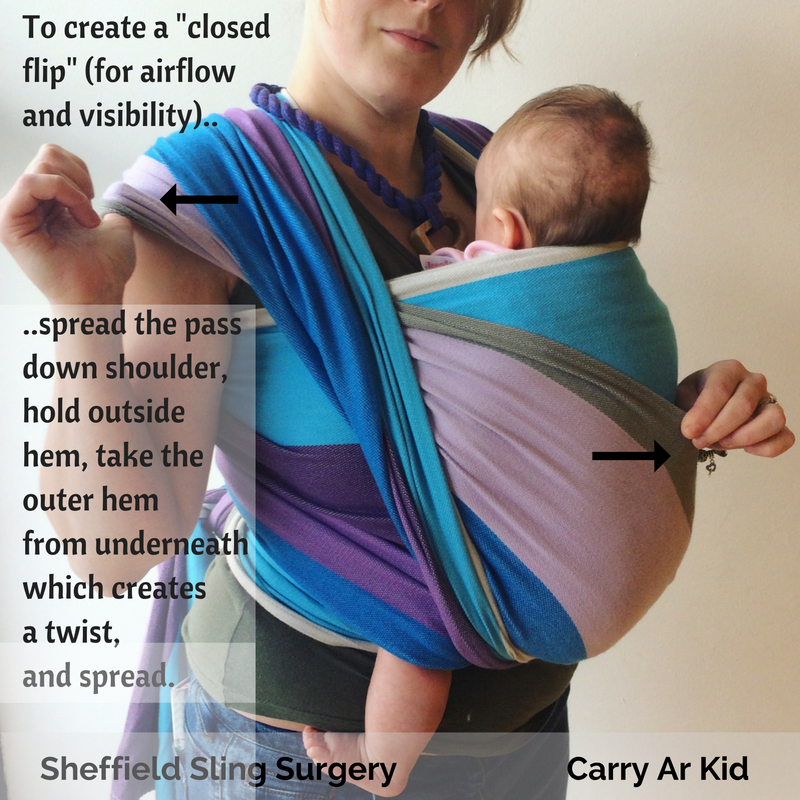
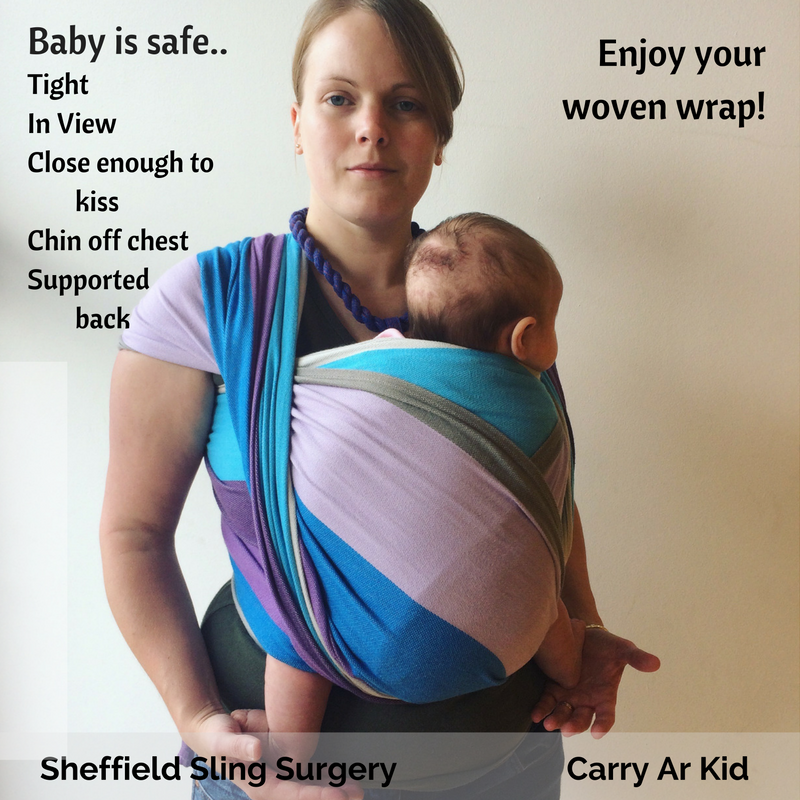
Stretchy wrap photo tutorial guide (two way stretchy wrap)
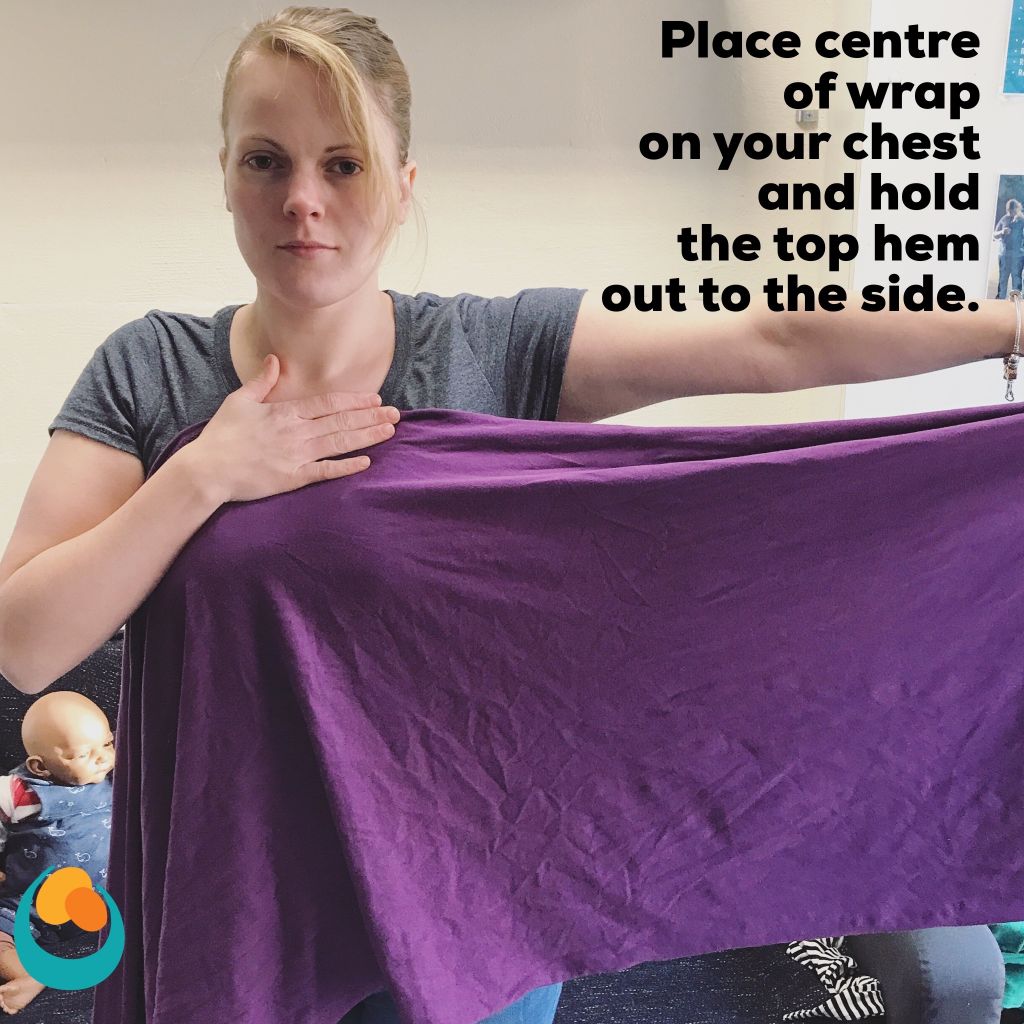
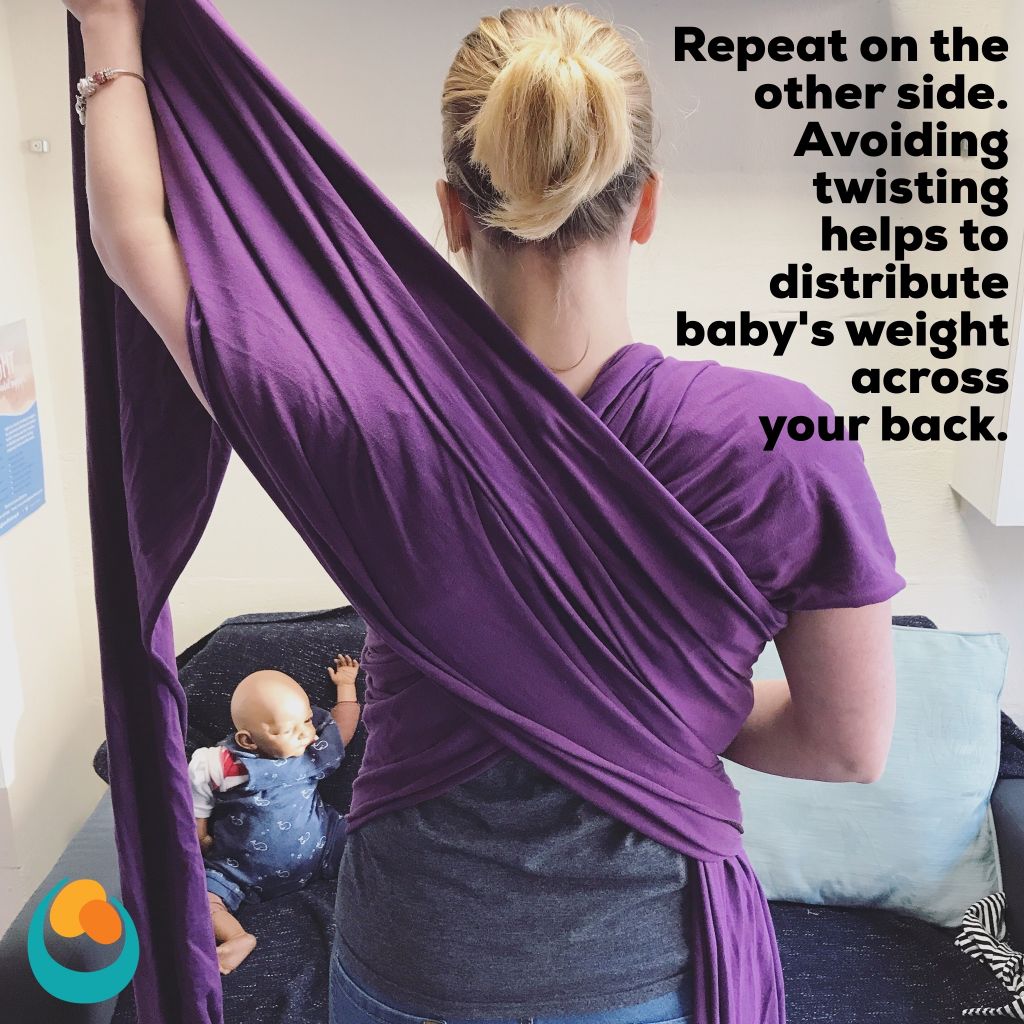
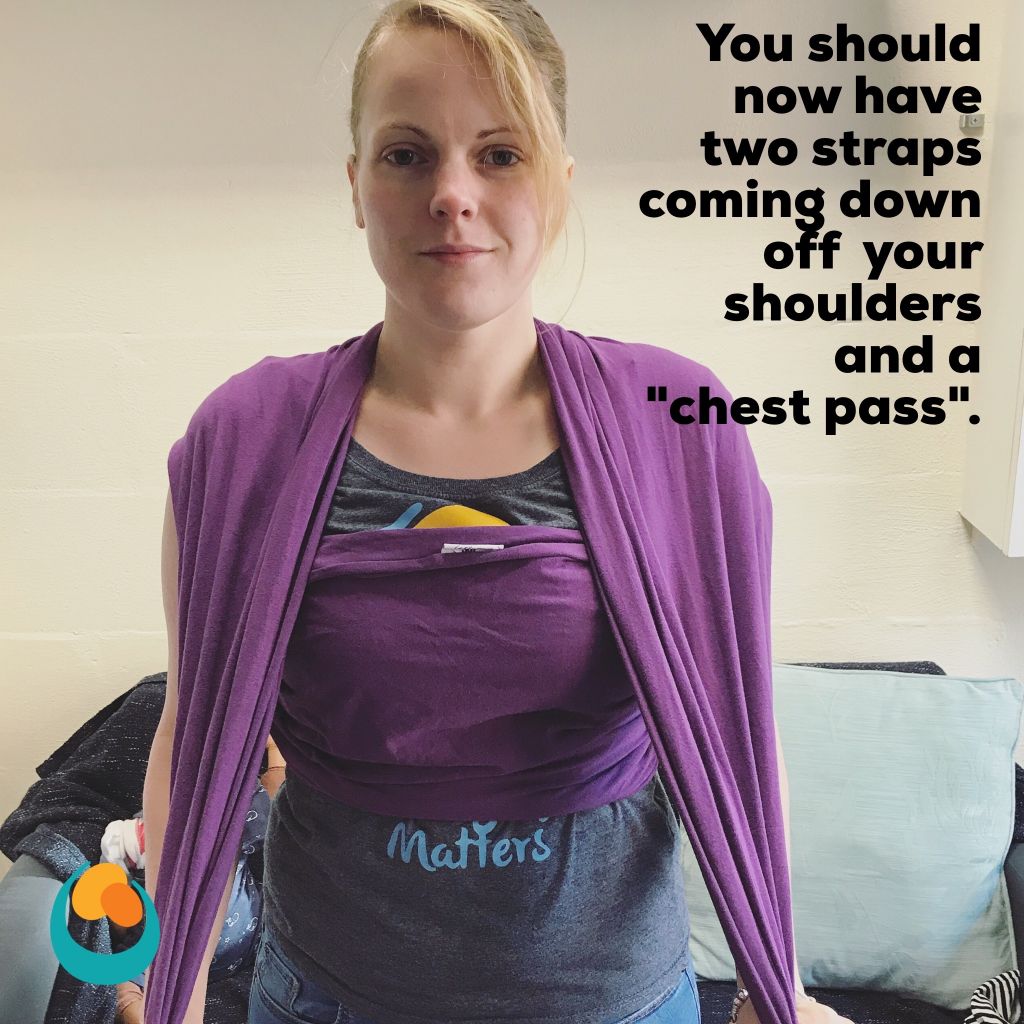
A step by step stretchy wrap photo tutorial guide; this is a two-way stretchy wrap. Two-way stretchy wraps stretch along their width and their length.
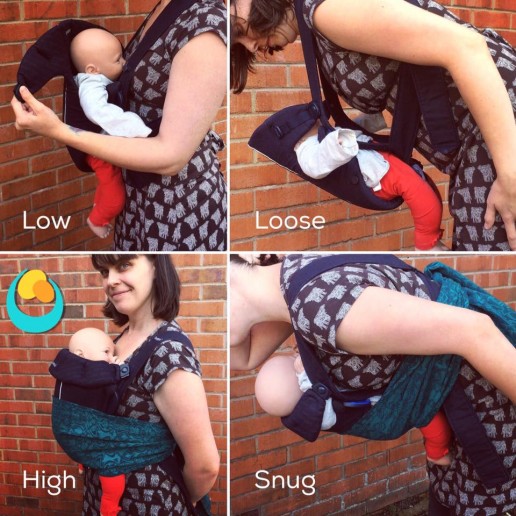
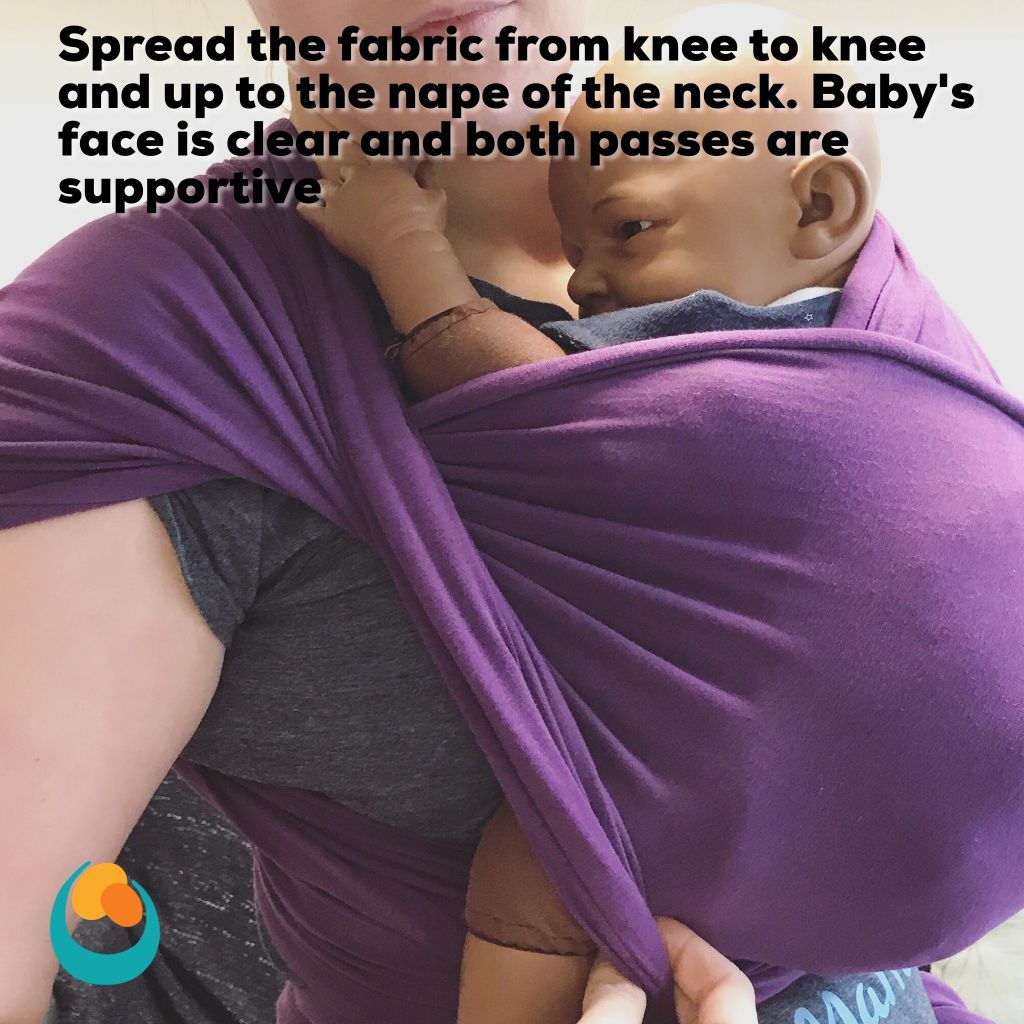
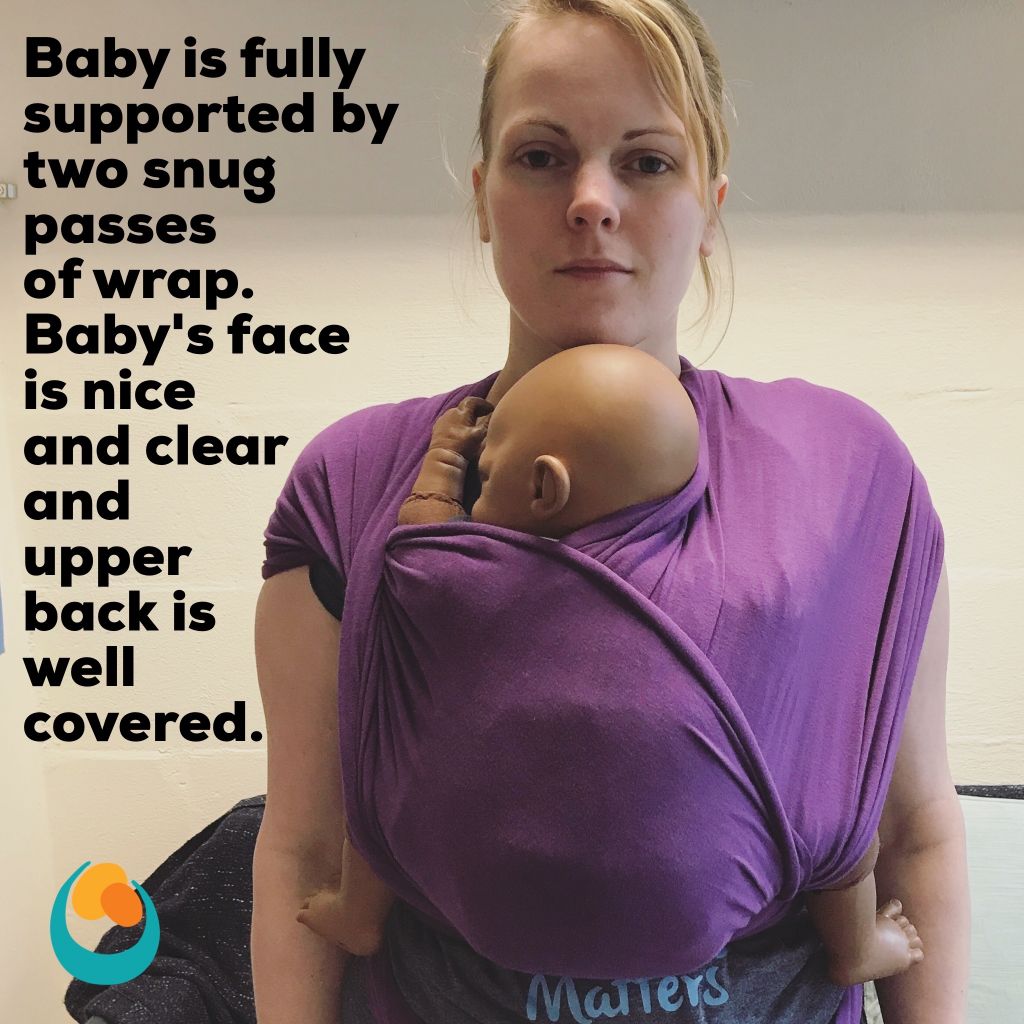
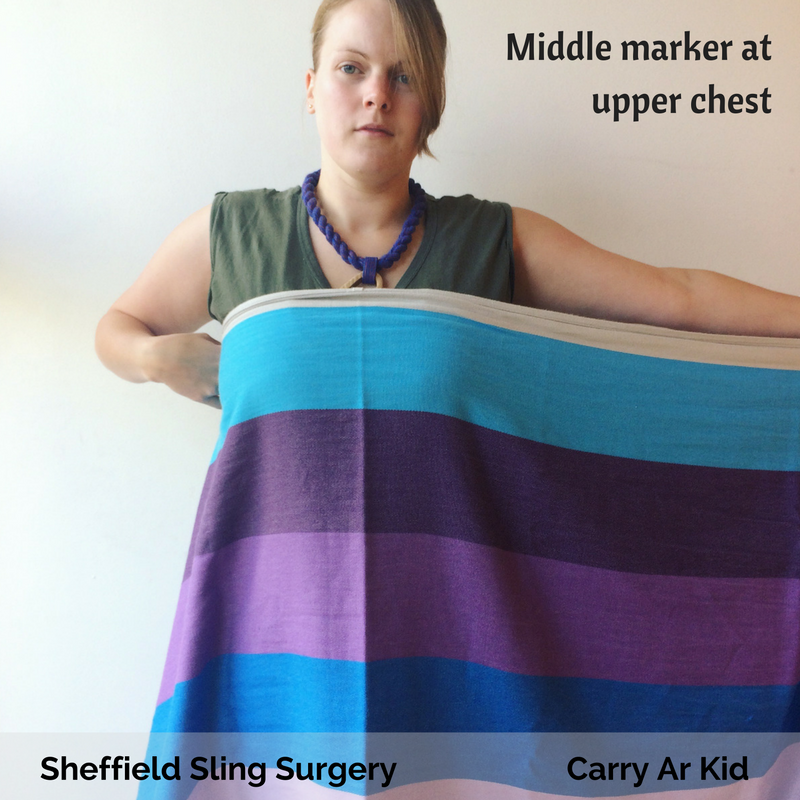
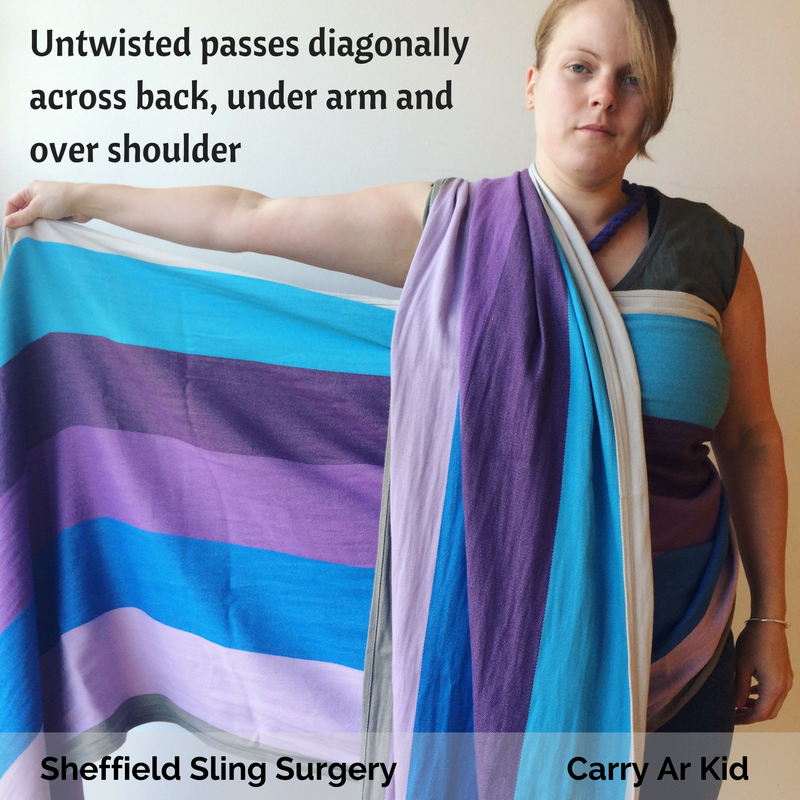
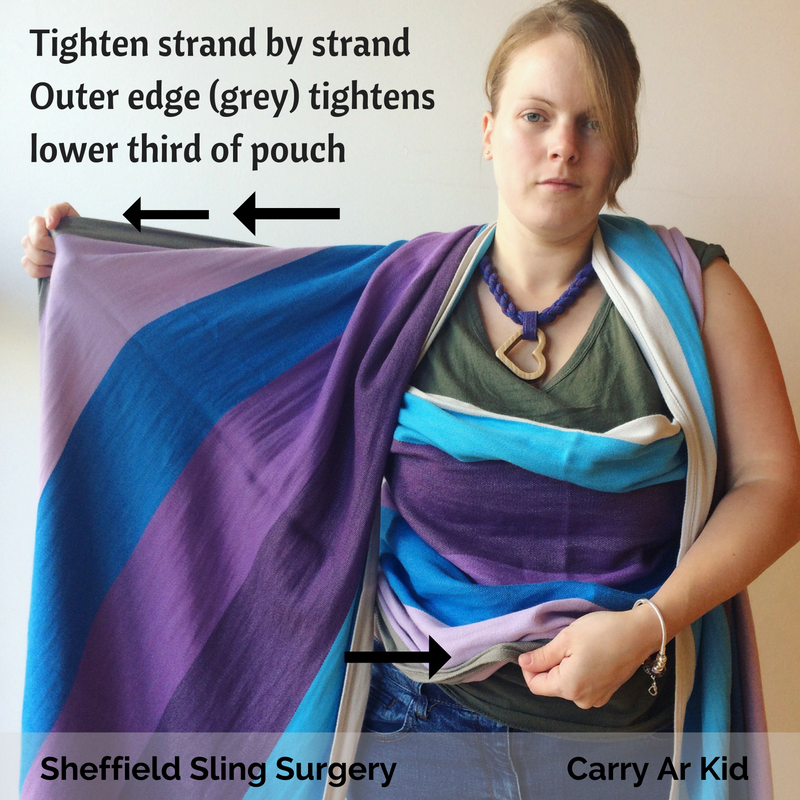
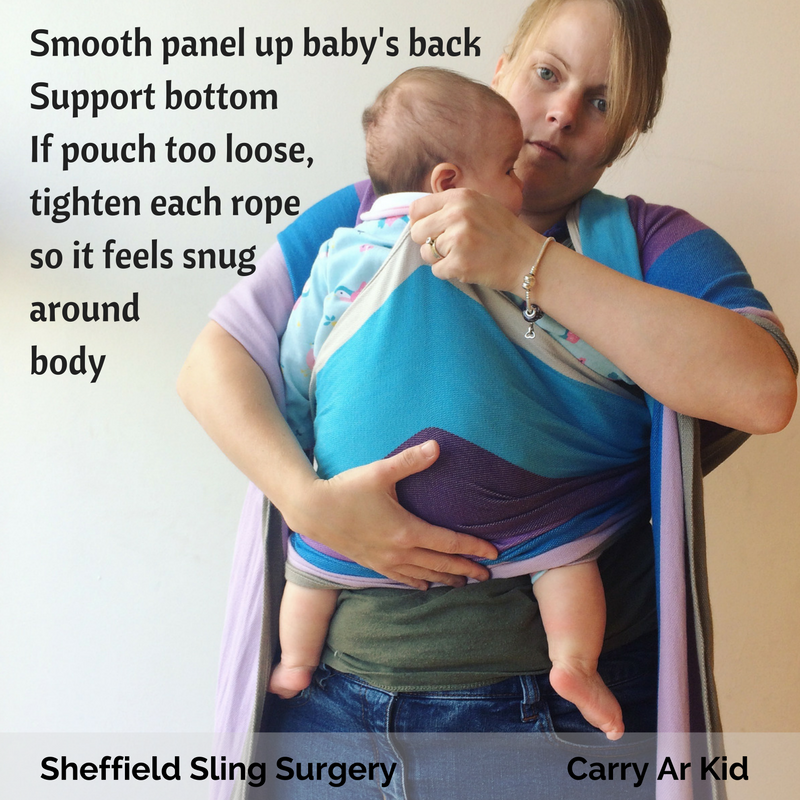
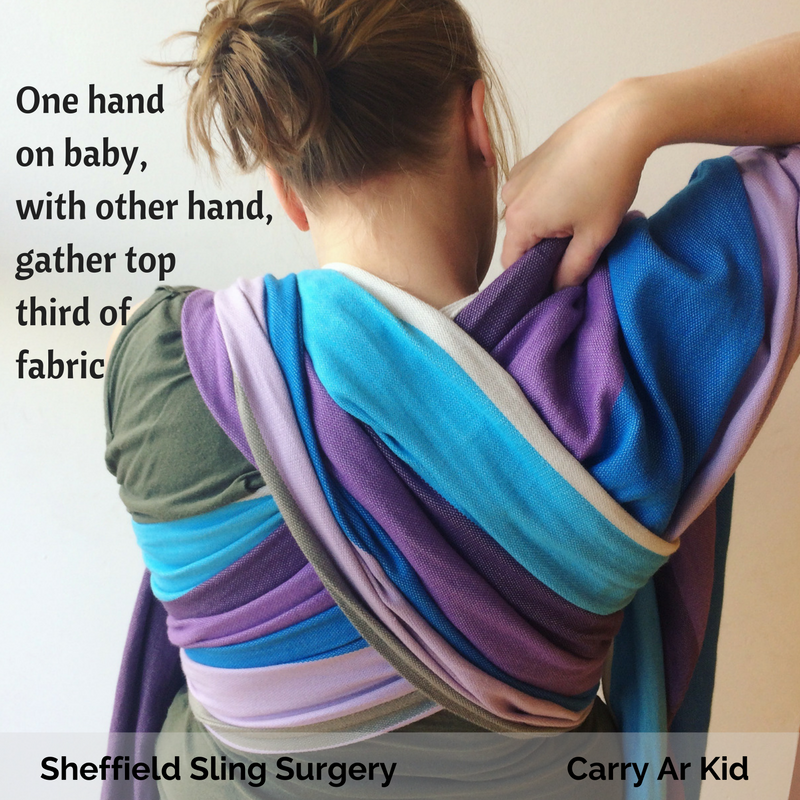
The key to success is in preparation; getting the tension right before baby goes in, and ensuring their position is right before spreading any fabric. This helps to avoid slumping or slipping. It gets easier with practice! Click on the images to make them larger for easier viewing.
If you have a very small or premature baby, or one who is keeping themselves very tightly tucked and isn’t opening their hips at all, please see your local sling professional for some extra support for using your stretchy wrap.
Below is a video for how to take baby out without needing to untie the wrap each time, making it very convenient.


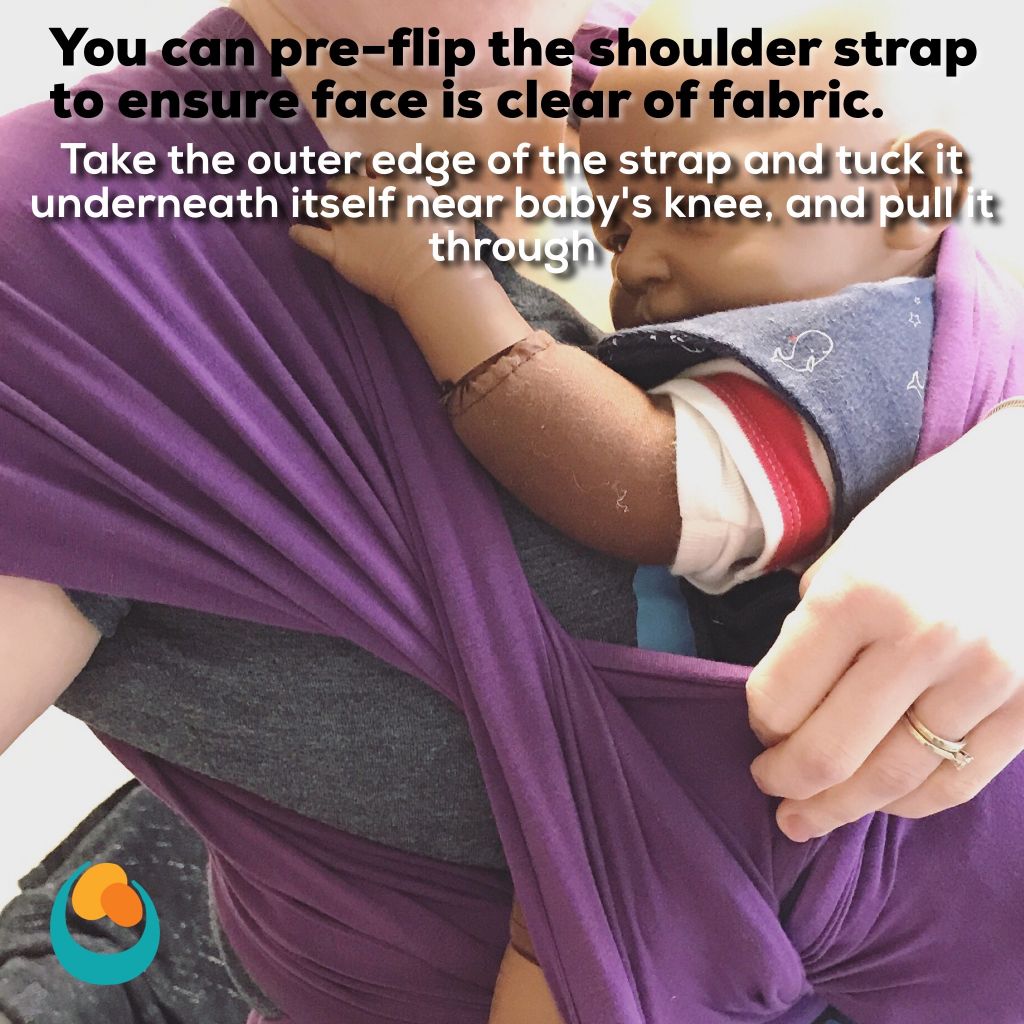
Here is a video of the same technique, with the shoulders being flipped afterwards.
Here is a short video of the pre-flipped shoulder.
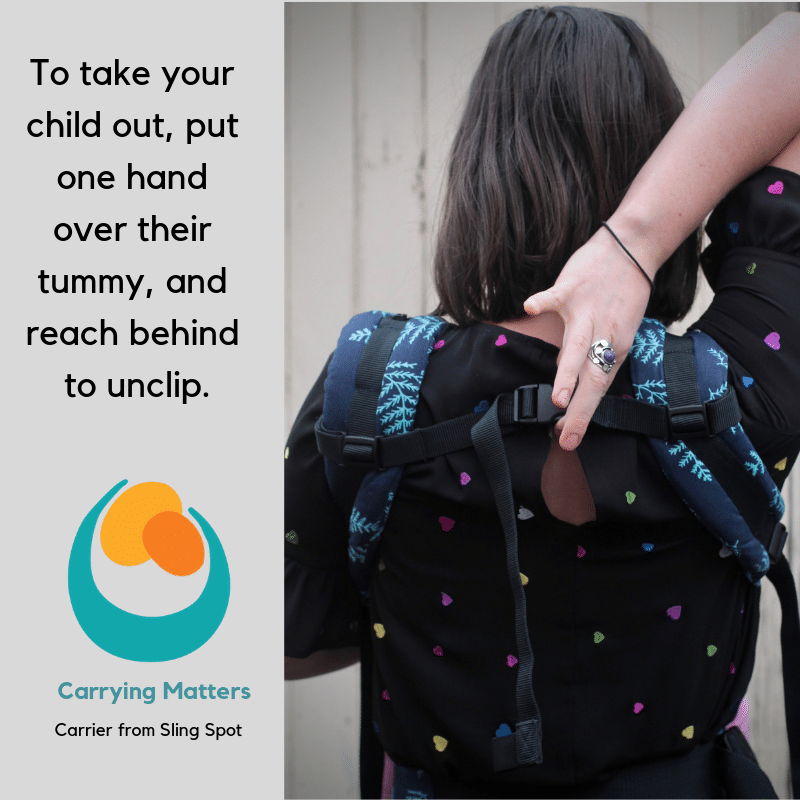
How to take a baby out of a stretchy wrap simply, without retying. This makes it very easy to leave on and just pop baby back in later.
If your baby seems to slump over or is deeply asleep, here is how to “unfurl” them so their chest rests safely against yours.
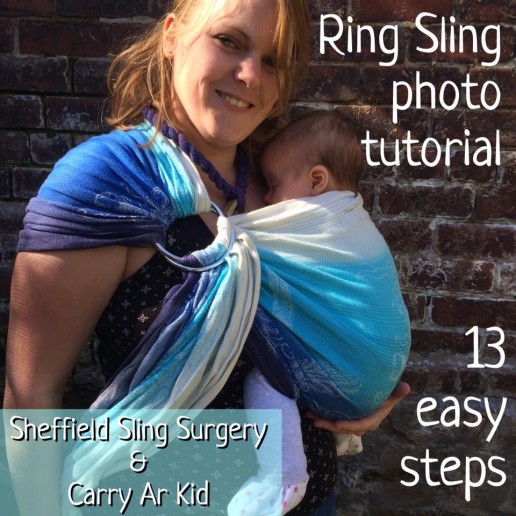
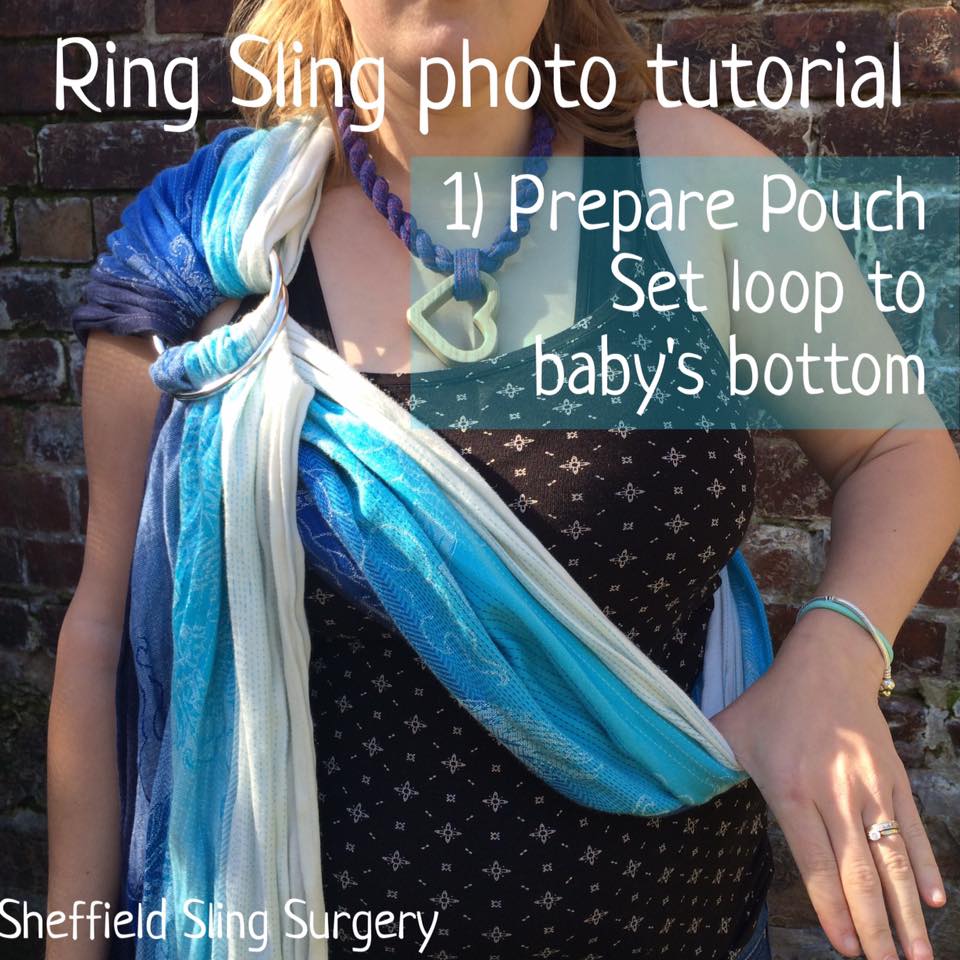
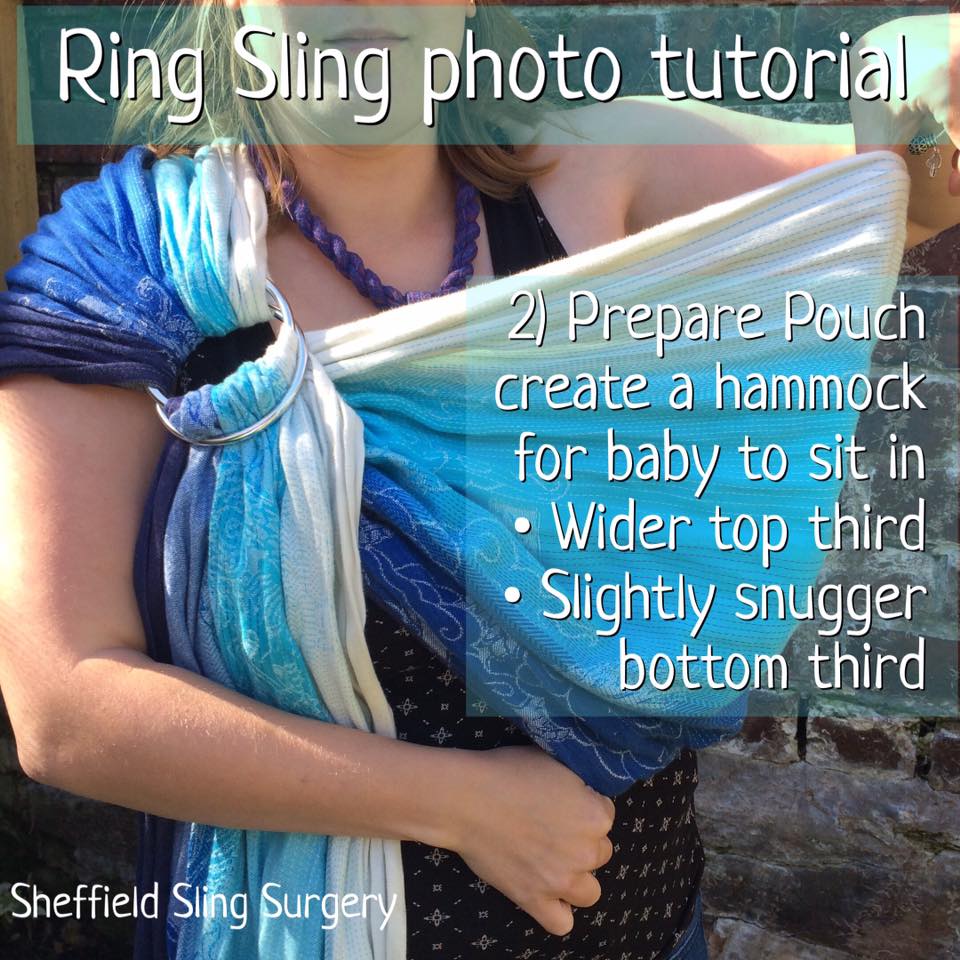
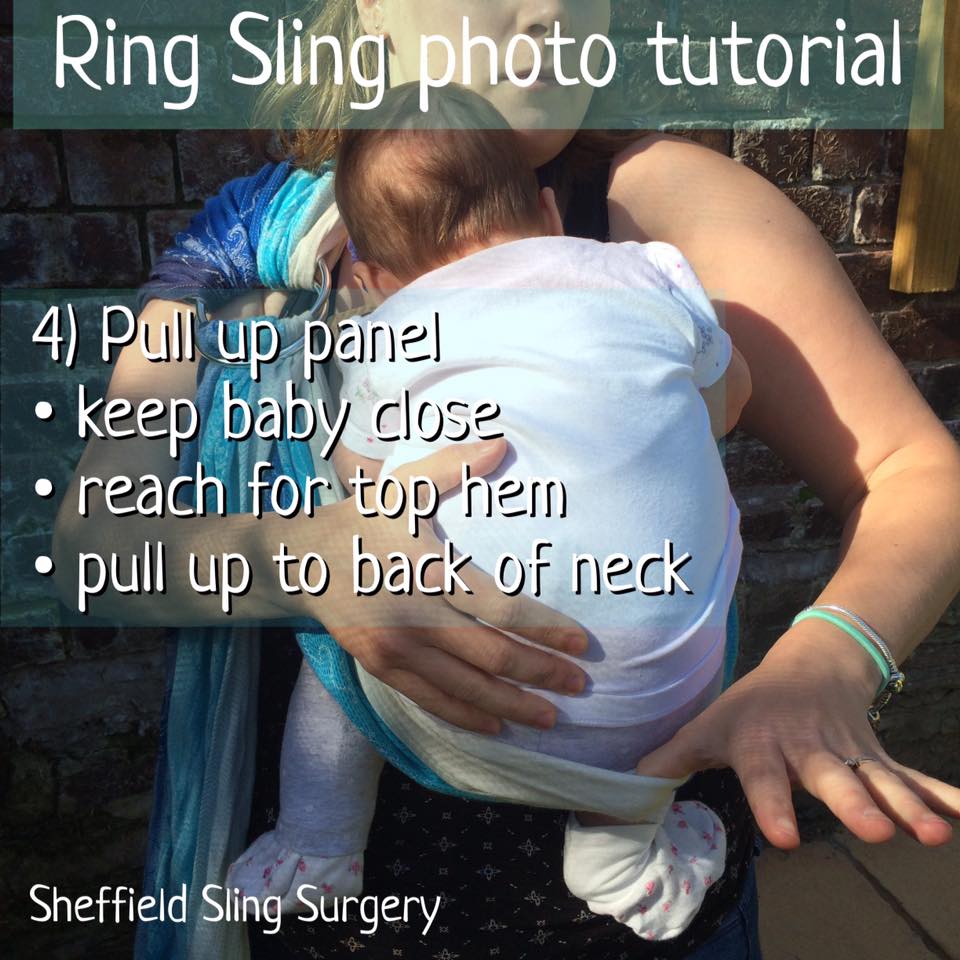
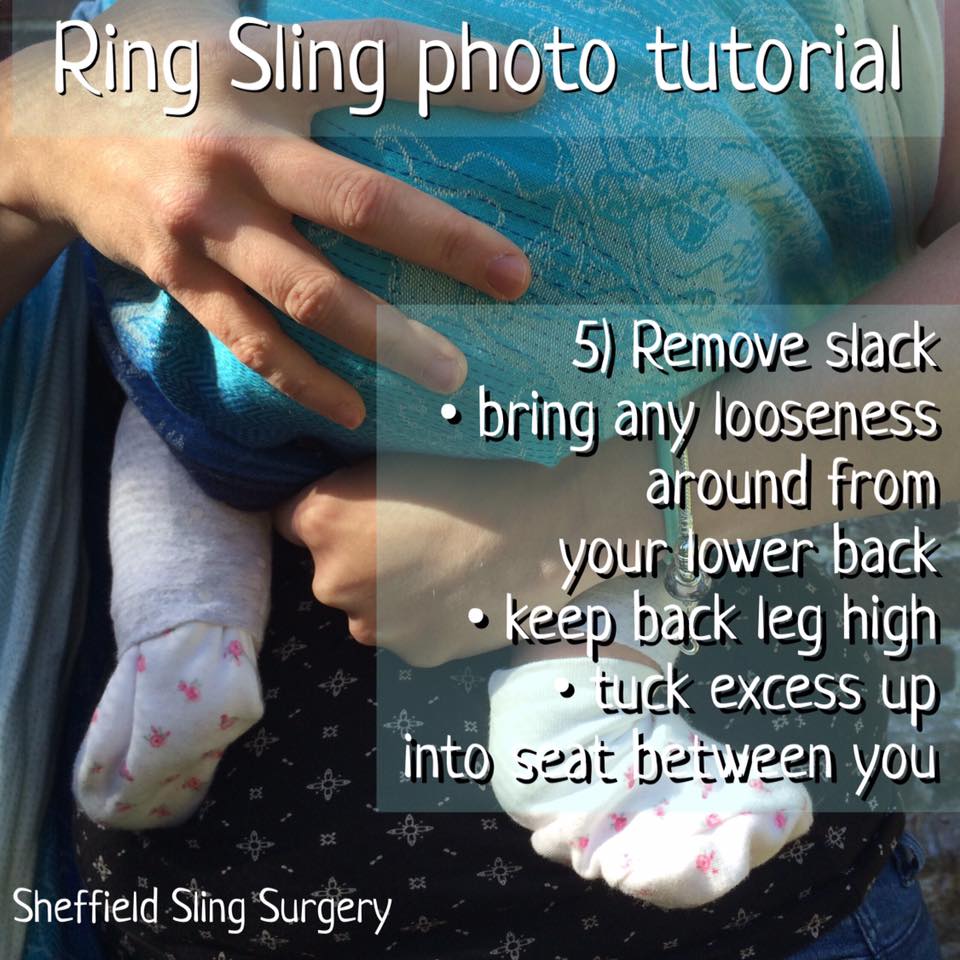
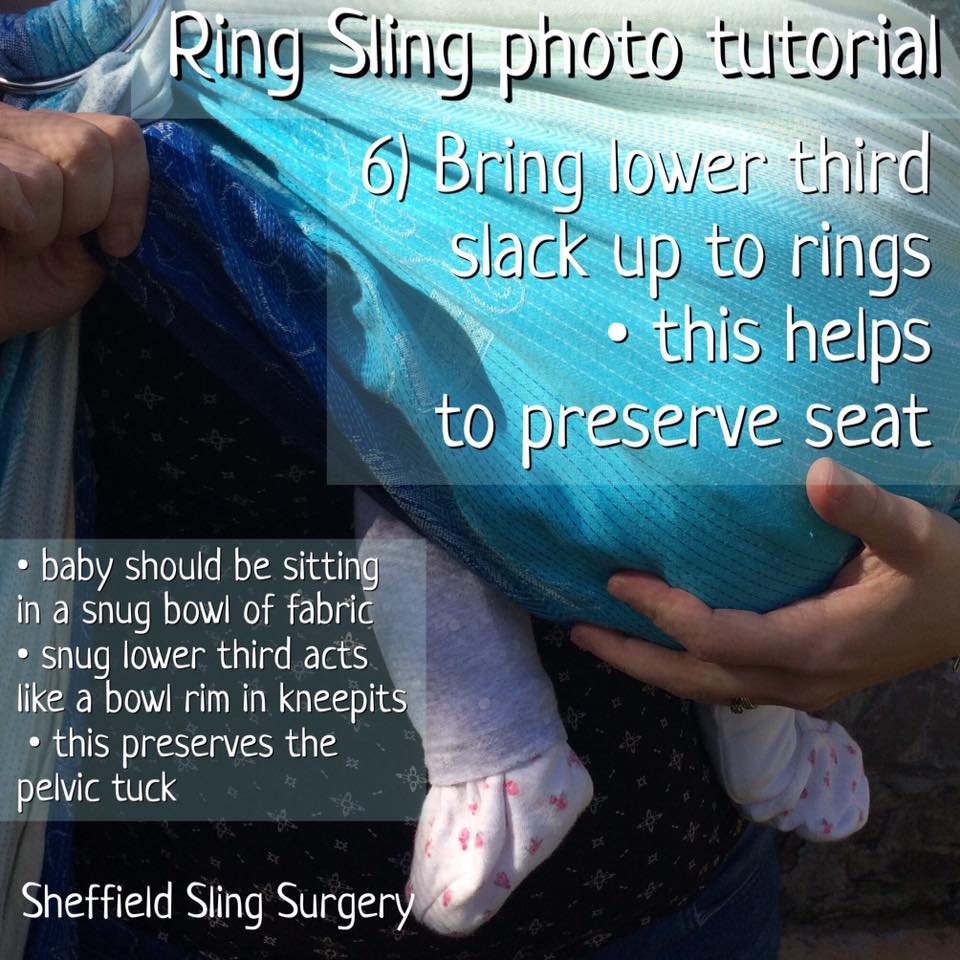
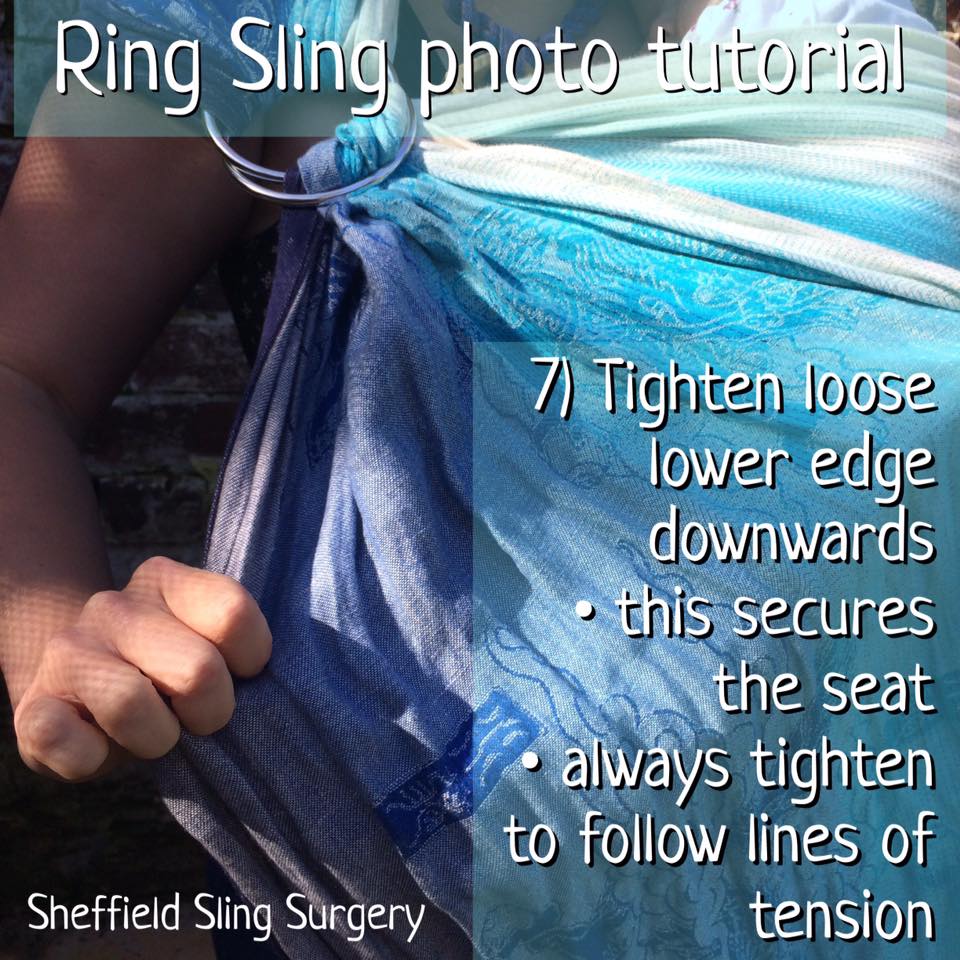
You can find information about other types of carriers in our Guide to Slings (with photo tutorials for a woven wrap front carry and a ring sling carry).


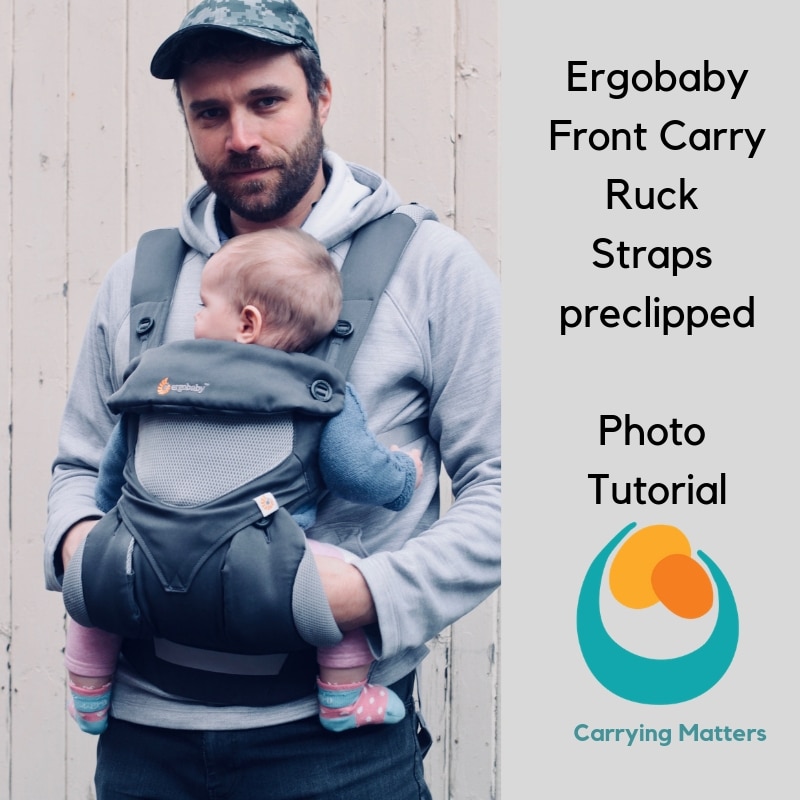
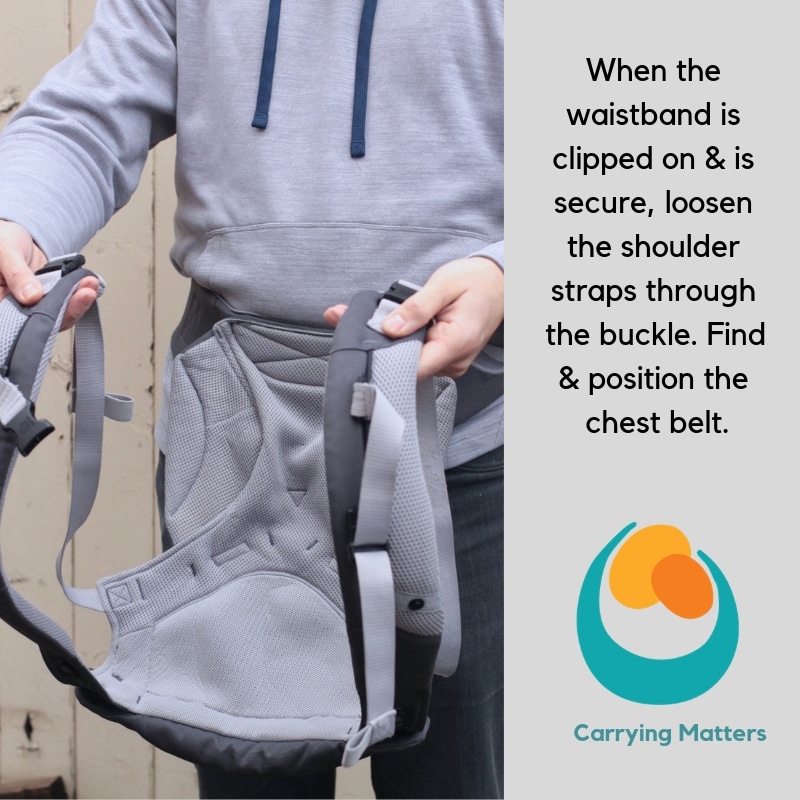
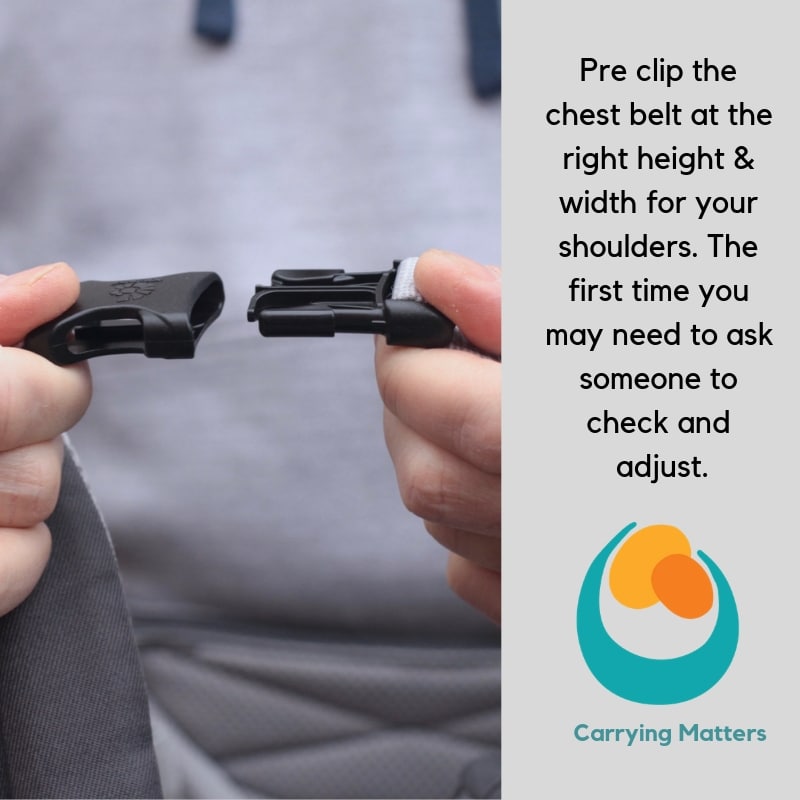
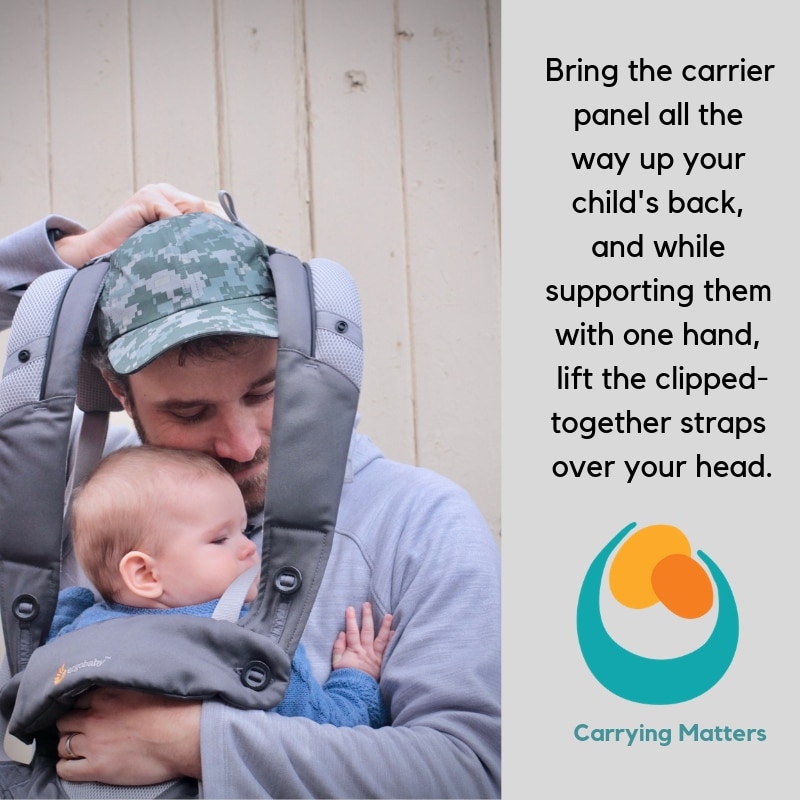
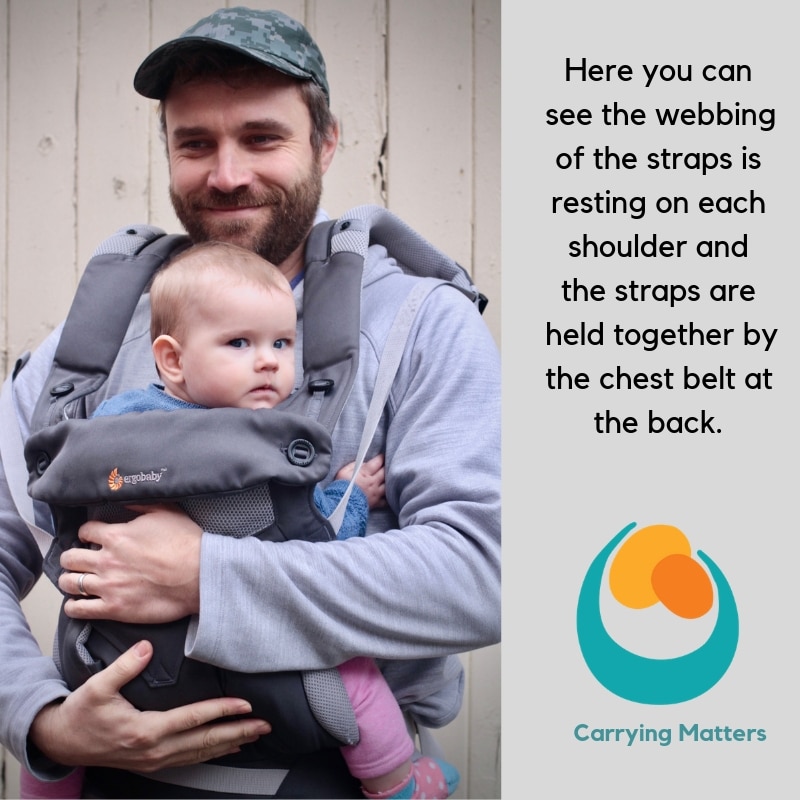
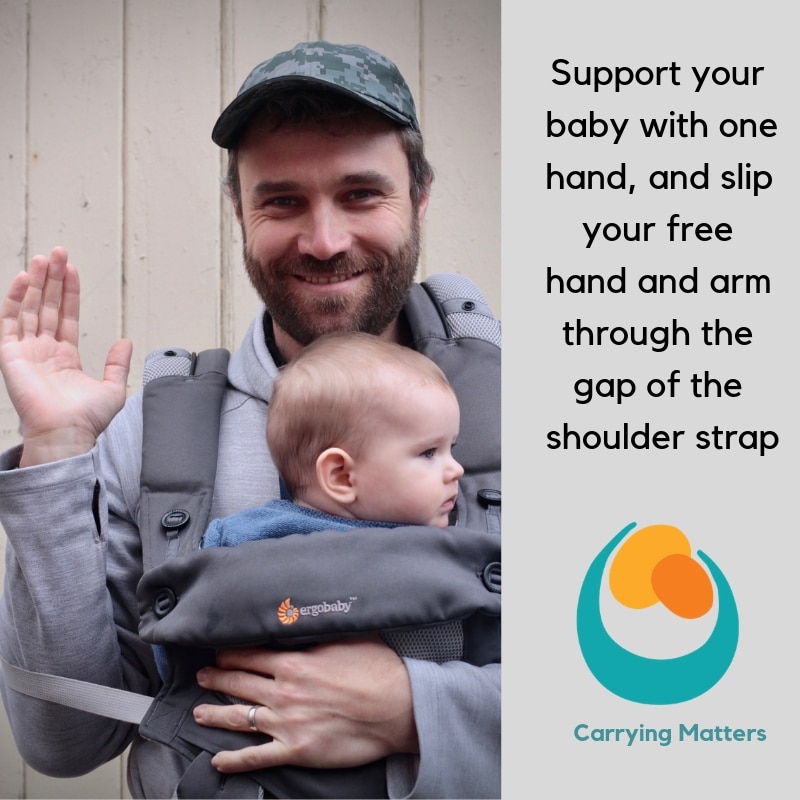
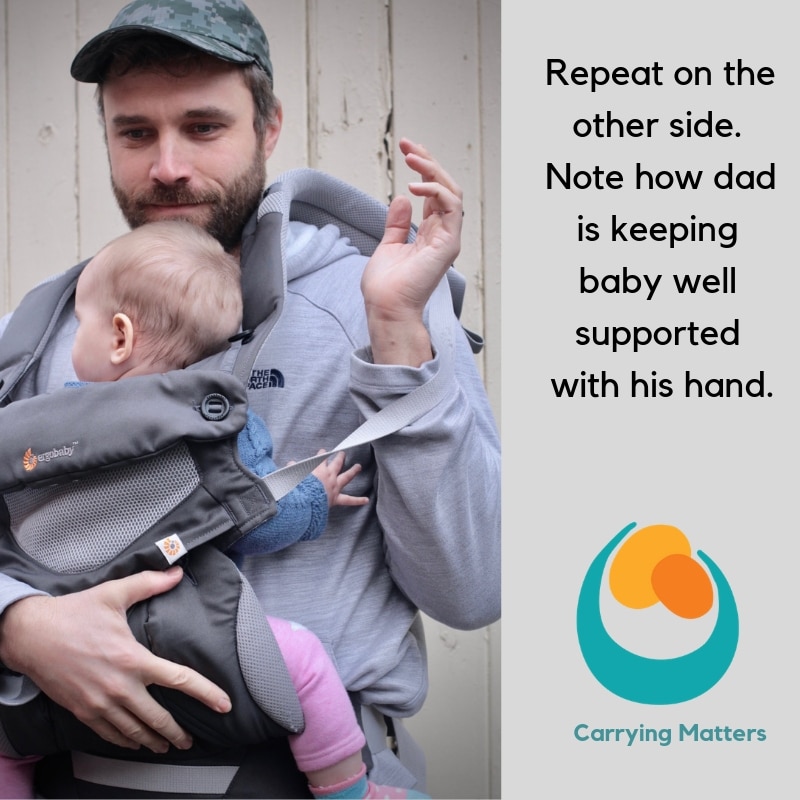
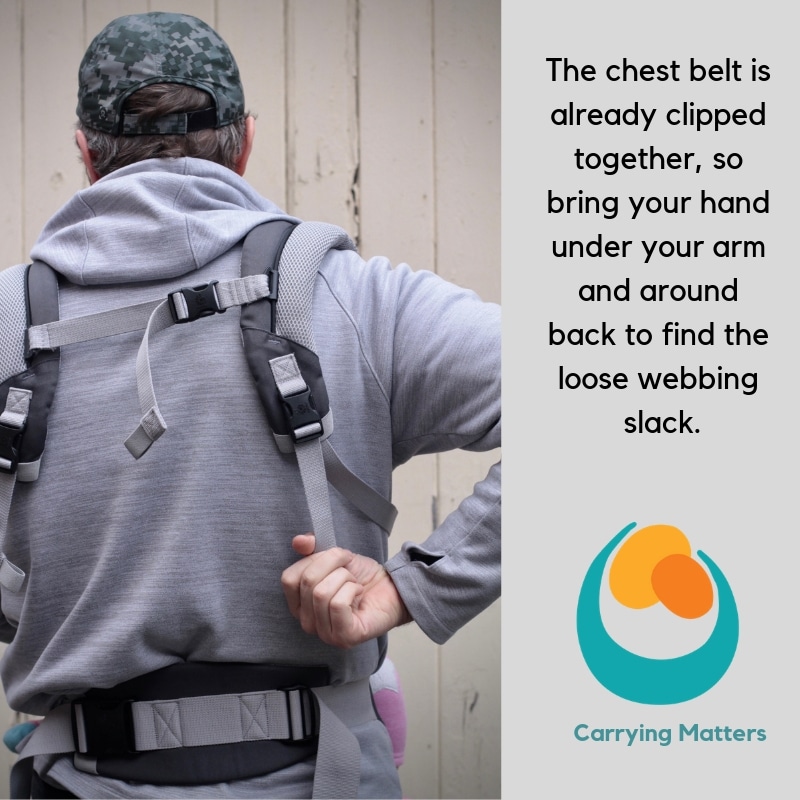
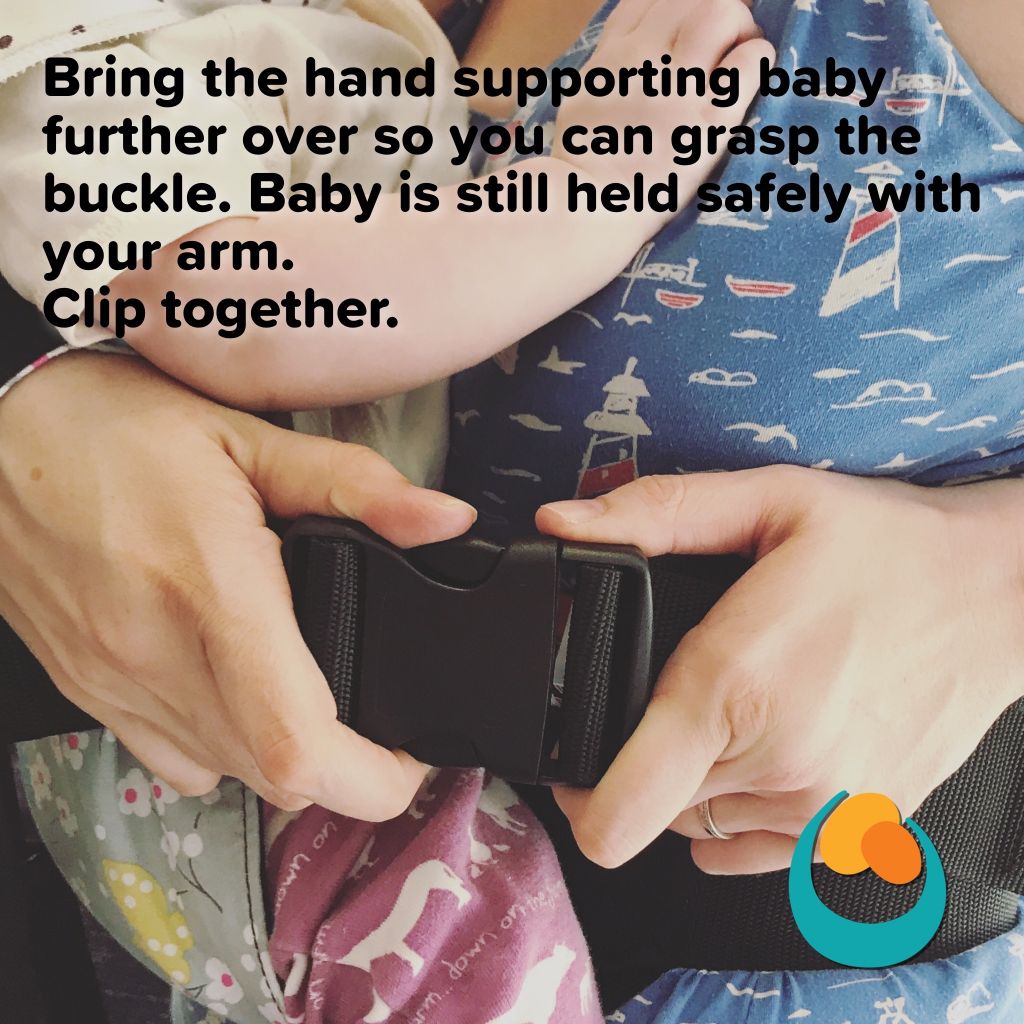
Ergobaby front carry ruck straps photo tutorial with pre-clipped straps
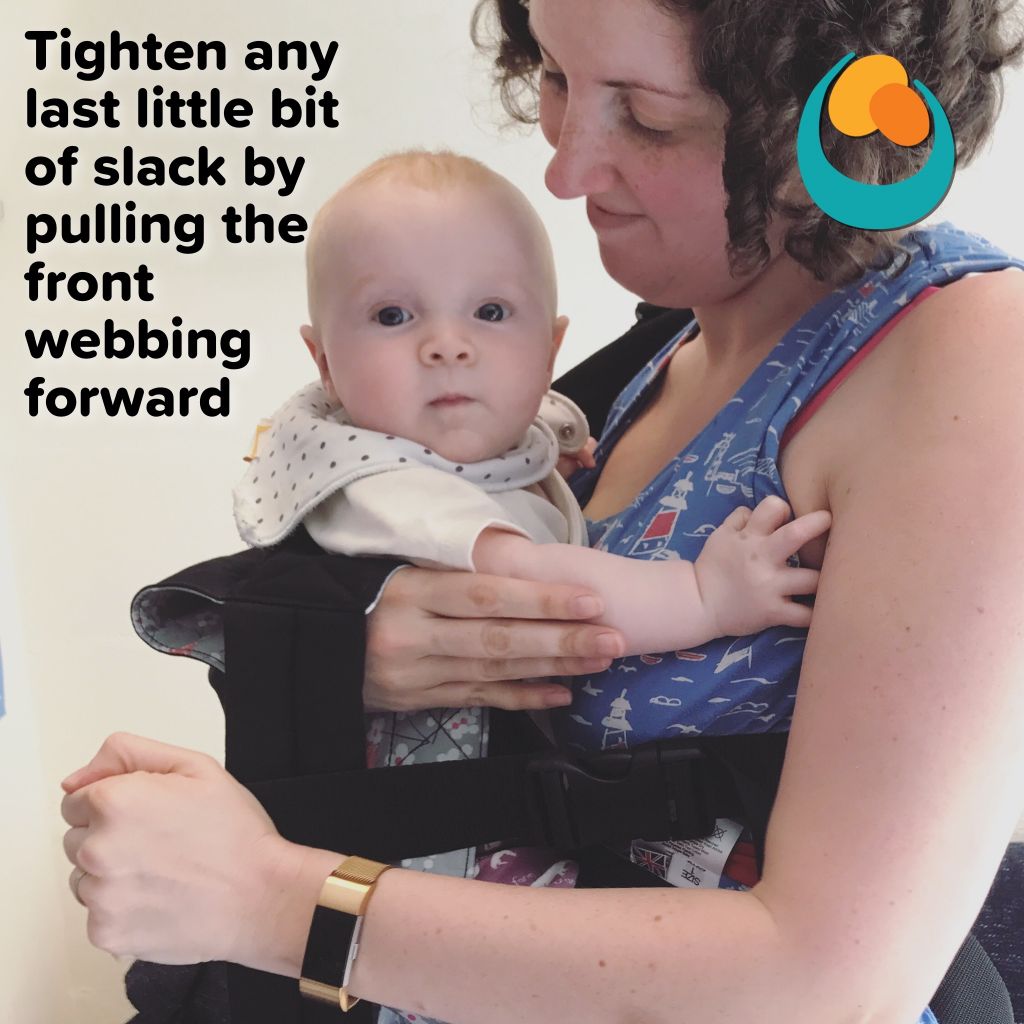
Ergobaby front carry ruck straps photo tutorial. A step by step guide to give you confidence! This method clips the chest belt at the start so it is preclipped into the optimal position.
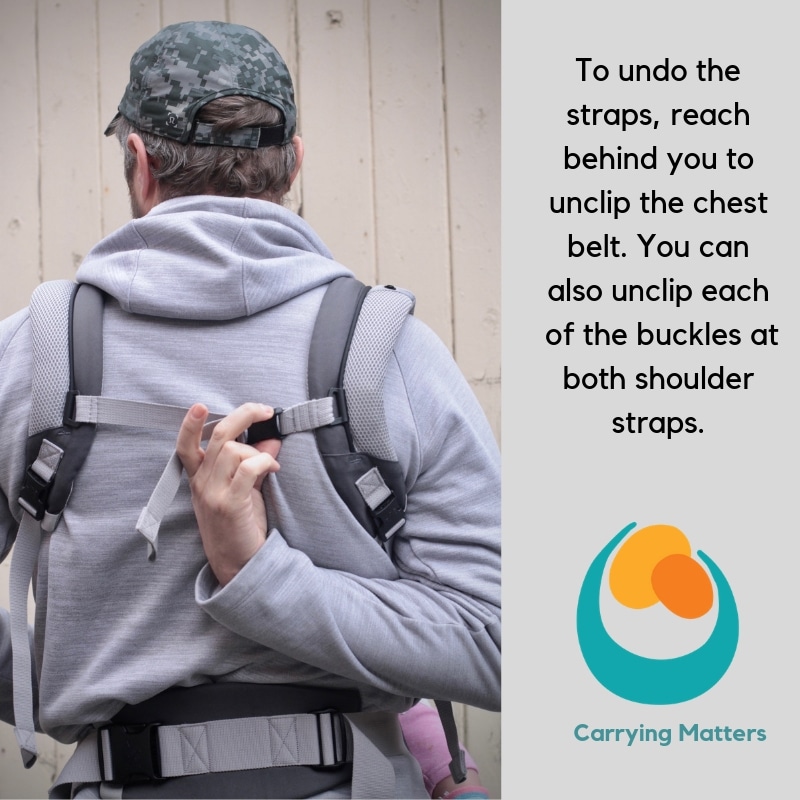
Many parents find it hard to do up the chest belt of rucksack strapped carriers. This may be due to how flexible they are (or aren’t!) and how easy they are able to reach behind their neck. Some find this pre-clipped method easier.
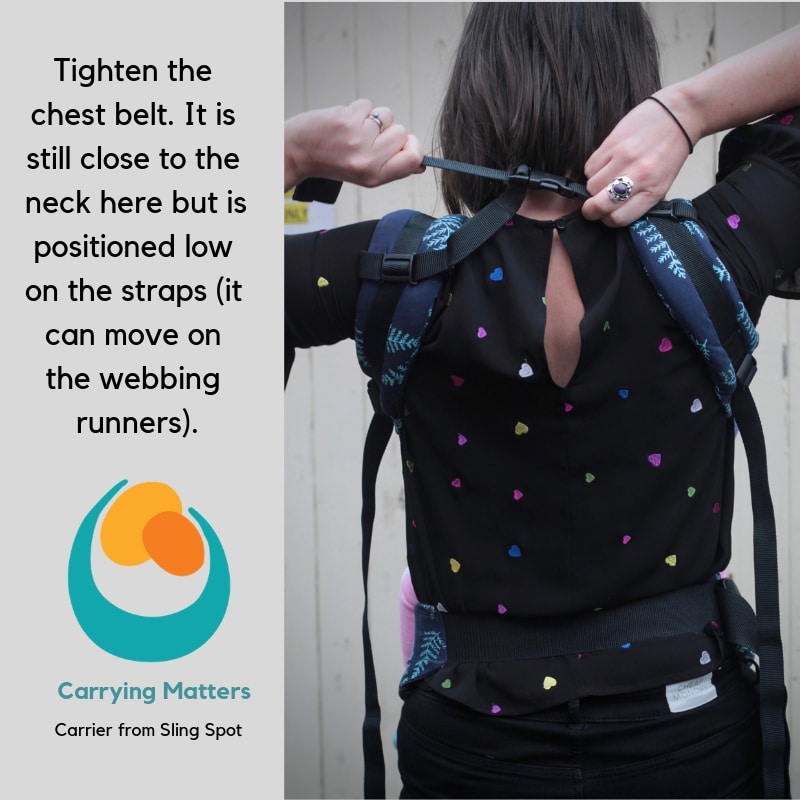
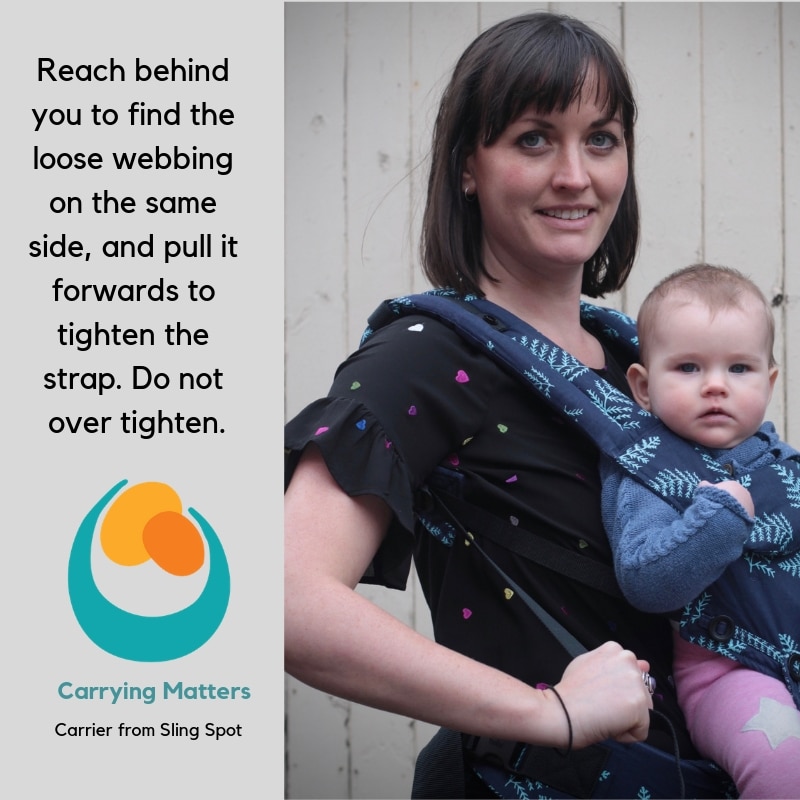
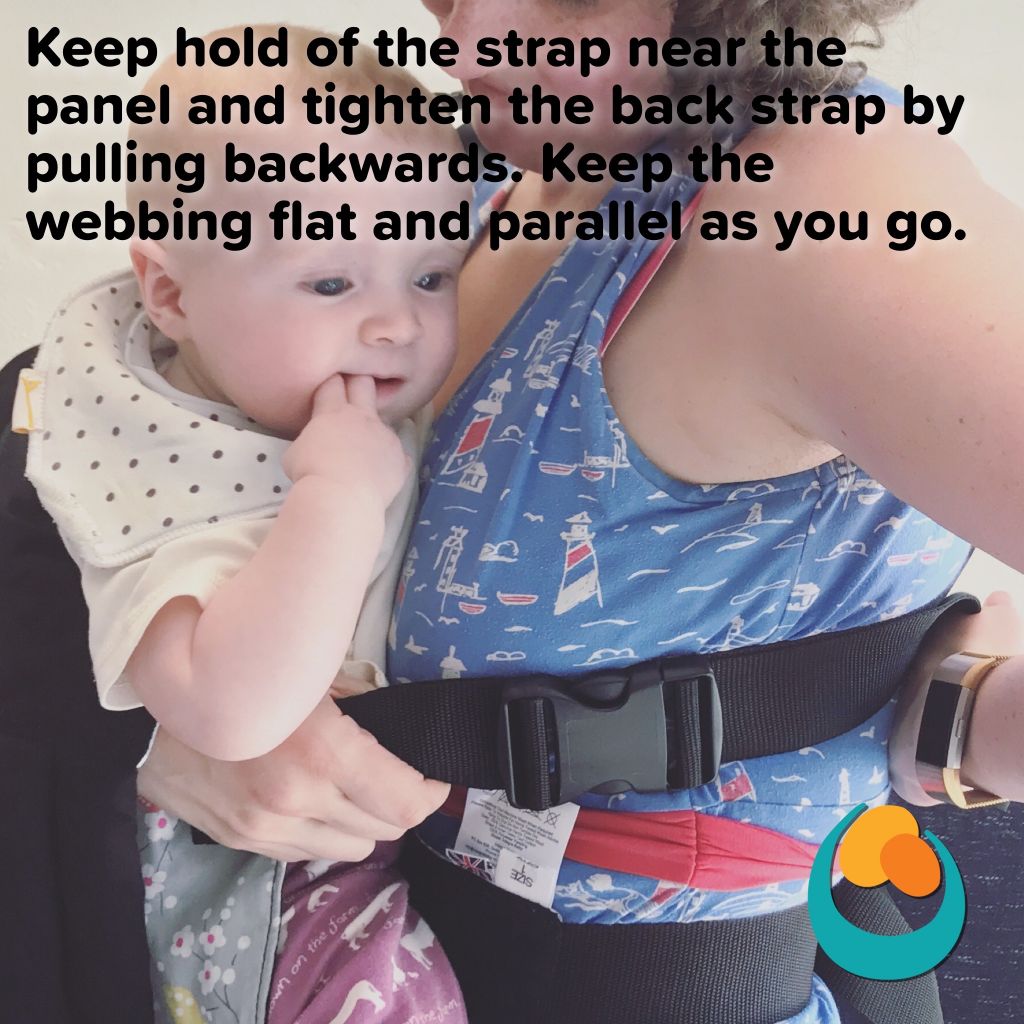
Top tip: don’t forget you can move the chest belt up and down on the webbing that runs along the shoulder straps. Everyone will have a particular preference for the chest belt location. As you tighten the shoulder straps, the chest belt will move down your back. If it still feels too high behind your neck once the shoulder straps are tightened, move it down the webbing for the next time. Check you can still reach it to undo it when ready. If it is too low, move it up the webbing for the next time. A few practices and you’ll soon find the right combination for your comfort and convenience.
You can see the clip behind your neck method here.
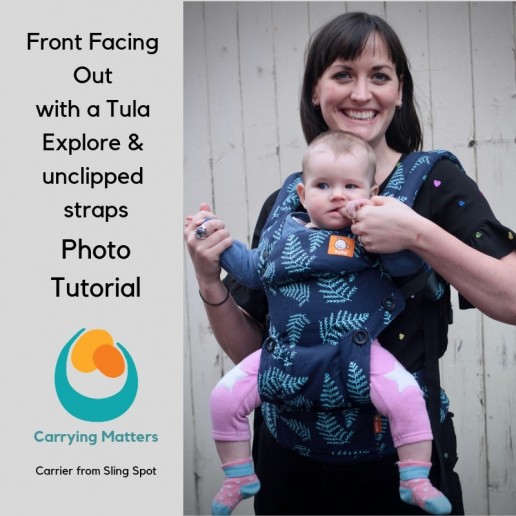
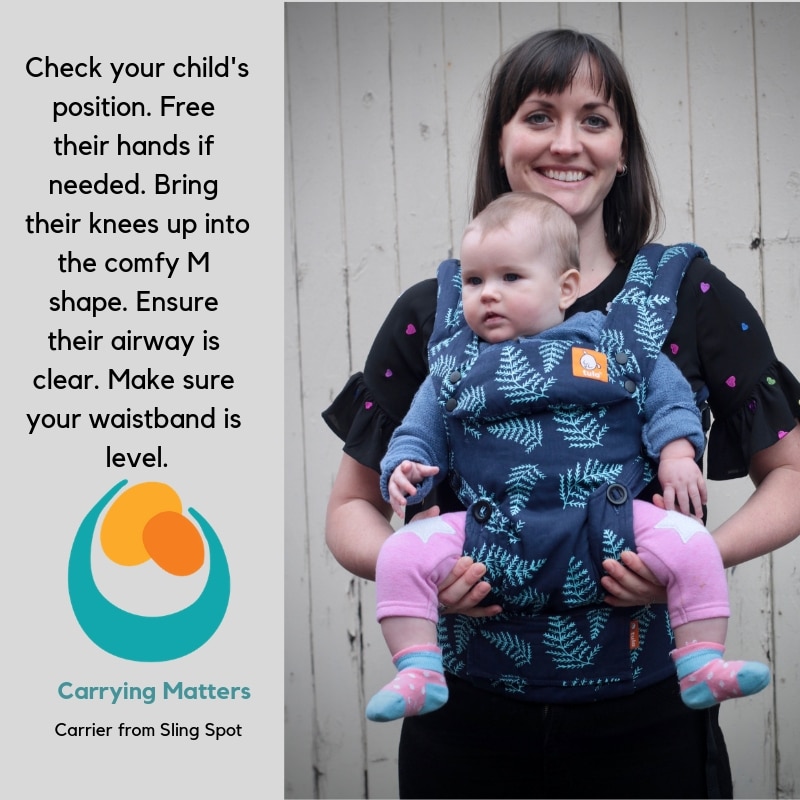
Tula Explore front facing out photo tutorial
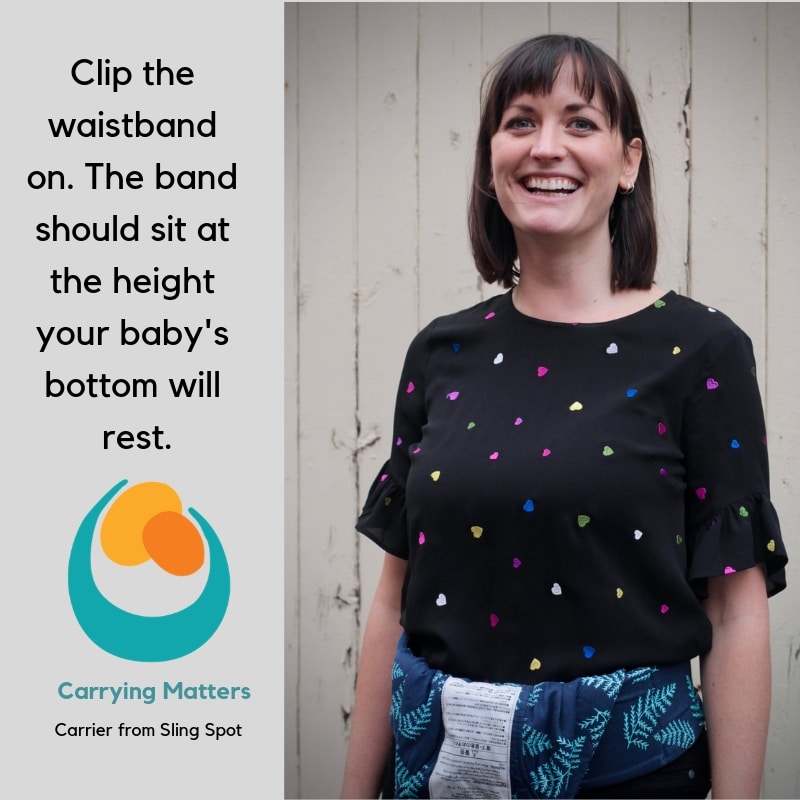
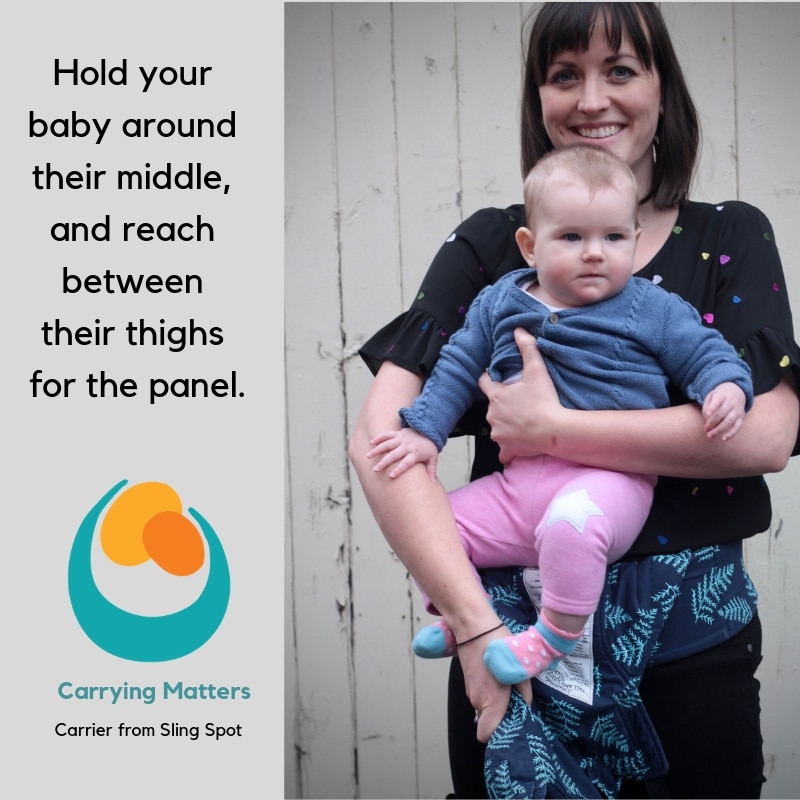
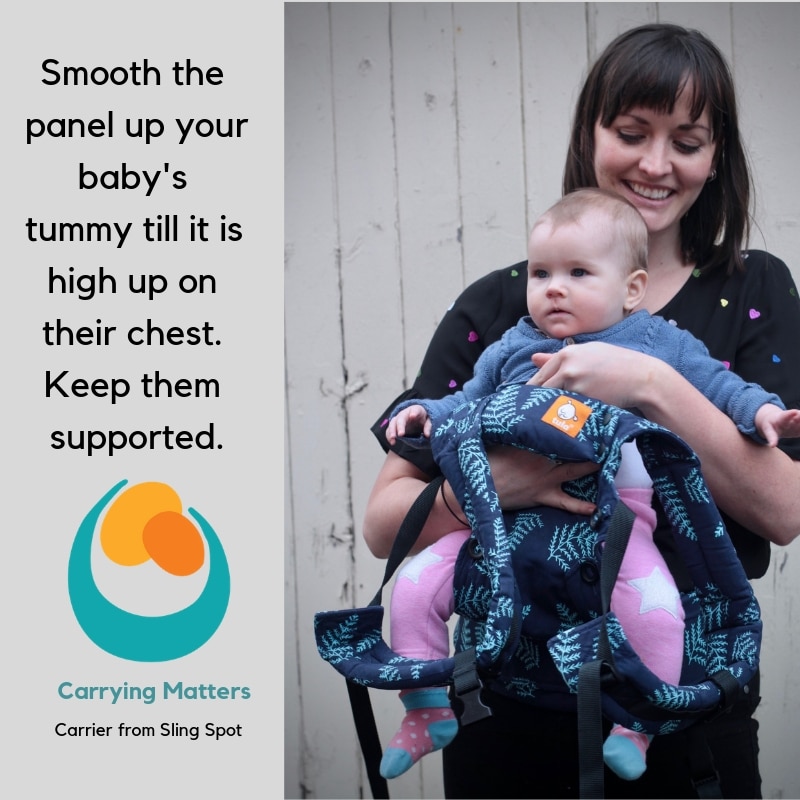
Tula Explore Front Facing Out photo tutorial with ruck straps. A step by step guide to give you confidence! This method clips the chest belt up behind the neck, after child and carrier are in position.
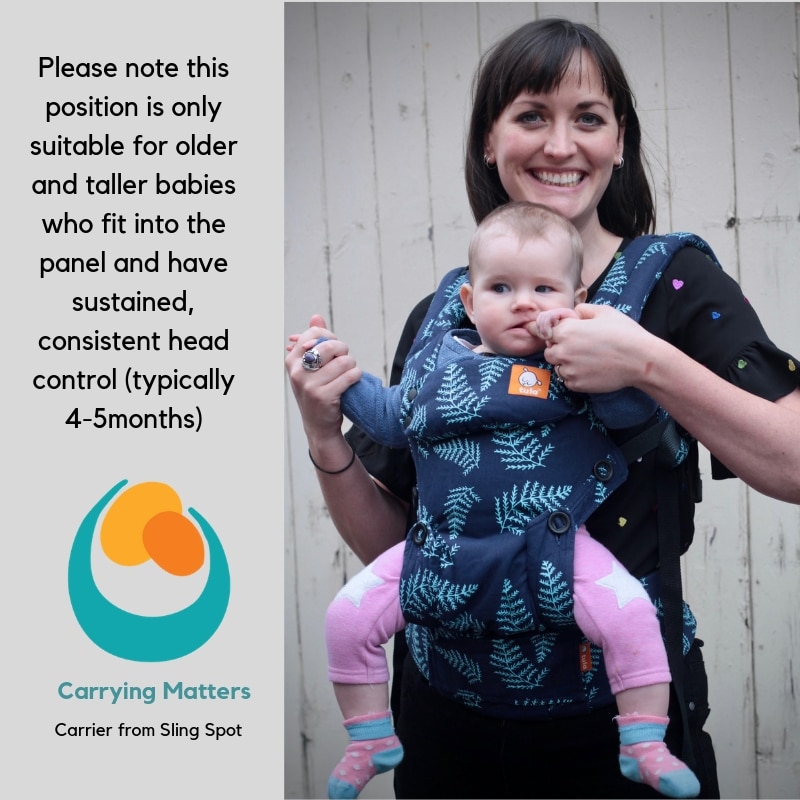
The Tula Explore carrier can be used facing forwards when baby is developmentally ready. Deciding if you want to use this position and when your baby is ready for it will be a very individual choice. Guidance suggests that baby should have well-established, independent and sustained head, neck and upper body control (for more than twenty minutes). Typically this develops around 4-5 months. Before this, there is a risk that baby may slump and compromise their airway, especially if they fall asleep in this position.
Furthermore, baby needs to be tall enough to fit into the structured panel, and their legs long enough to sit comfortably in the bucket seat. This little model is six months, and just big enough for this carrier.
Top tip: don’t forget you can move the chest belt up and down on the webbing that runs along the shoulder straps. Everyone will have a particular preference for the chest belt location. As you tighten the shoulder straps, the chest belt will move down your back. If it still feels too high behind your neck once the shoulder straps are tightened, move it down the webbing for the next time. Check you can still reach it to undo it when ready. If it is too low, move it up the webbing for the next time. A few practices and you’ll soon find the right combination for your comfort and convenience.
You can see the preclipped method here.

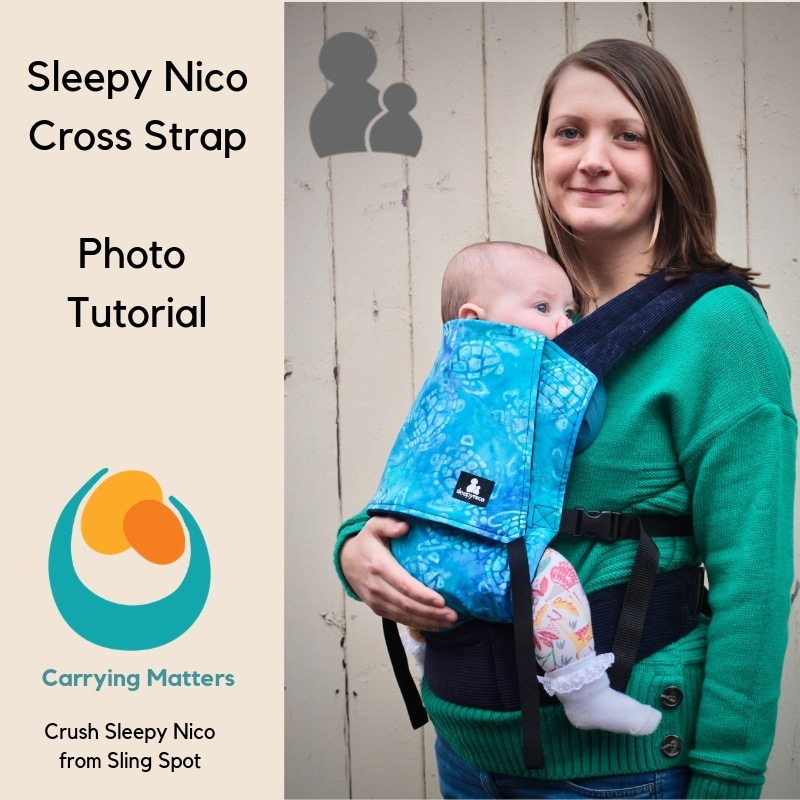
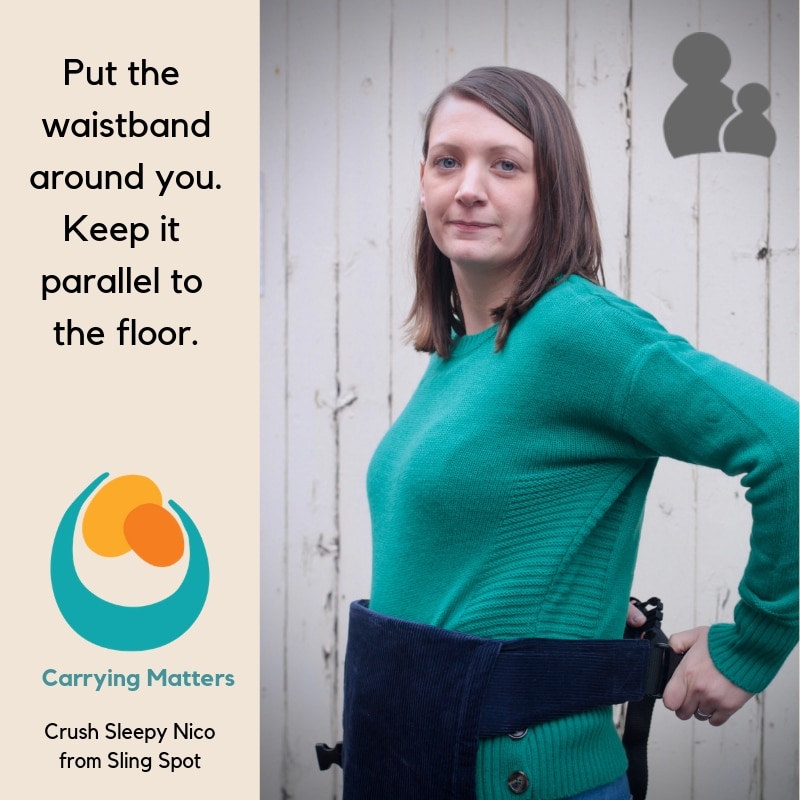
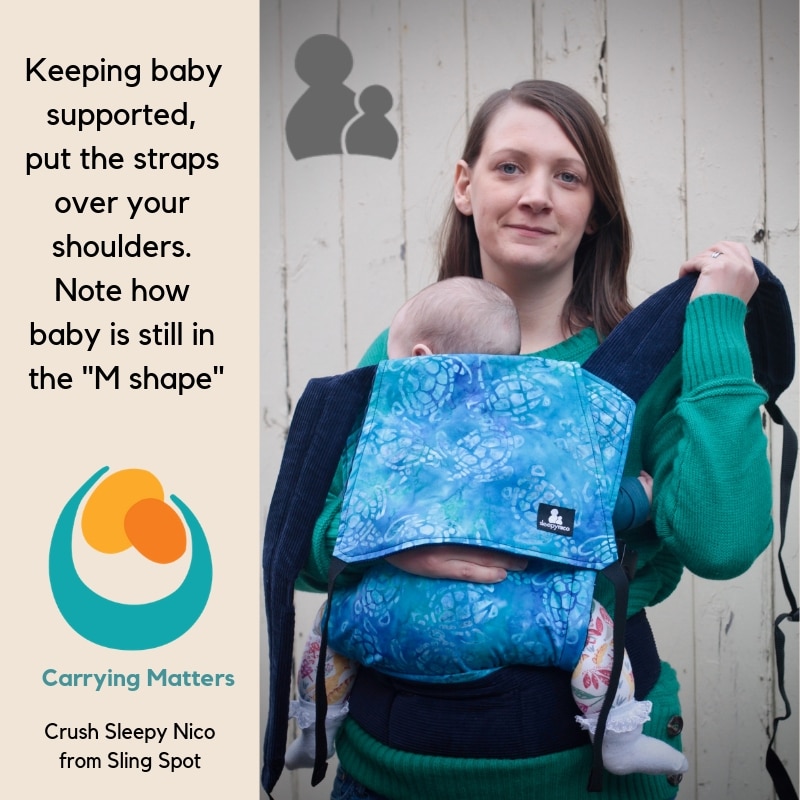
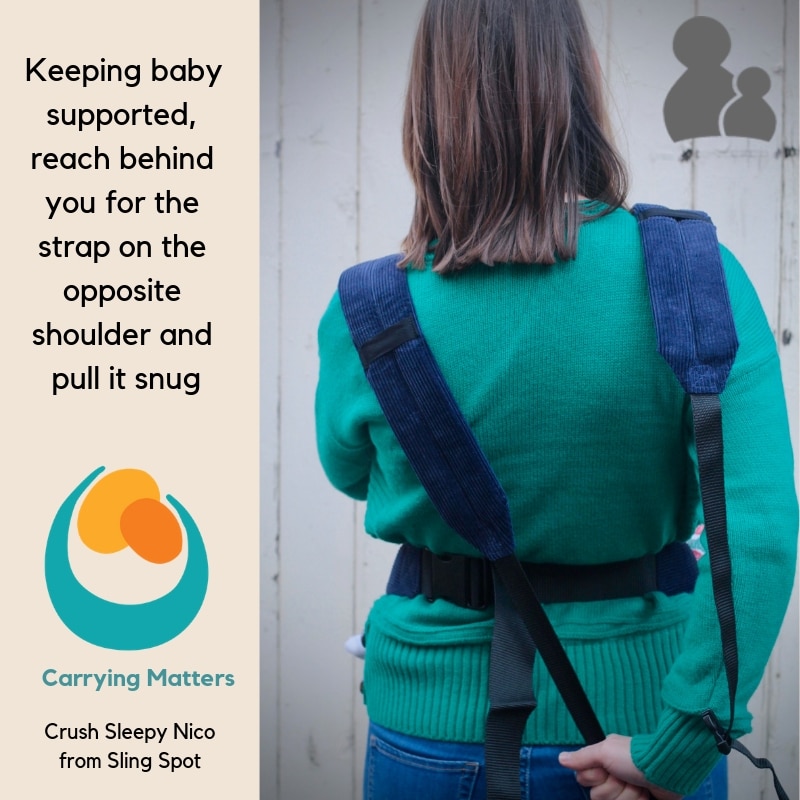
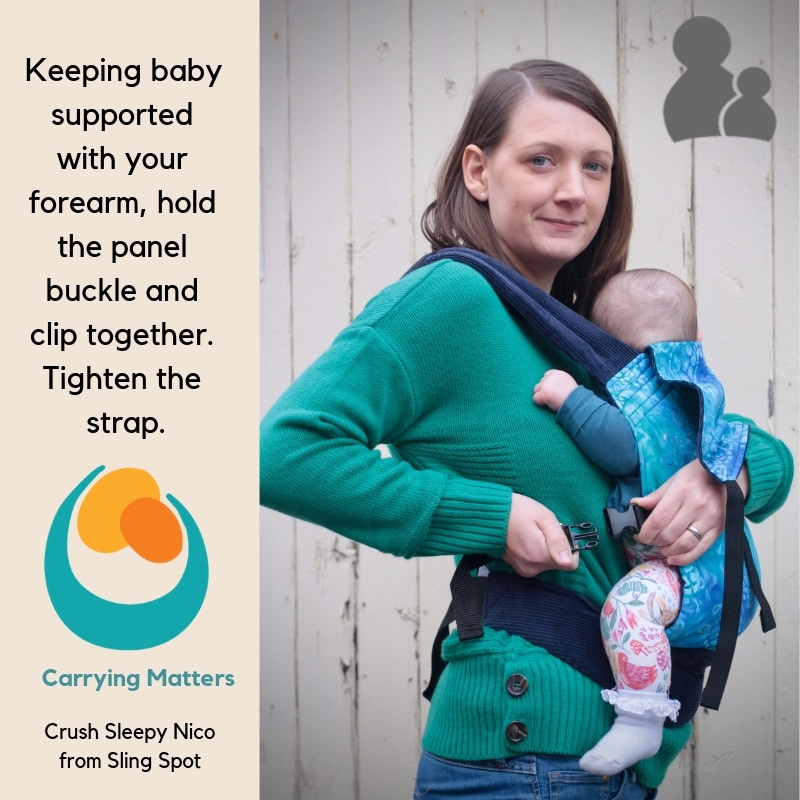
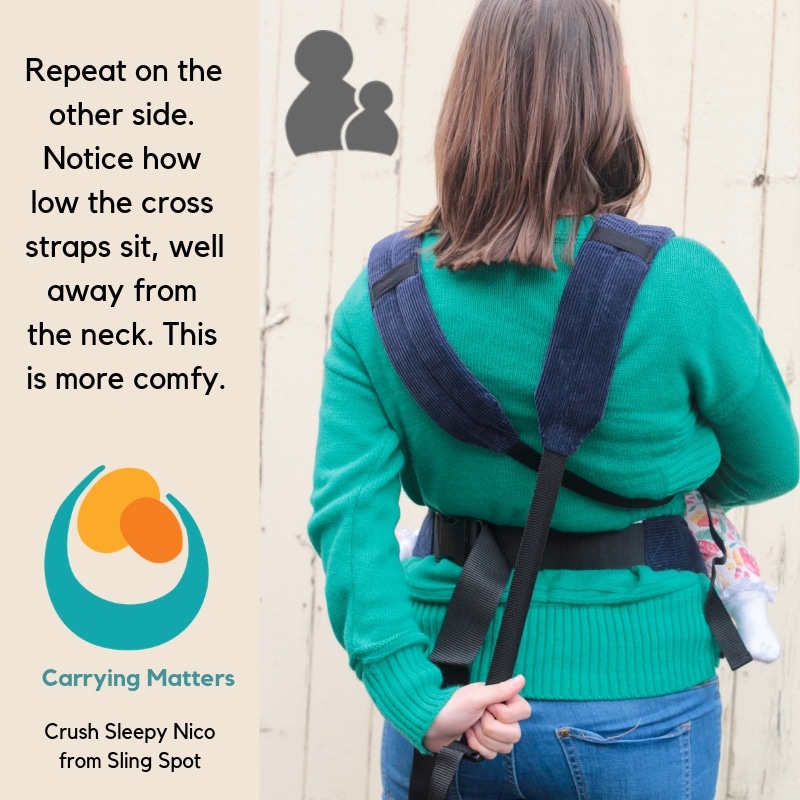
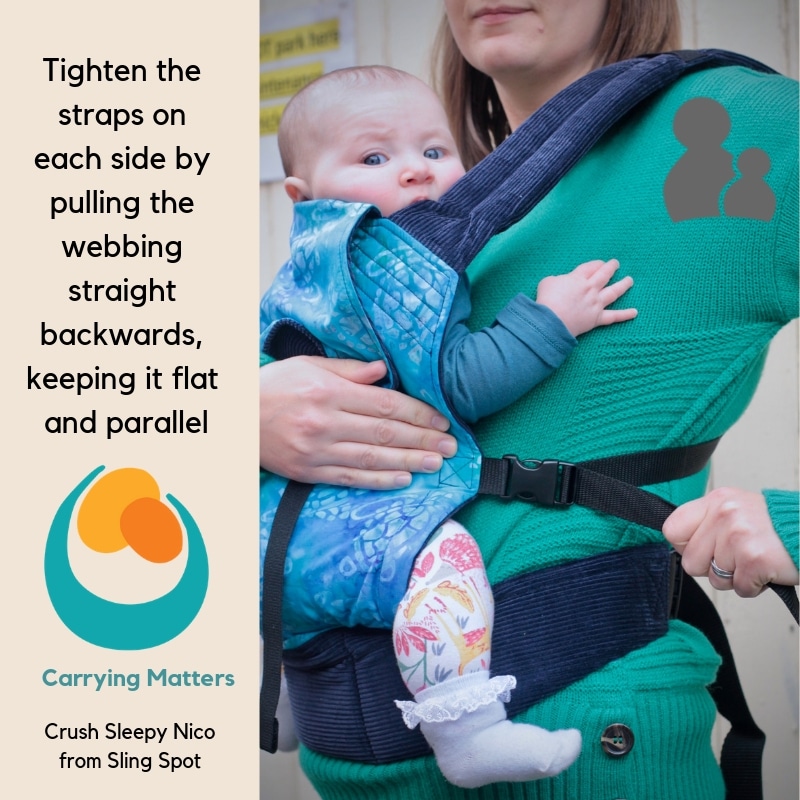
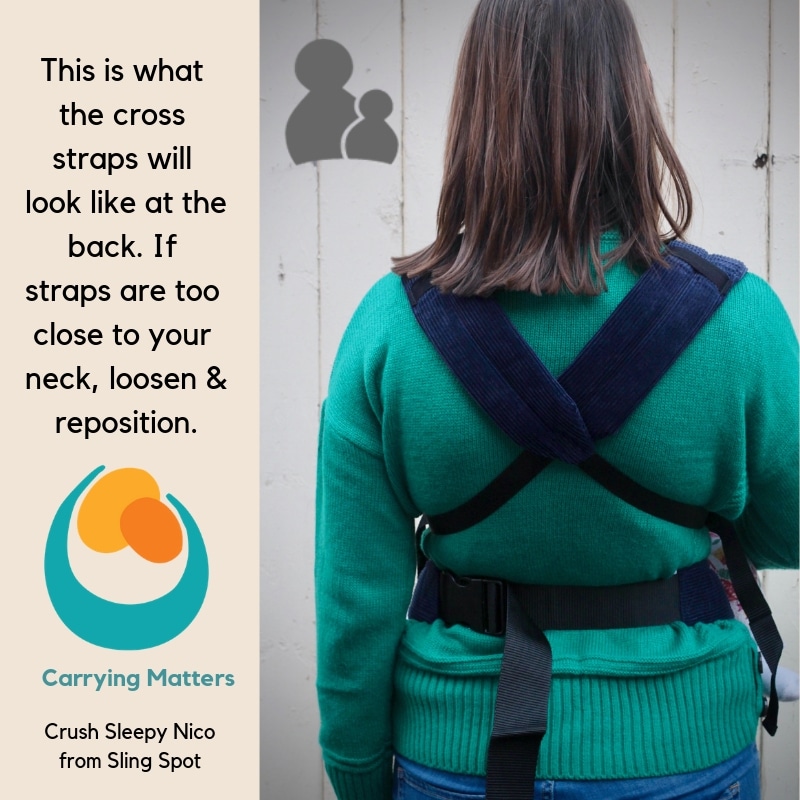
Sleepy Nico front carry with cross straps photo tutorial
Sleepy Nico Front Carry with cross straps photo tutorial; a step by step guide to give you confidence!
The Sleepy Nico carrier can be used from 10-12 weeks to toddlerhood. It can be used for rucksack straps too, and back carries from about six months. This carrier is the Crush (duuuude!) fabric from Sling Spot.


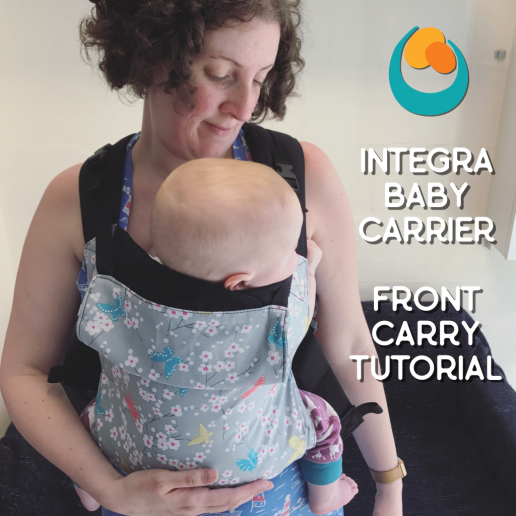
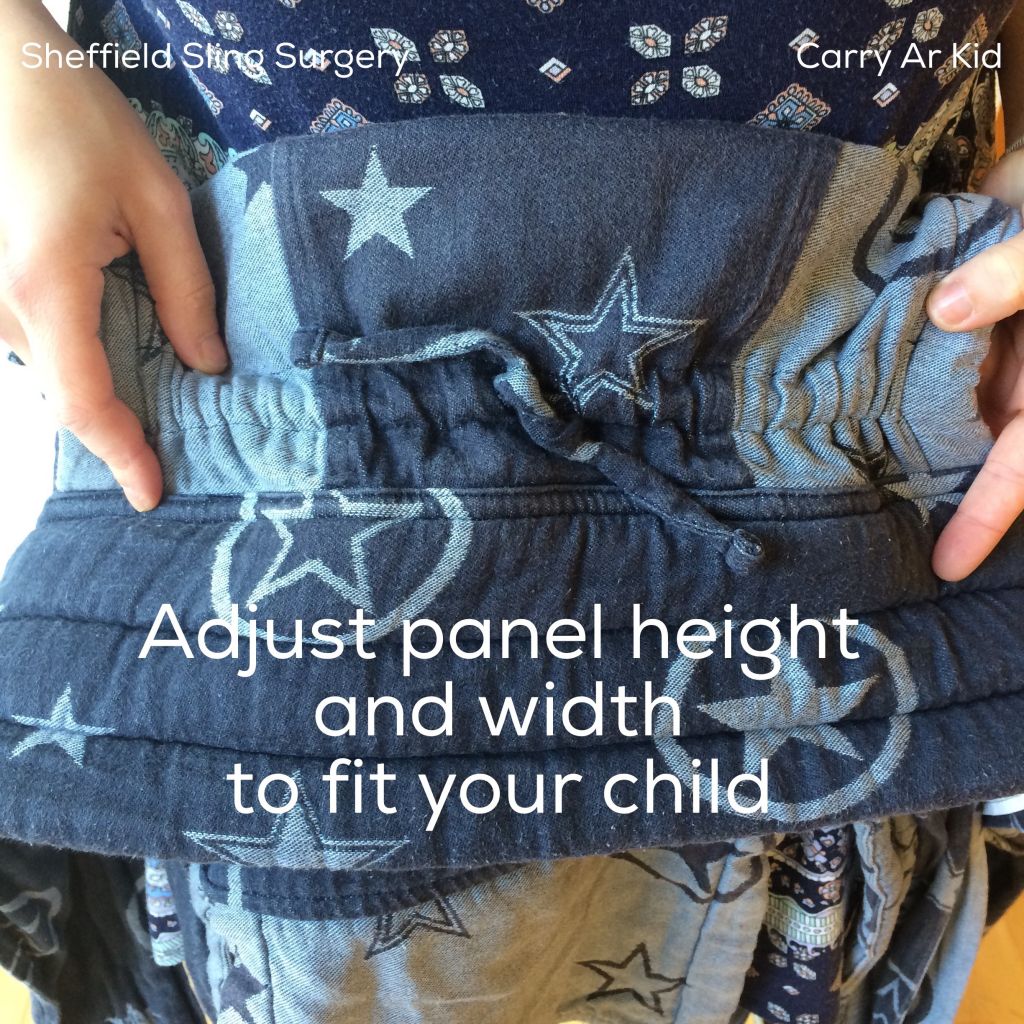
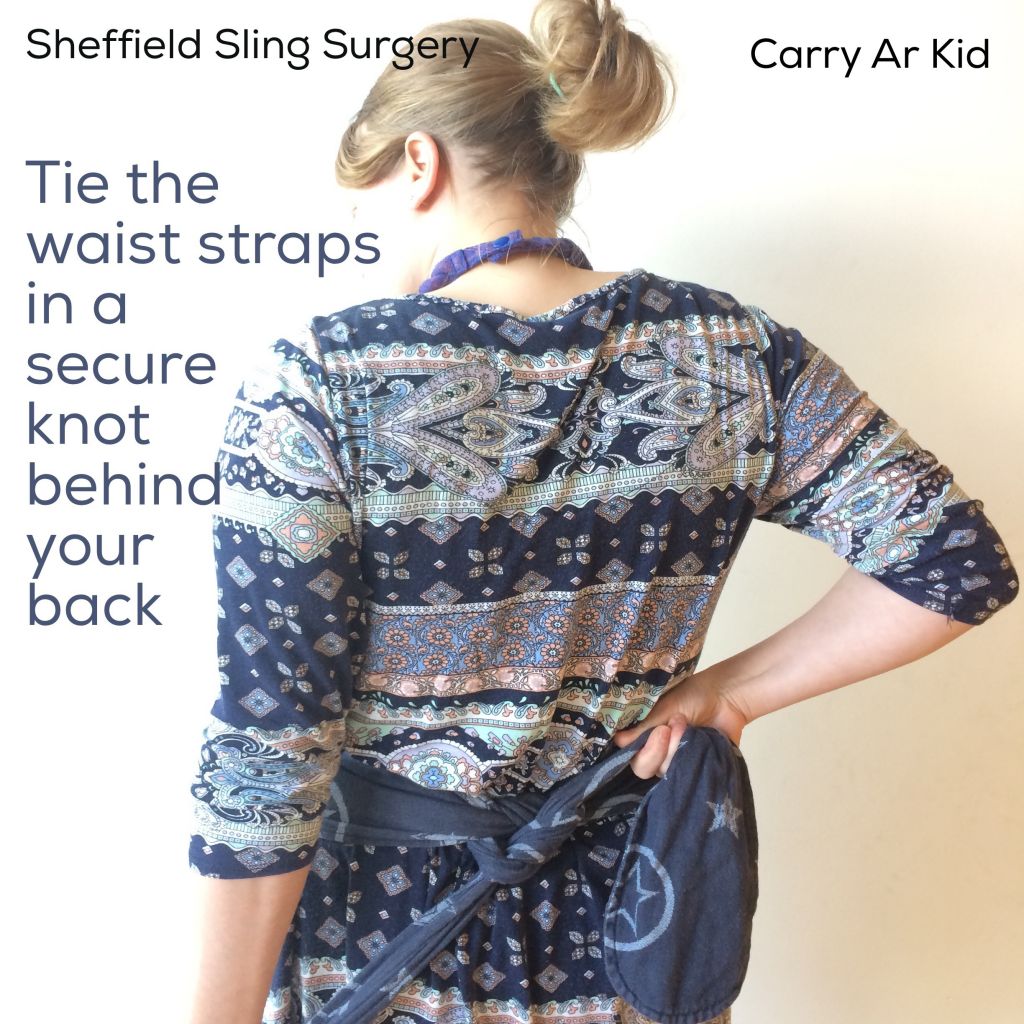
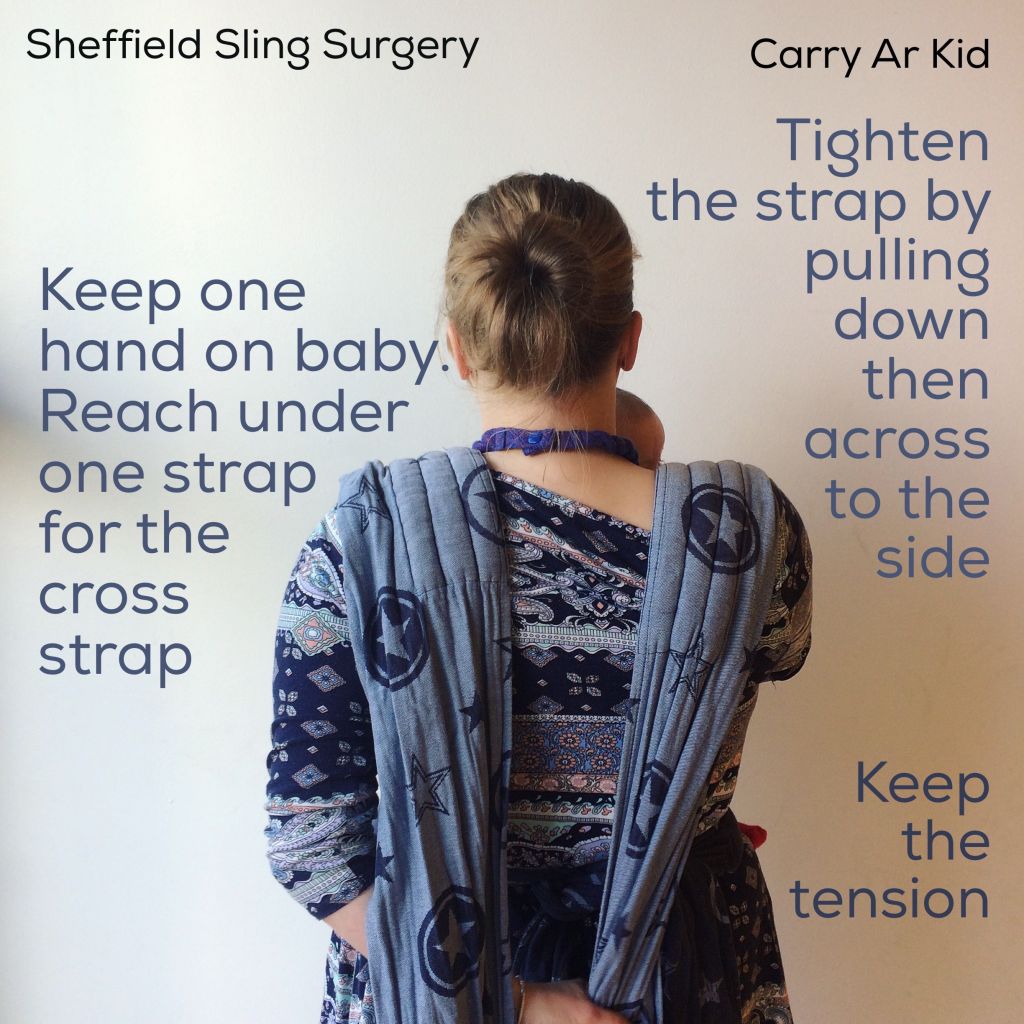
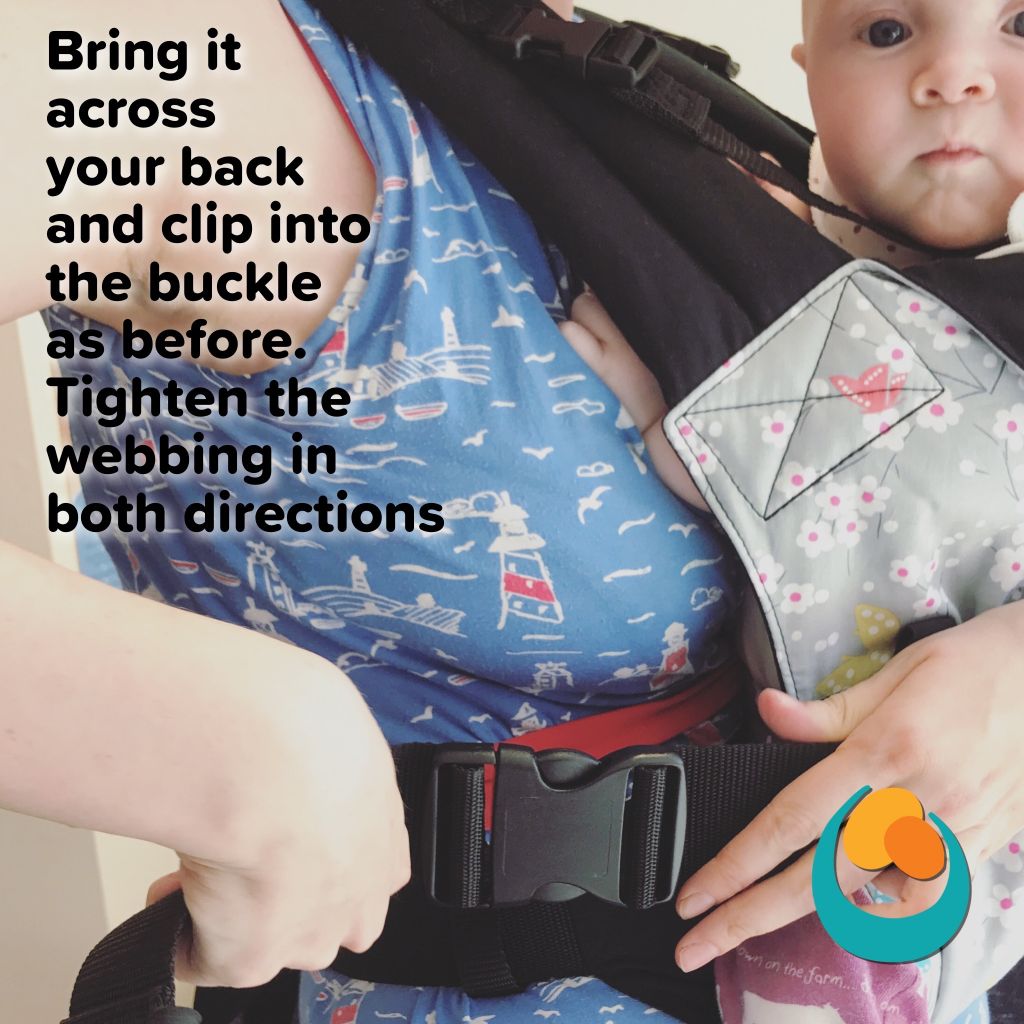
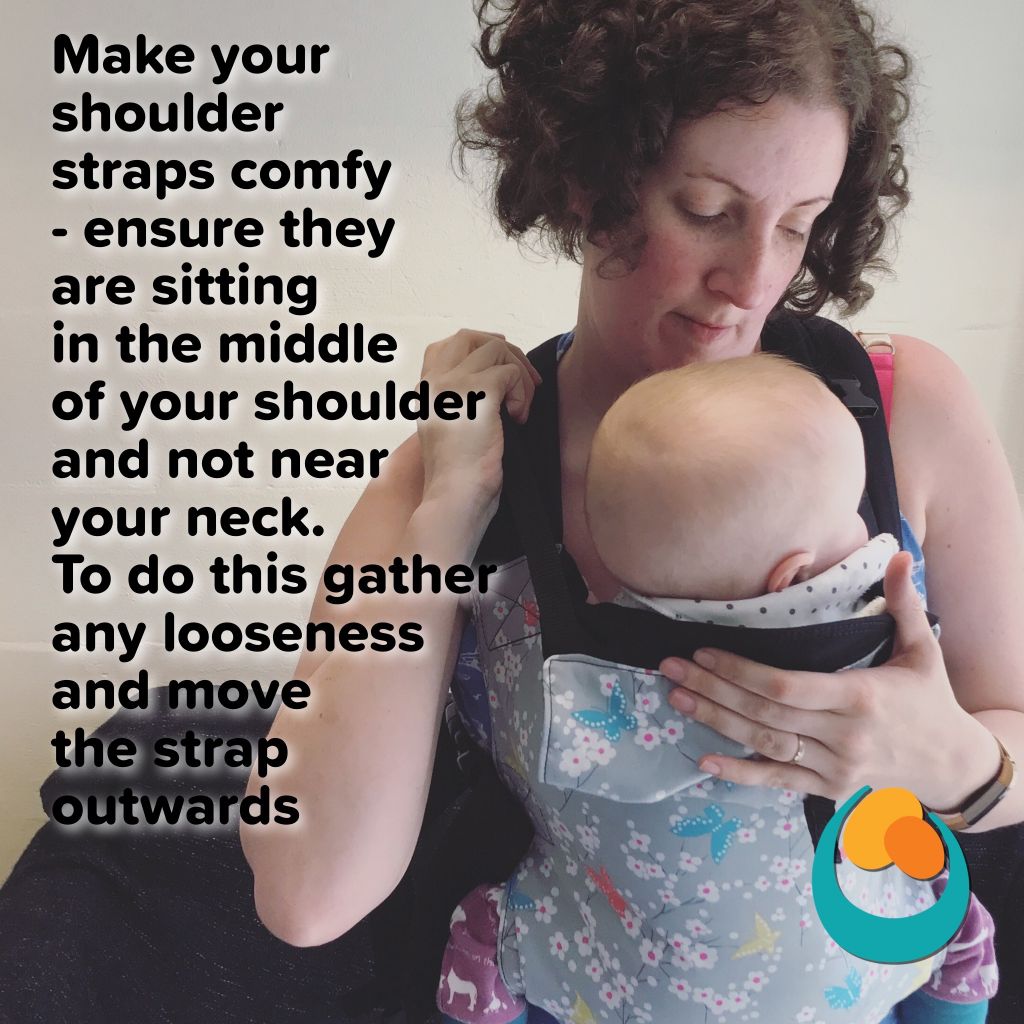
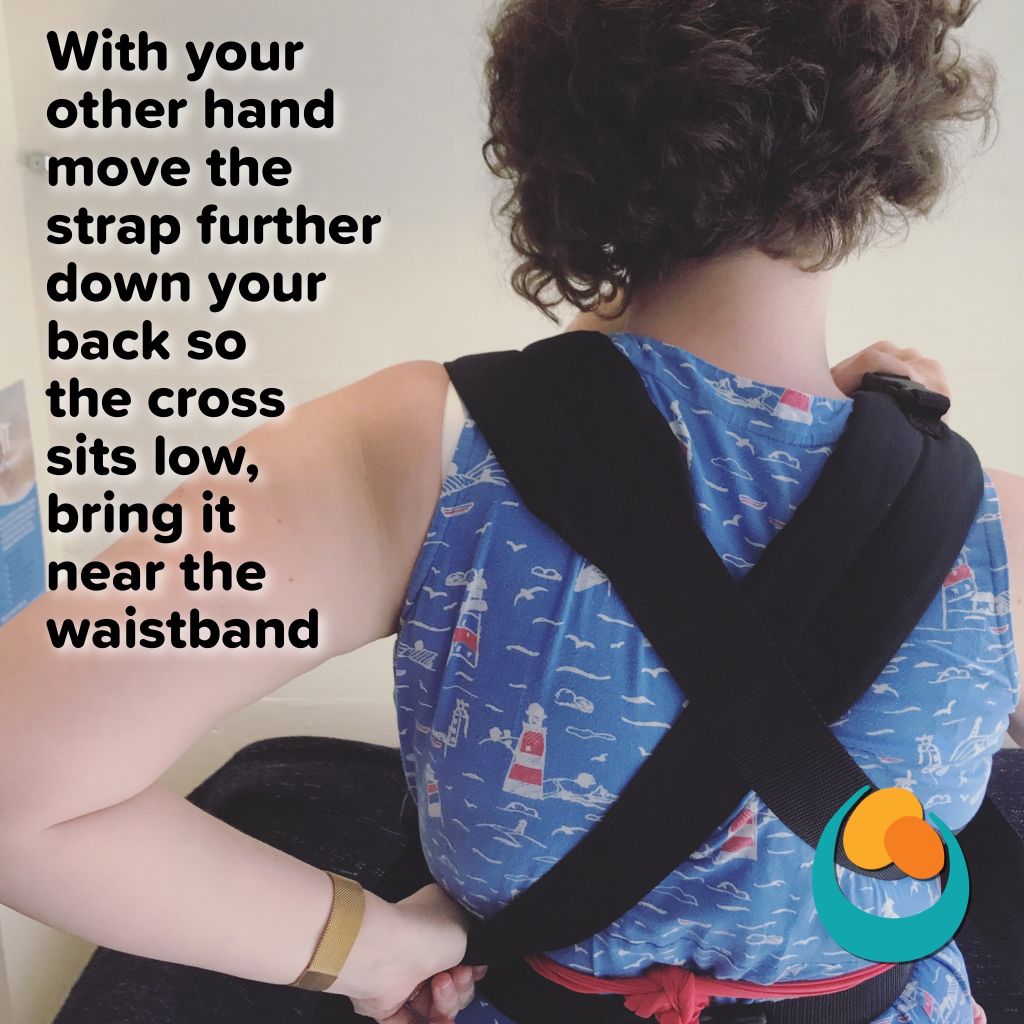
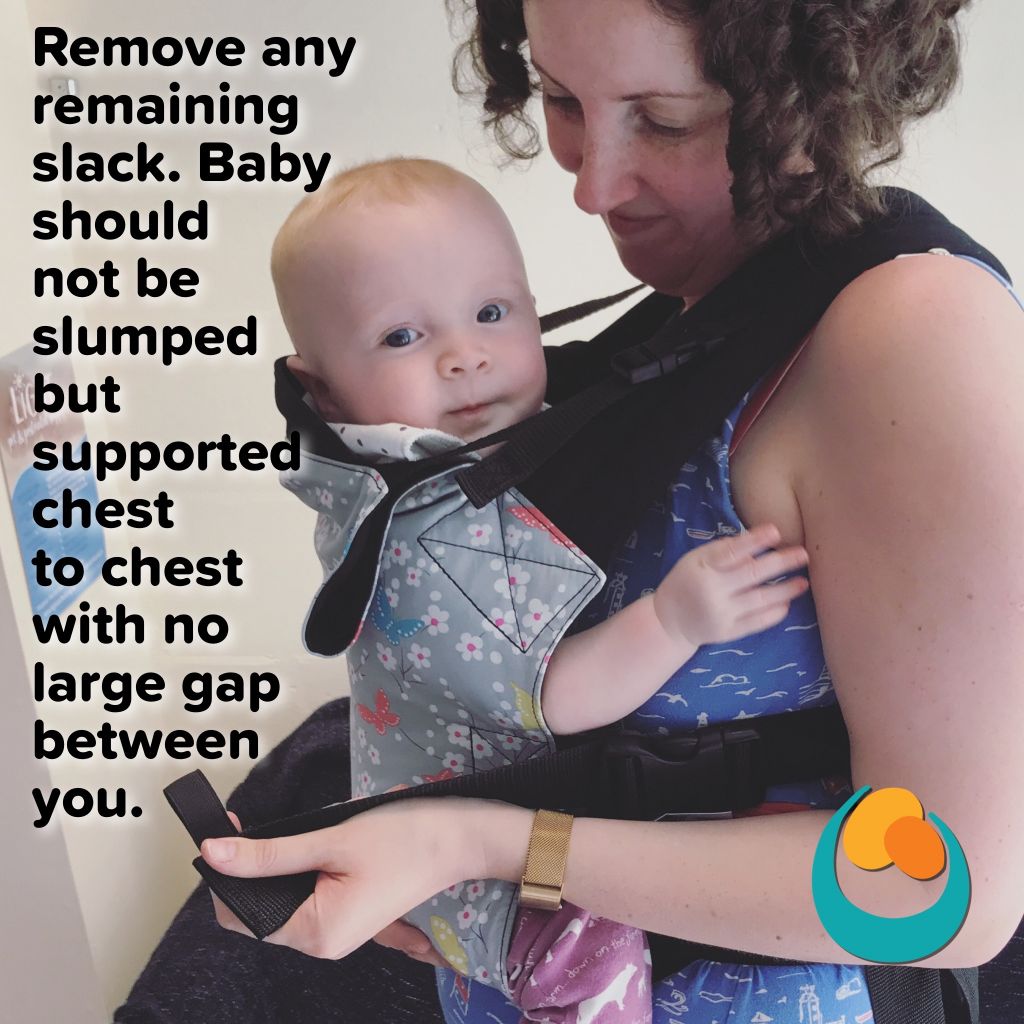
Front carry with an Integra Baby Carrier tutorial (cross straps)
Our front carry with an Integra Baby Carrier tutorial (cross straps) with an older baby will help you feel confident, safe and secure.
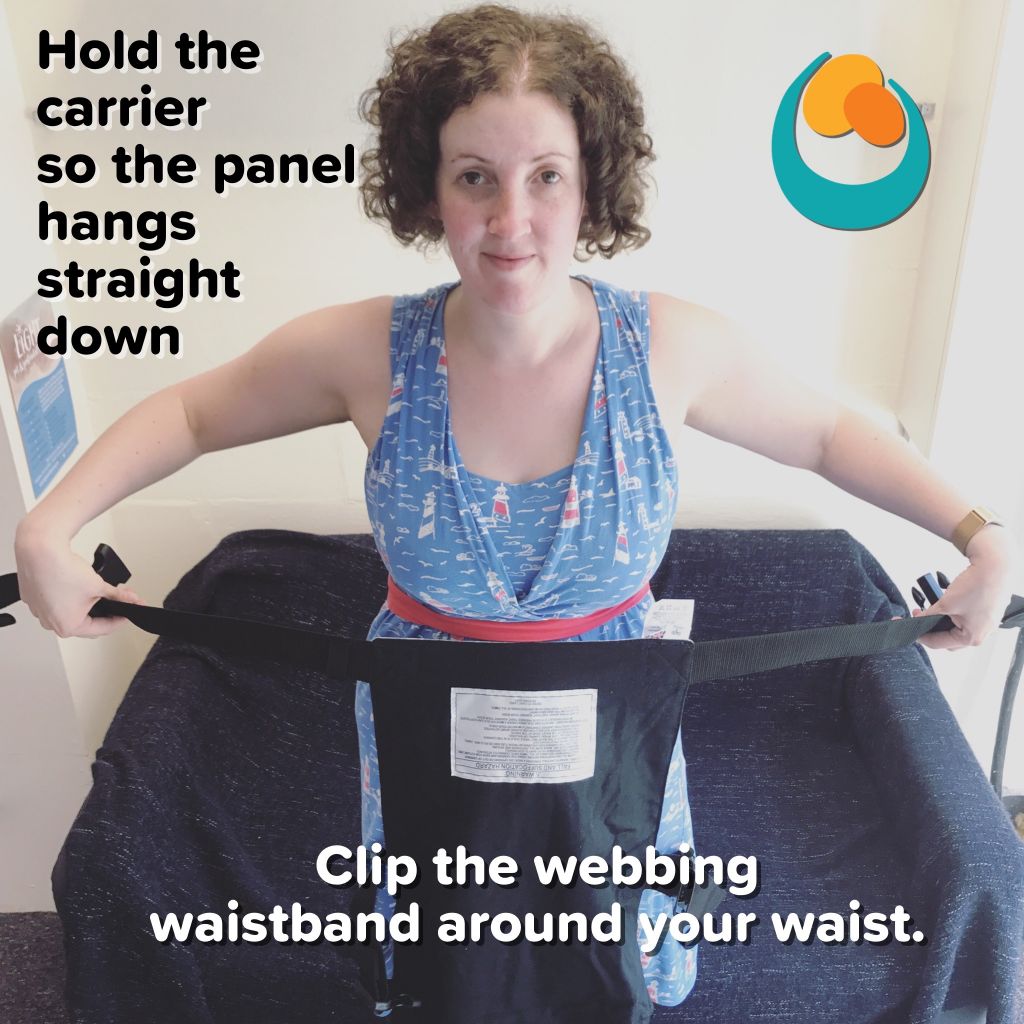
With a newborn to about four months, please use the included accessory strap to cinch the panel at the base. (This will have the effect of making the panel narrower and shorter so it fits around your baby's body.)
This method applies to any waistbandless carrier where the panel hangs straight down from the webbing like an apron.

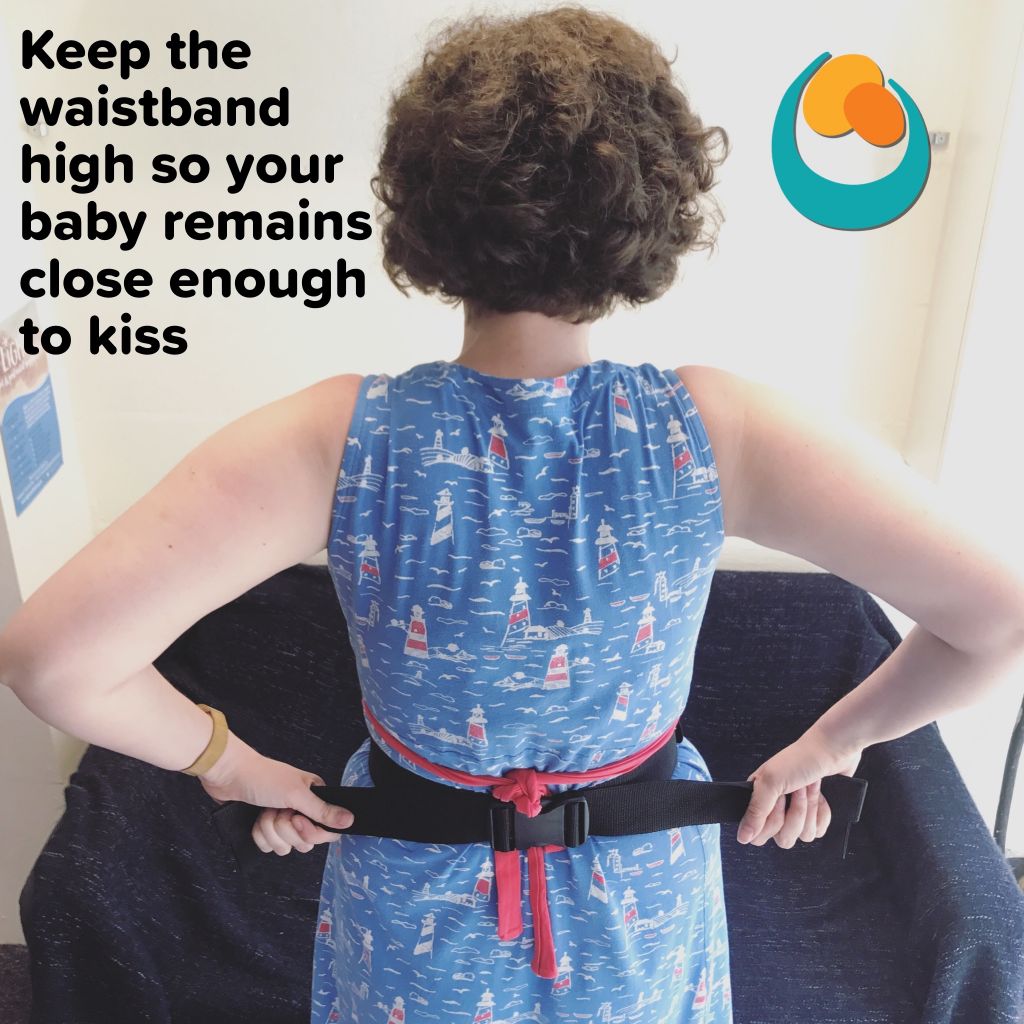
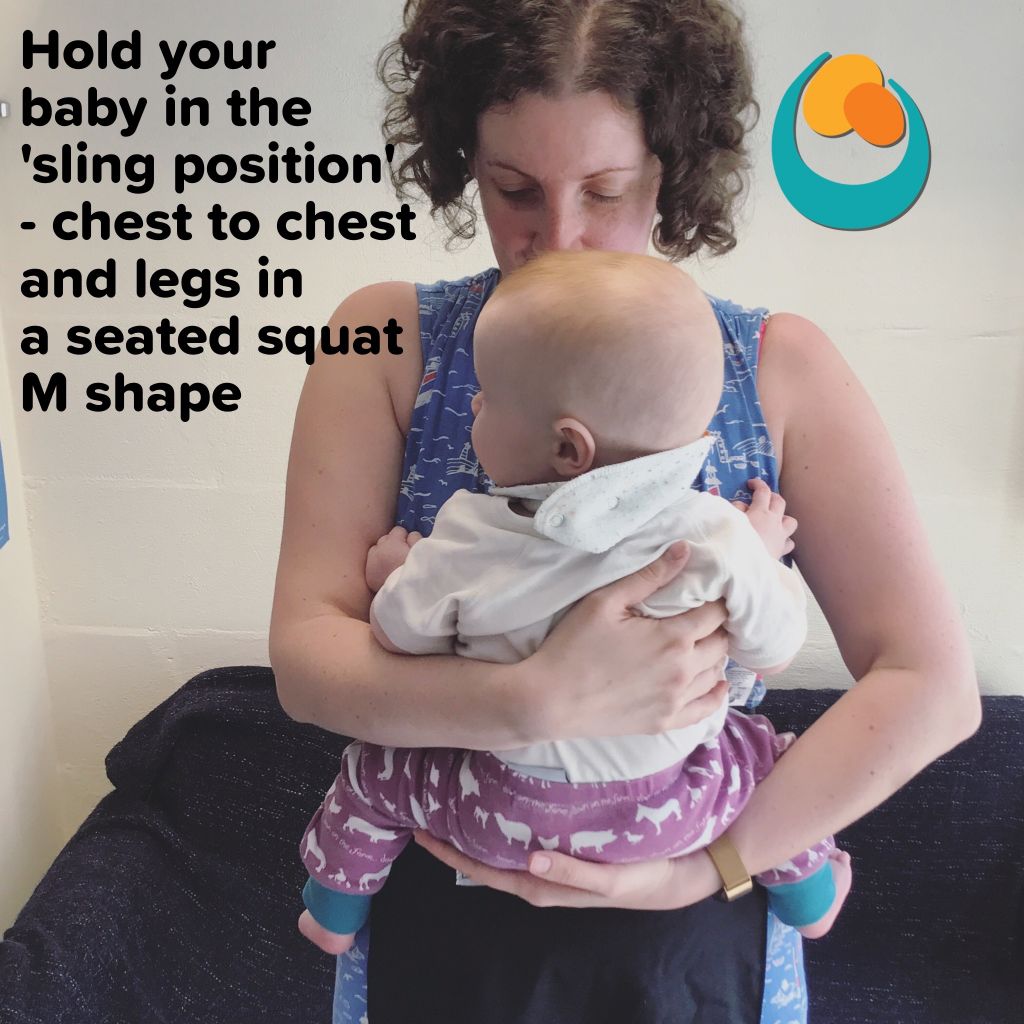
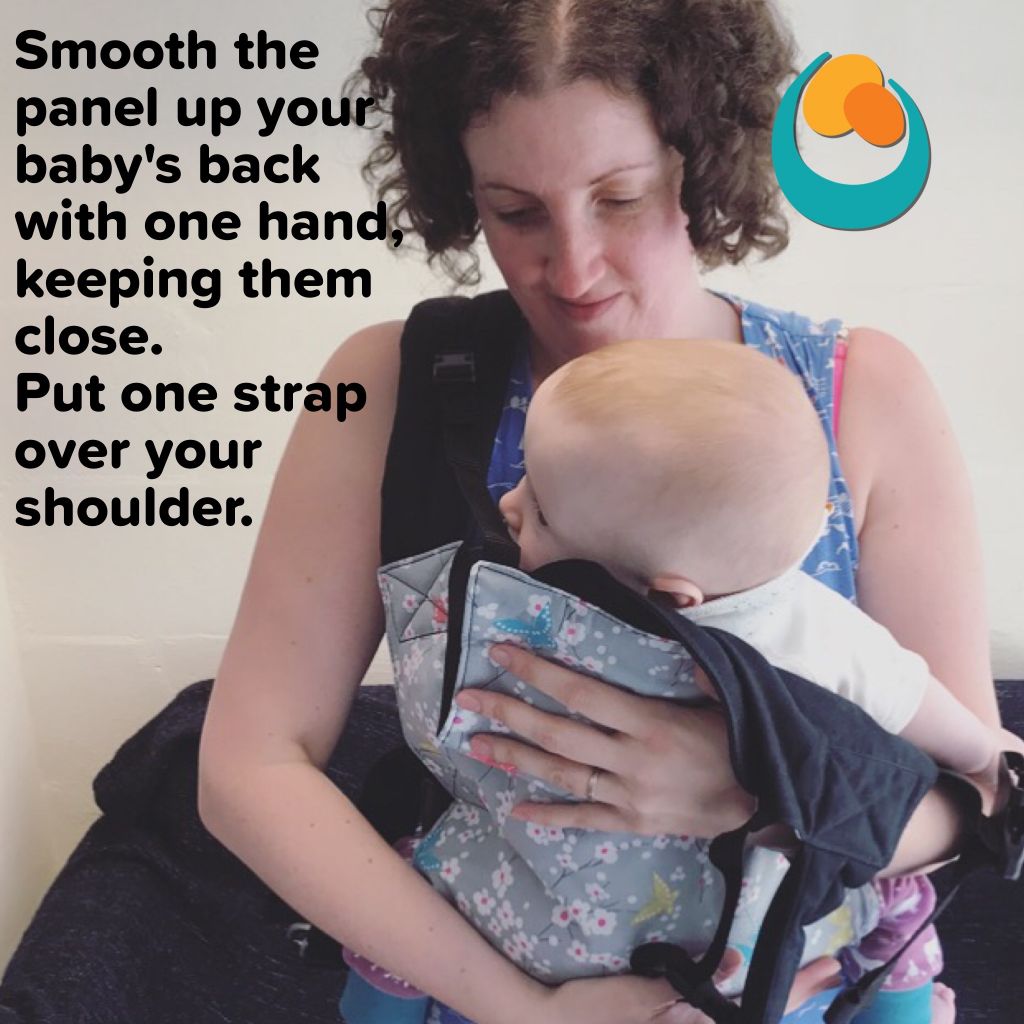
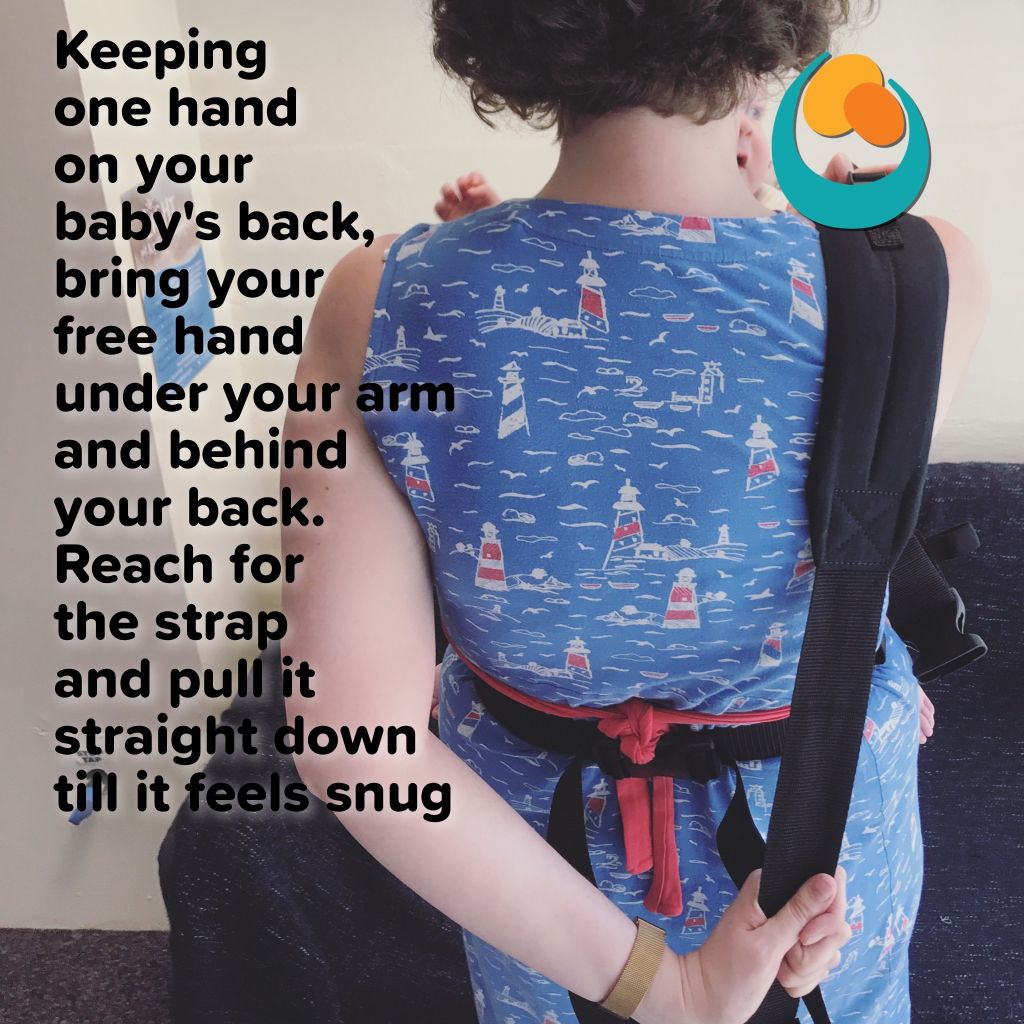
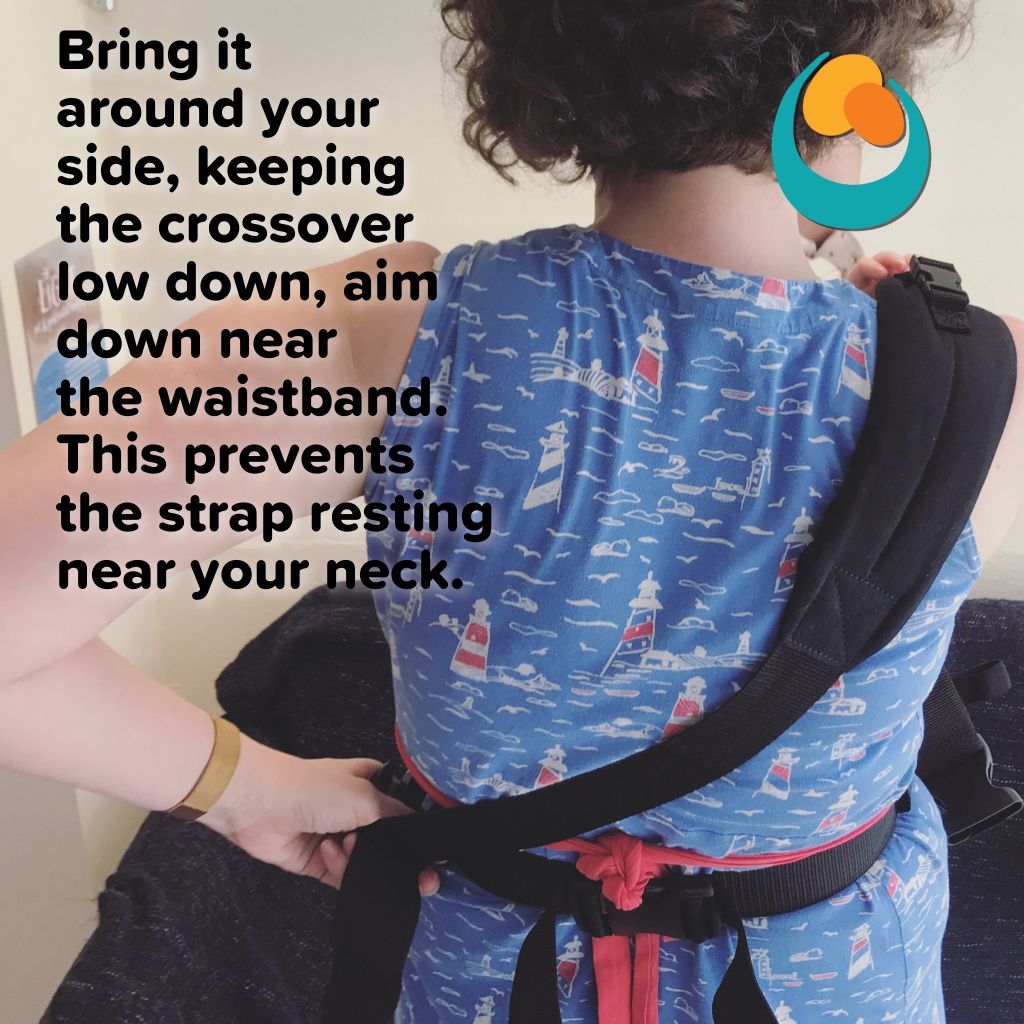


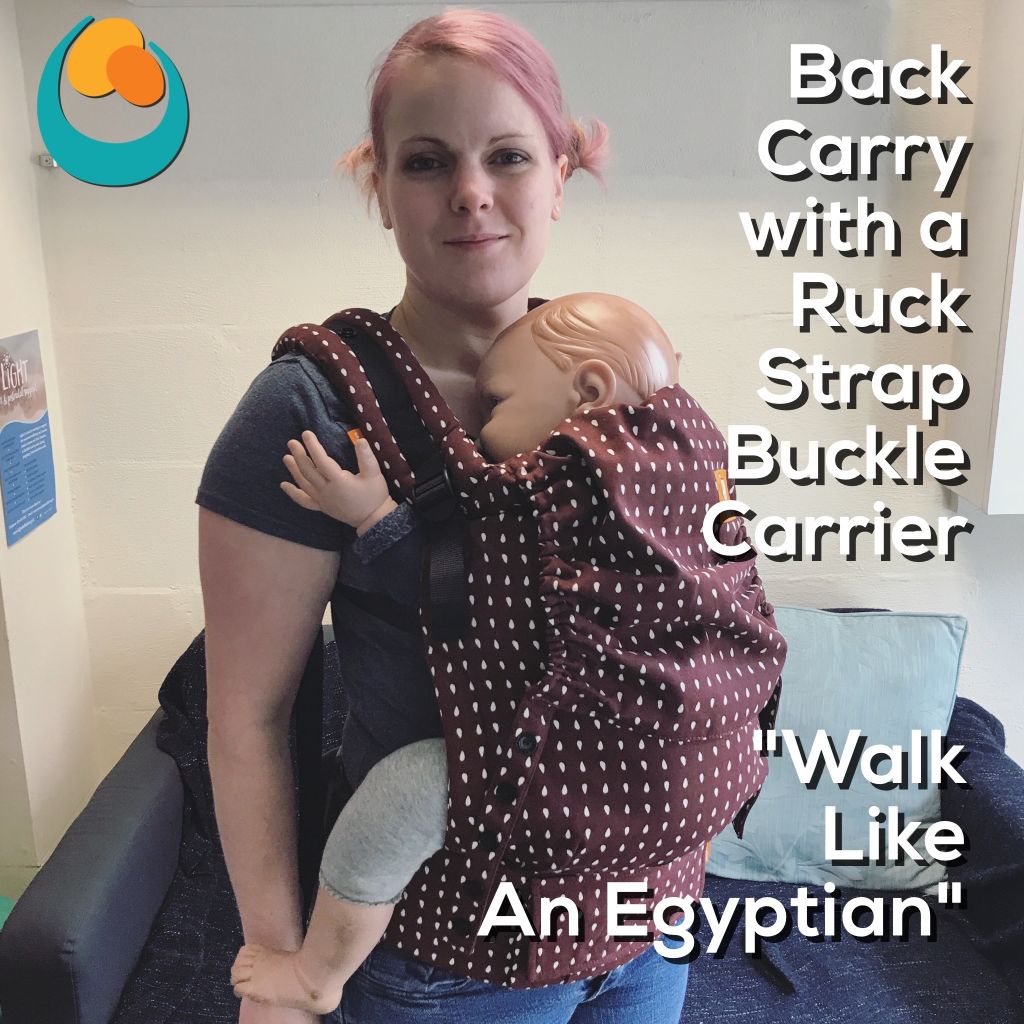
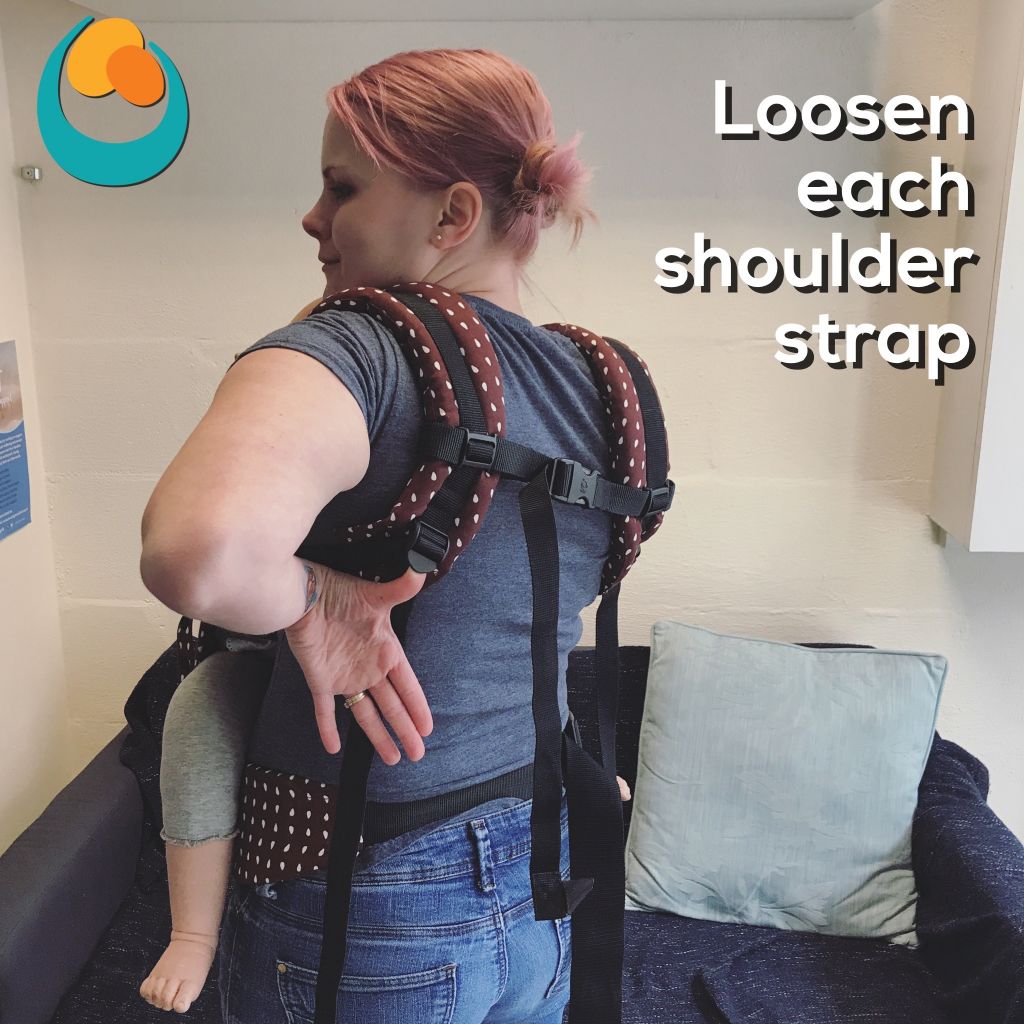
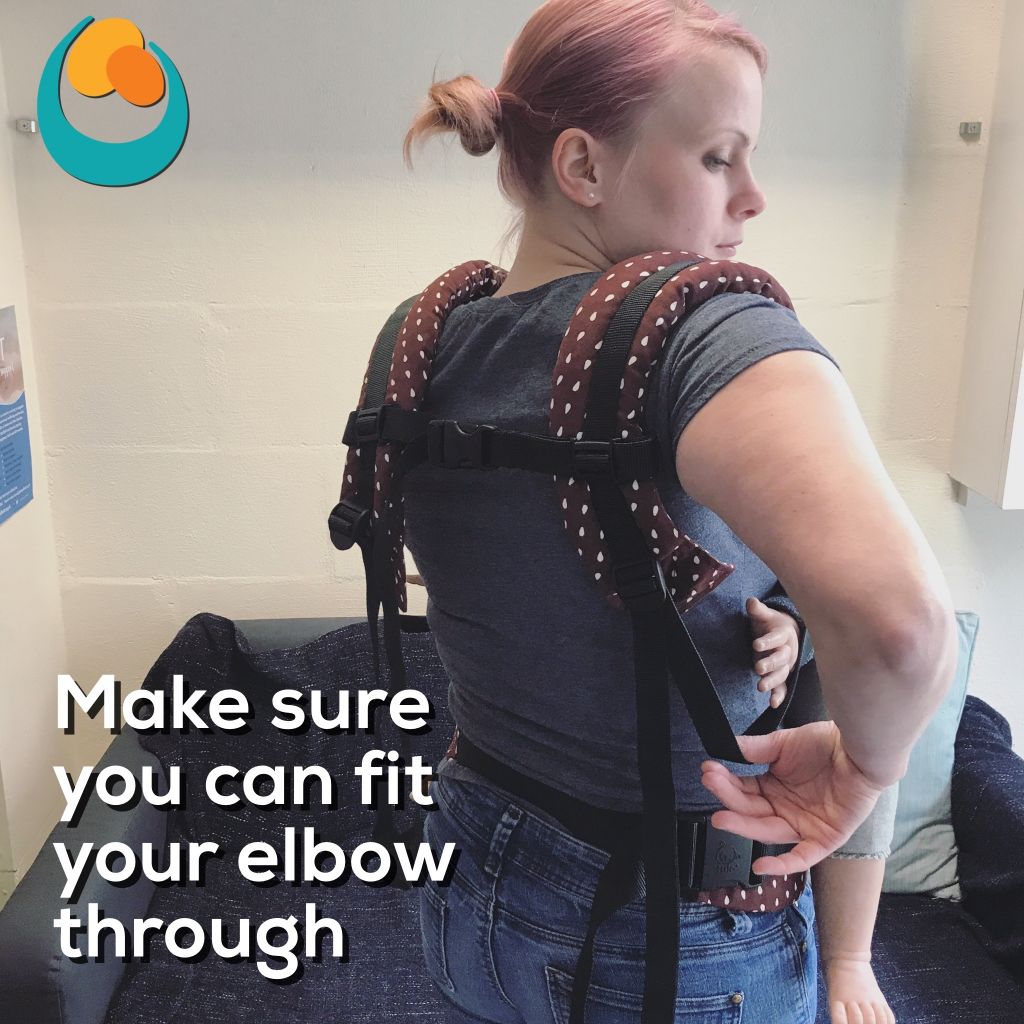
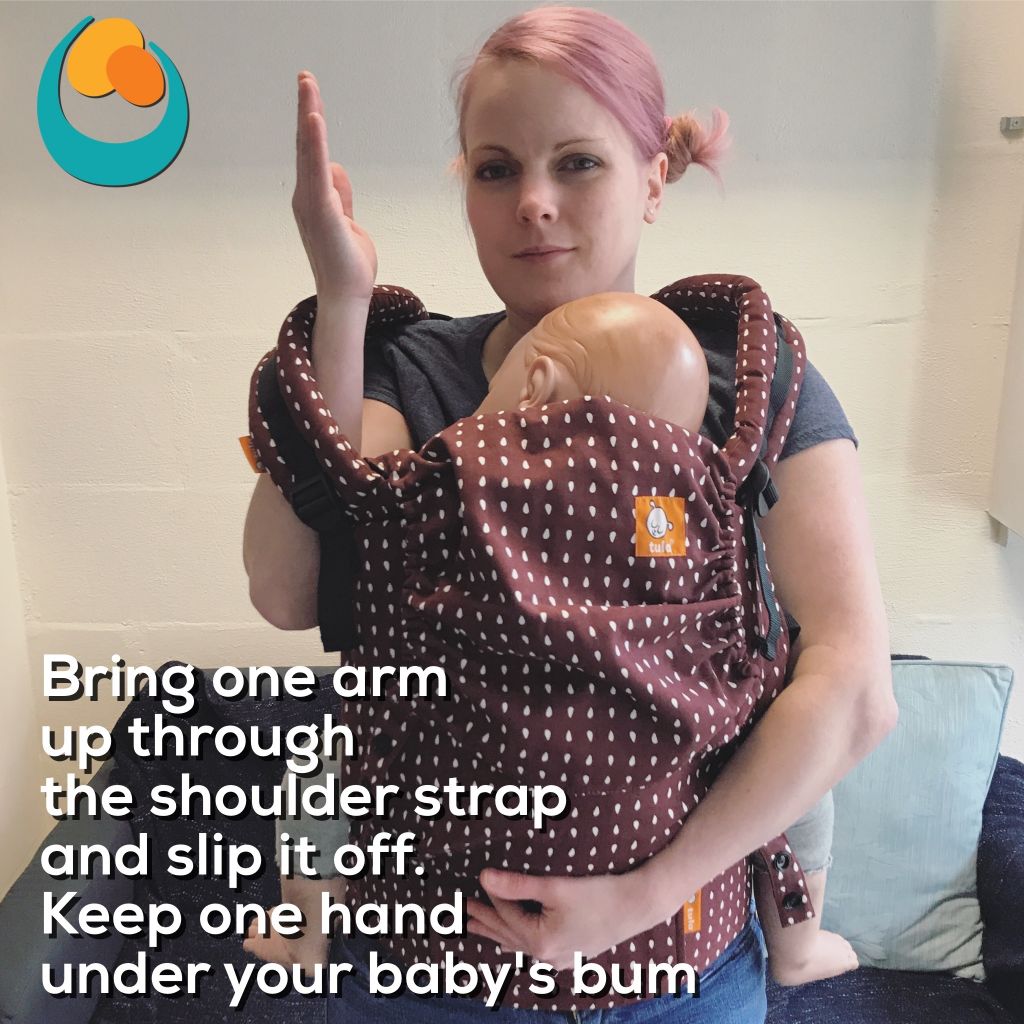
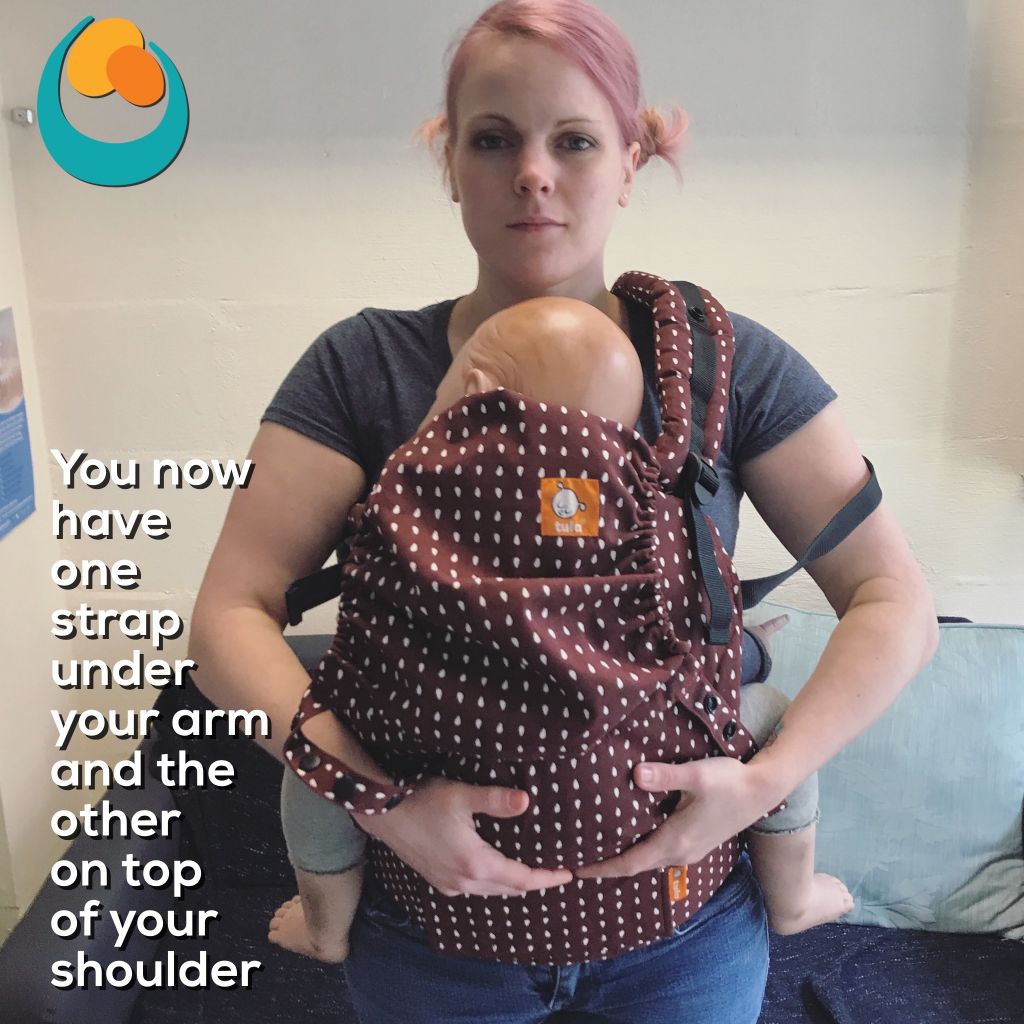
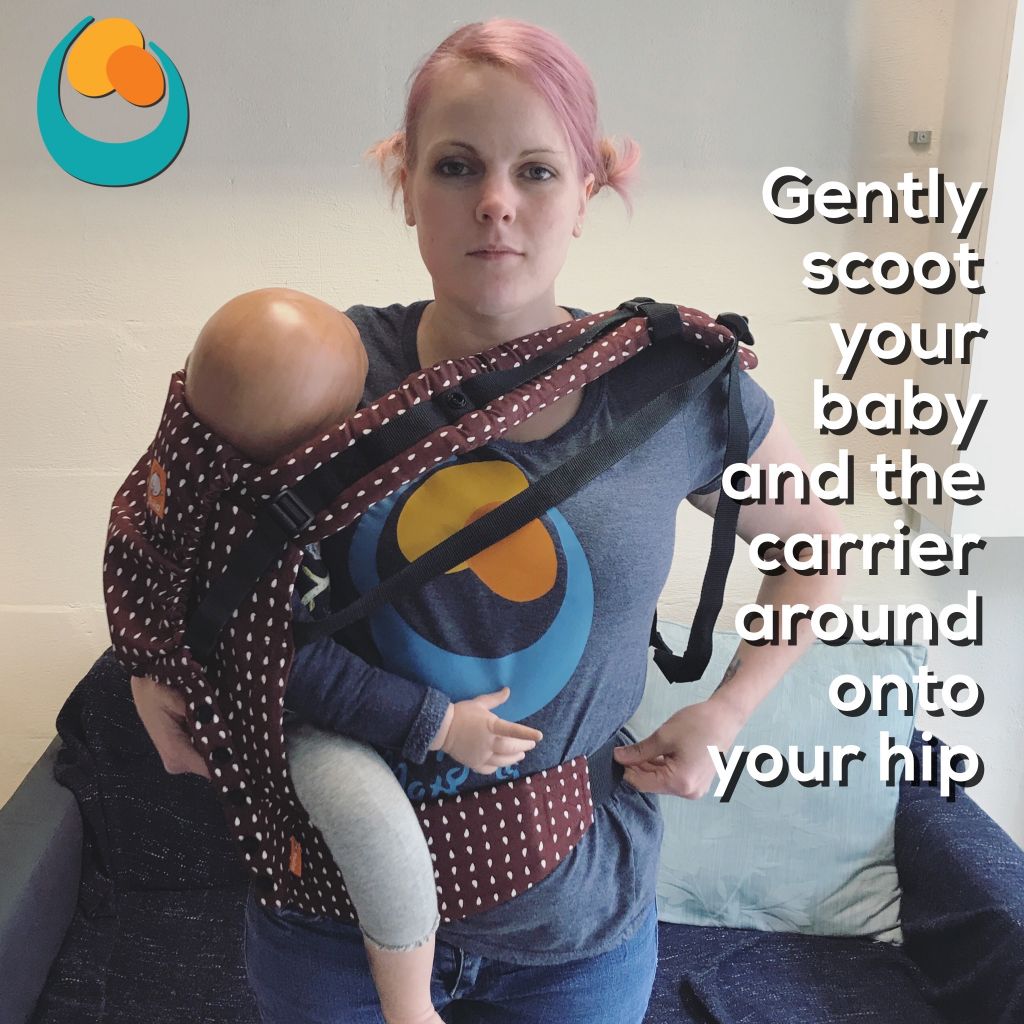
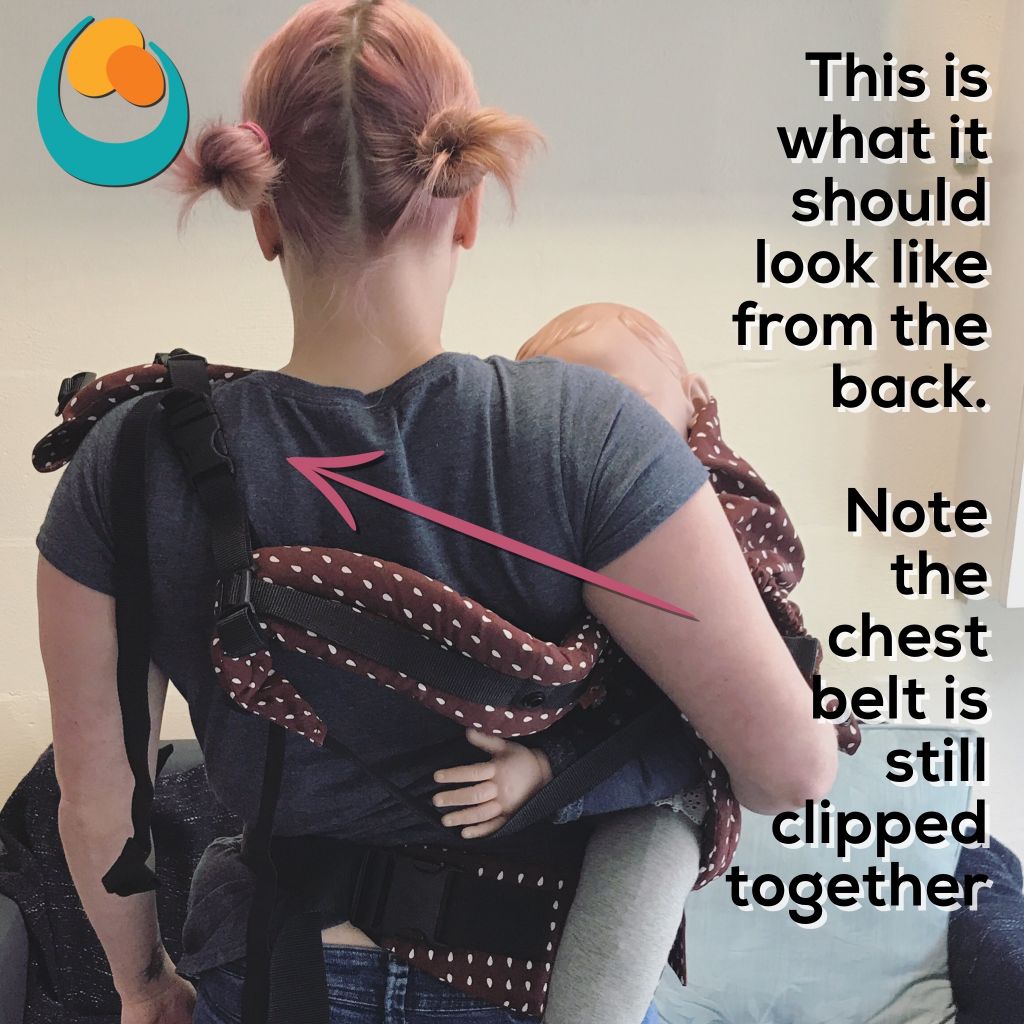
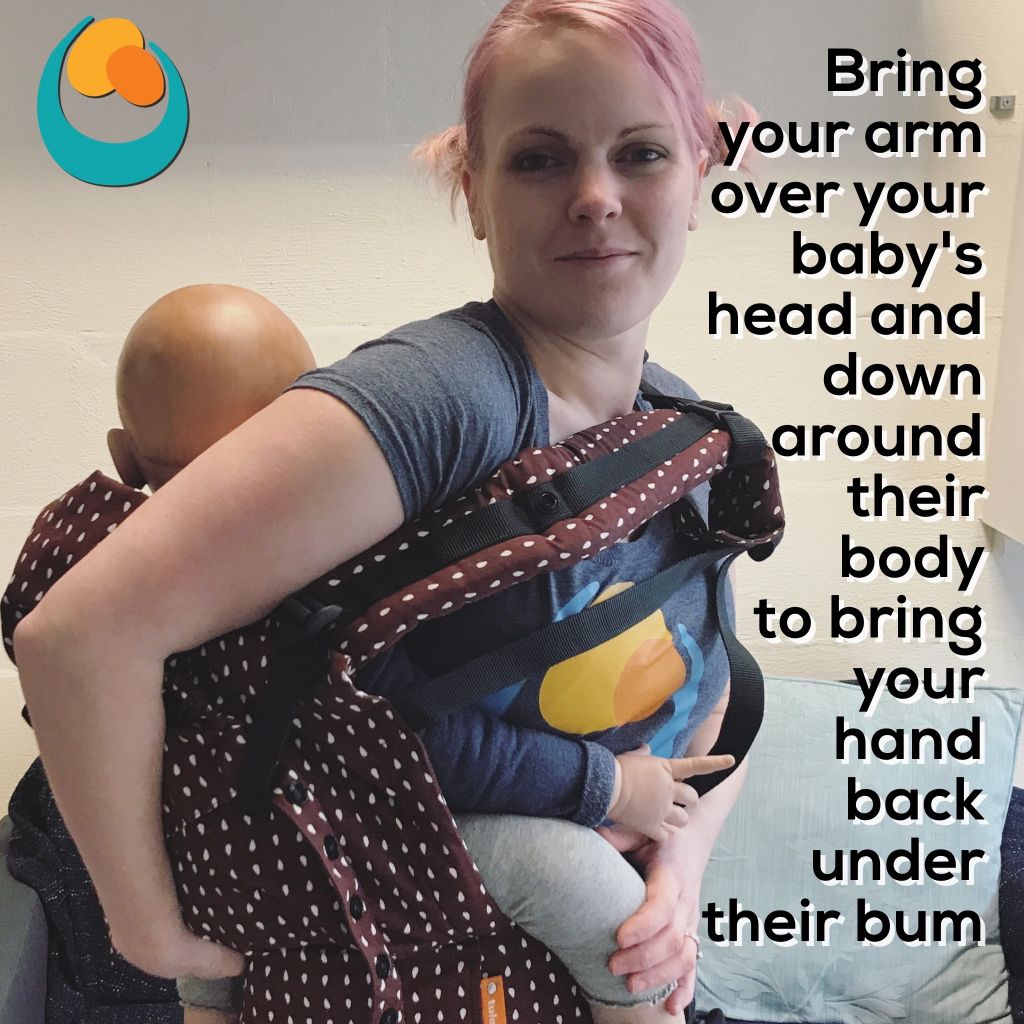
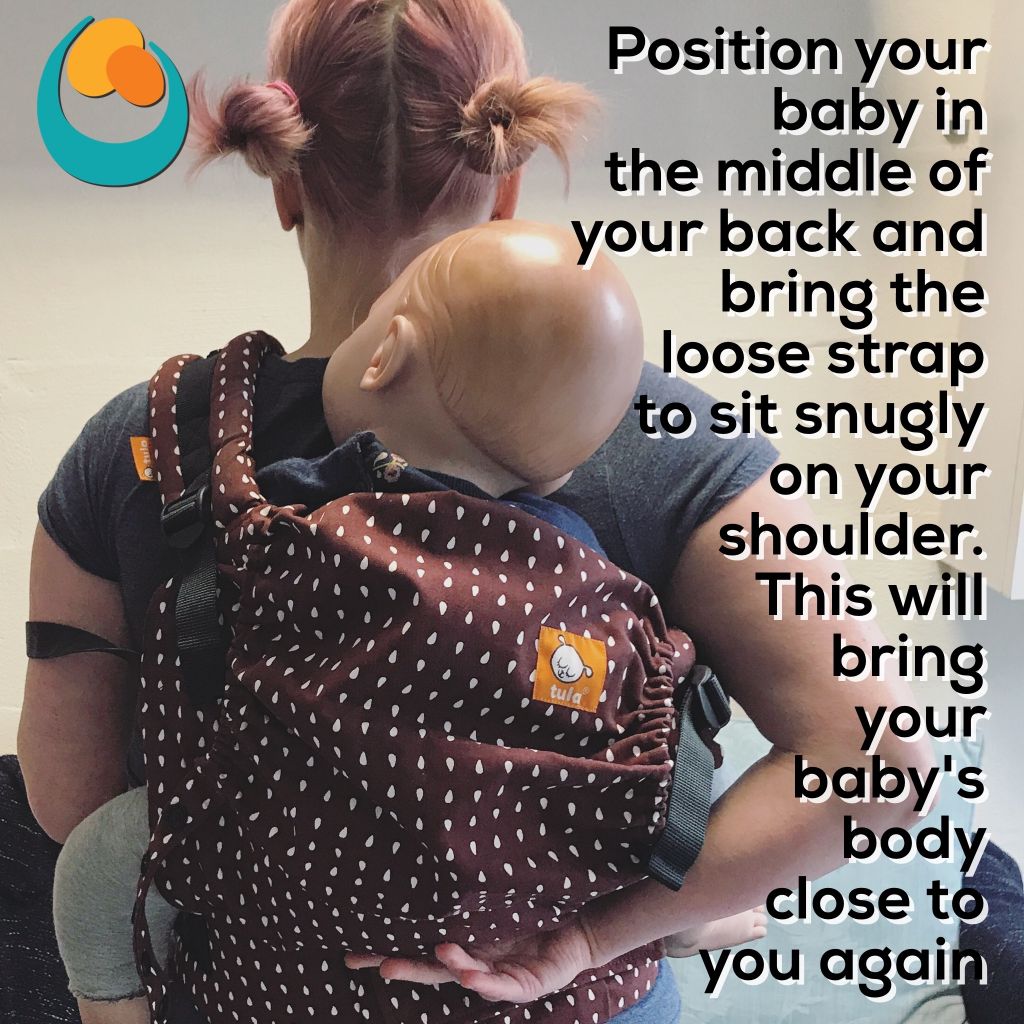
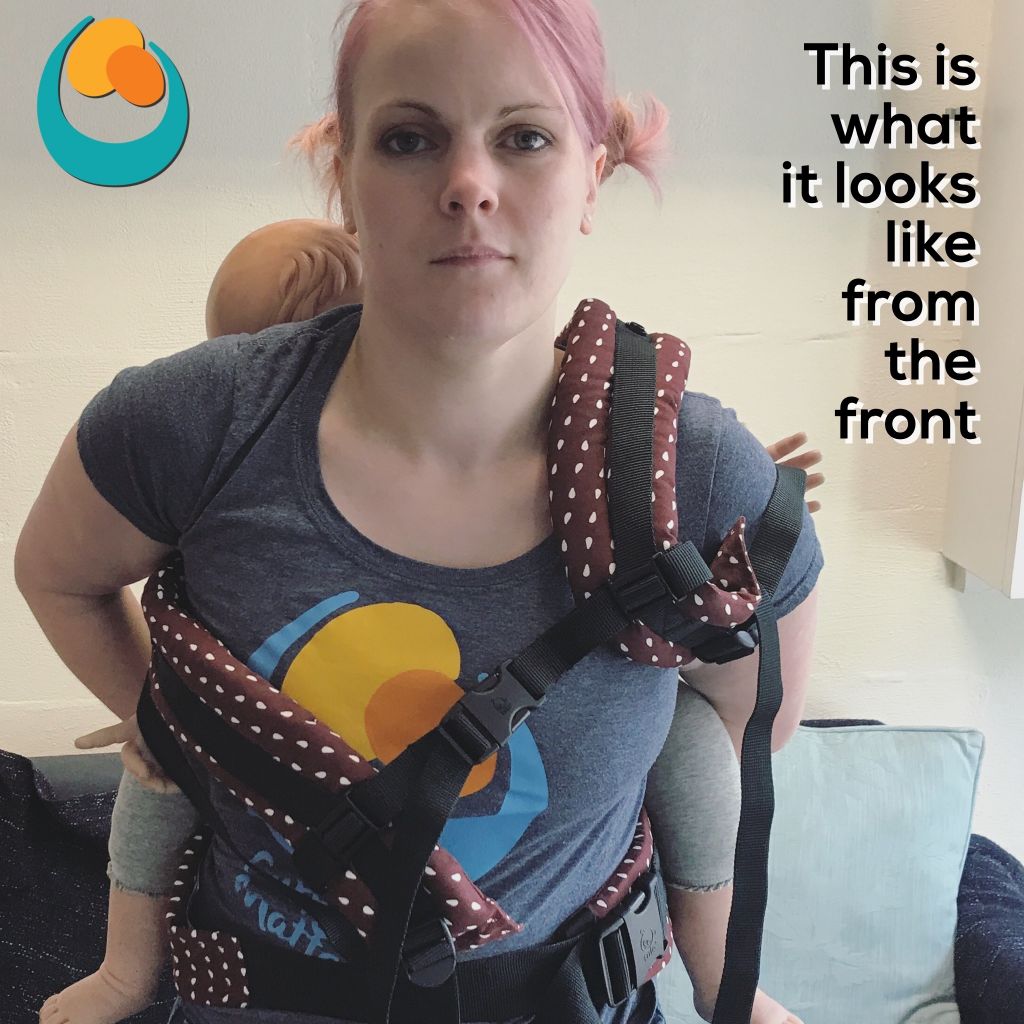
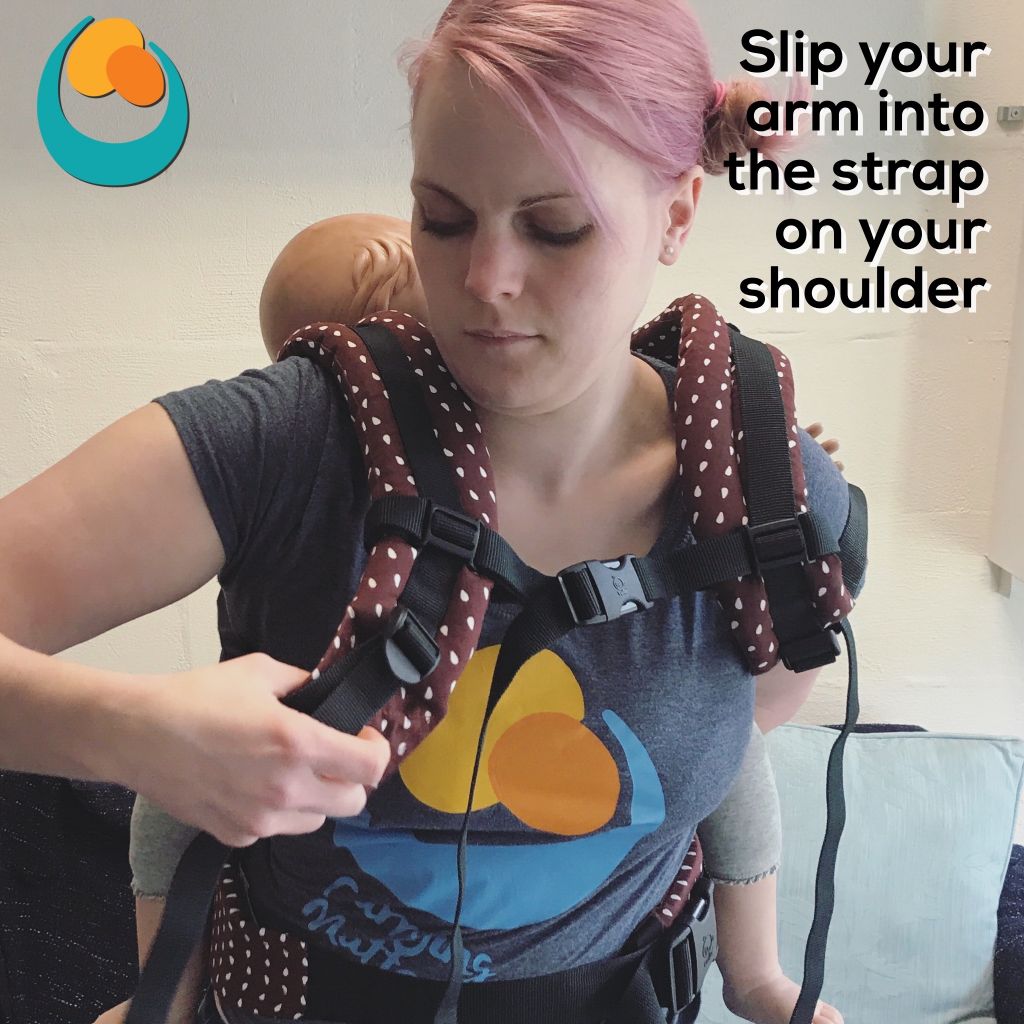
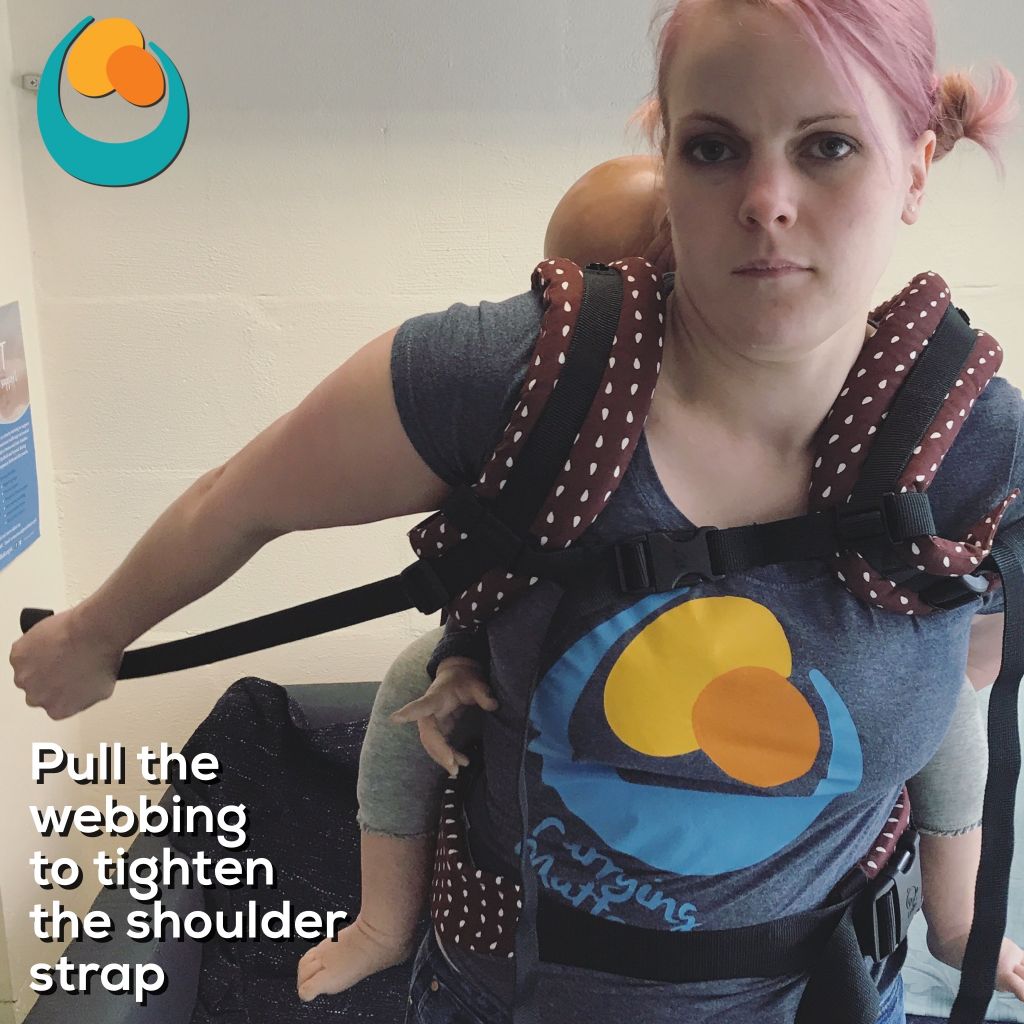
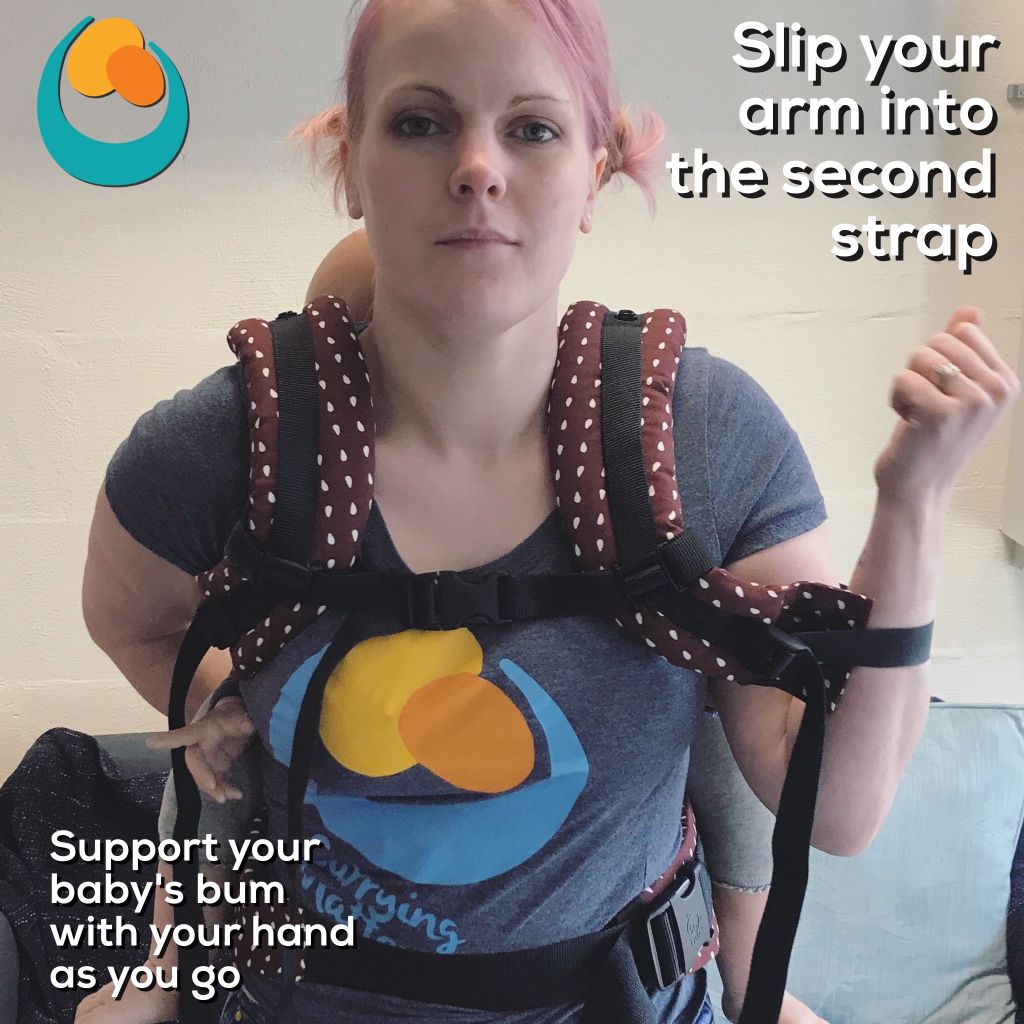
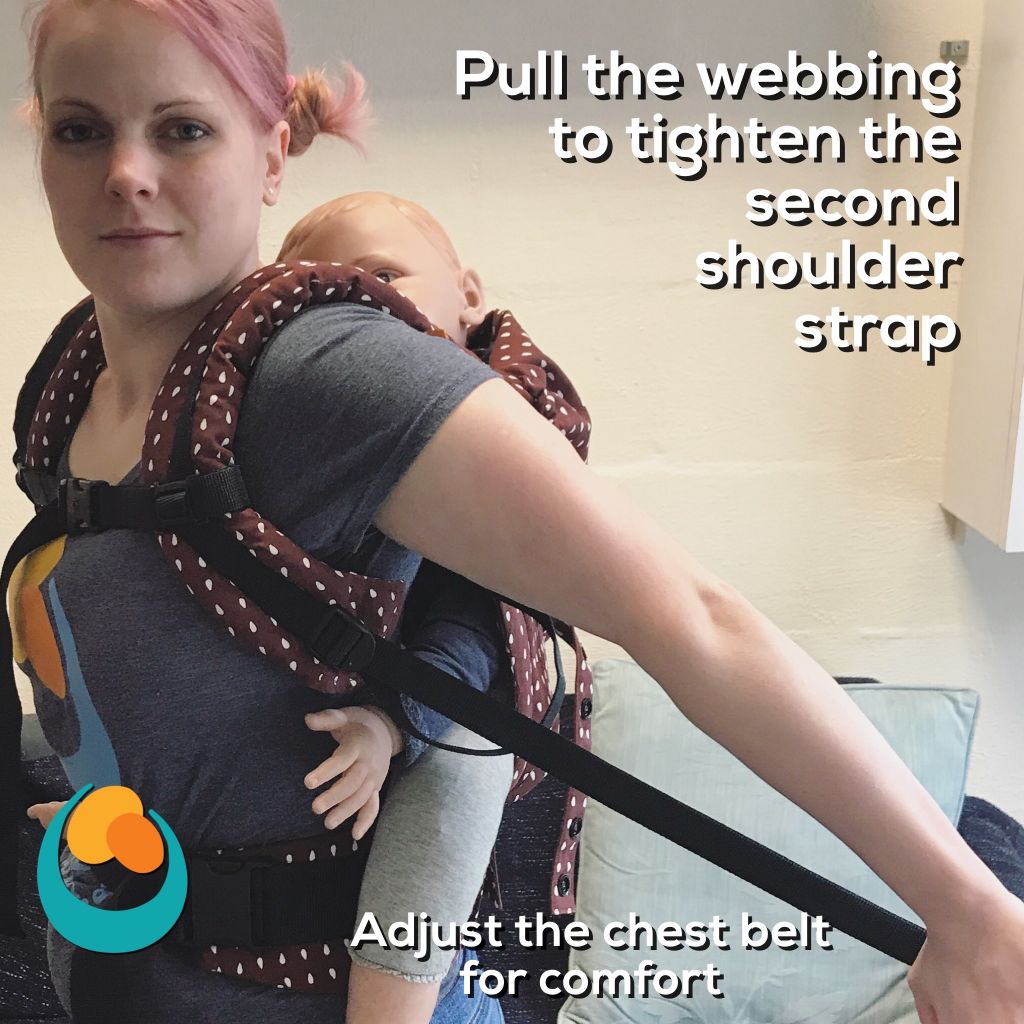
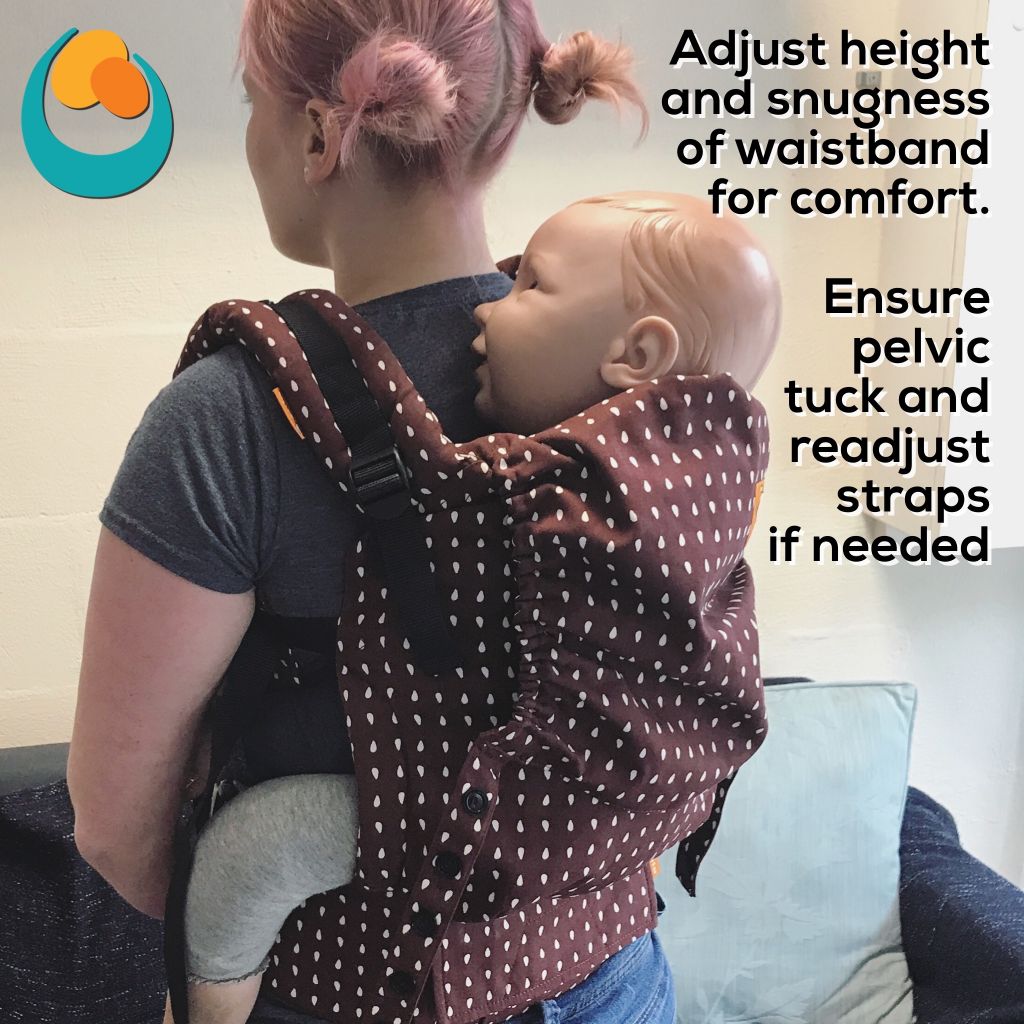
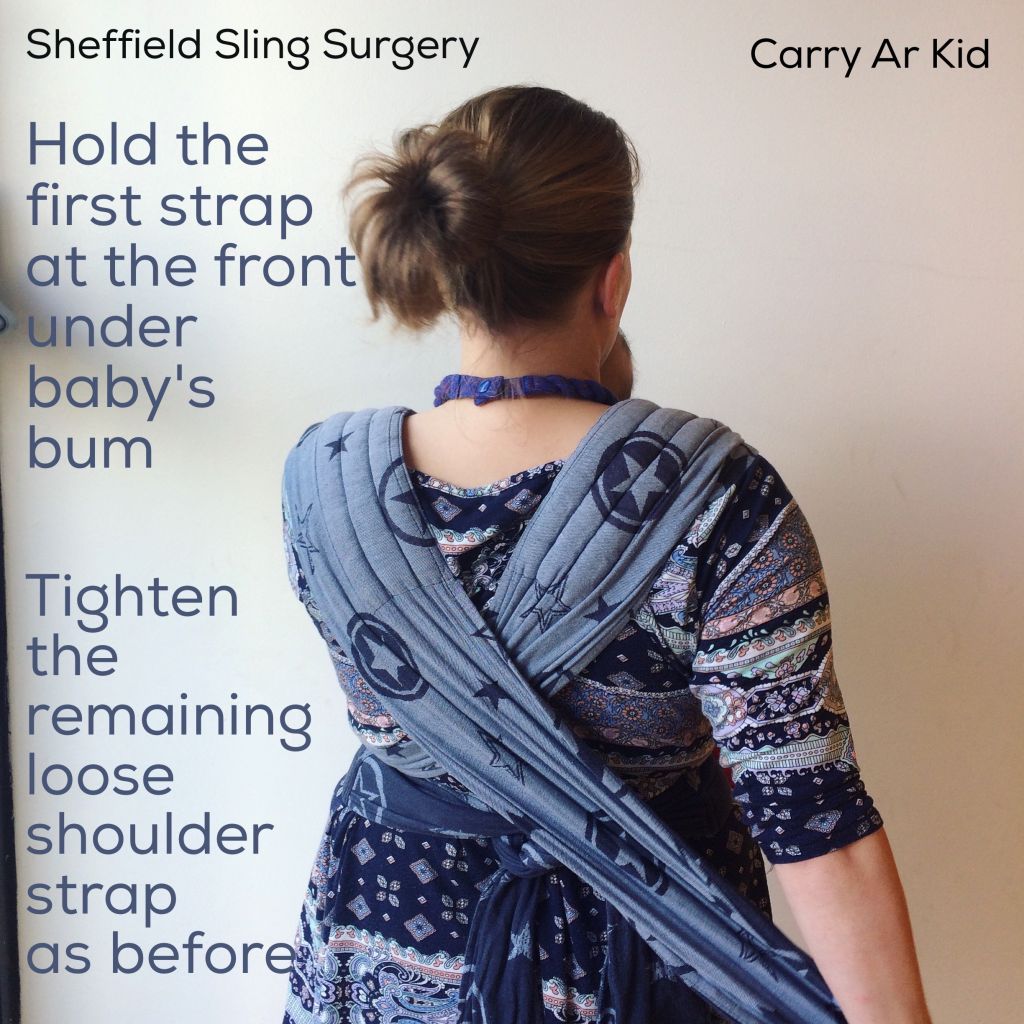
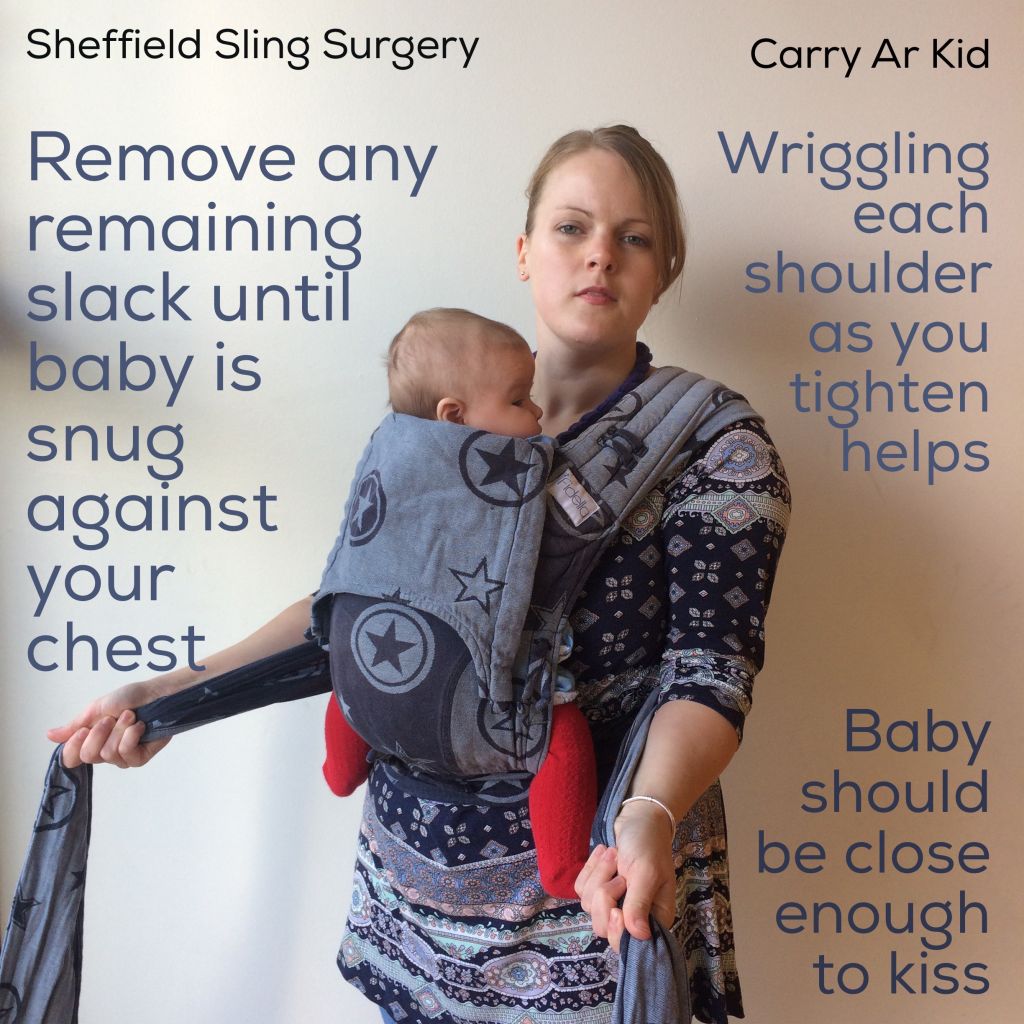
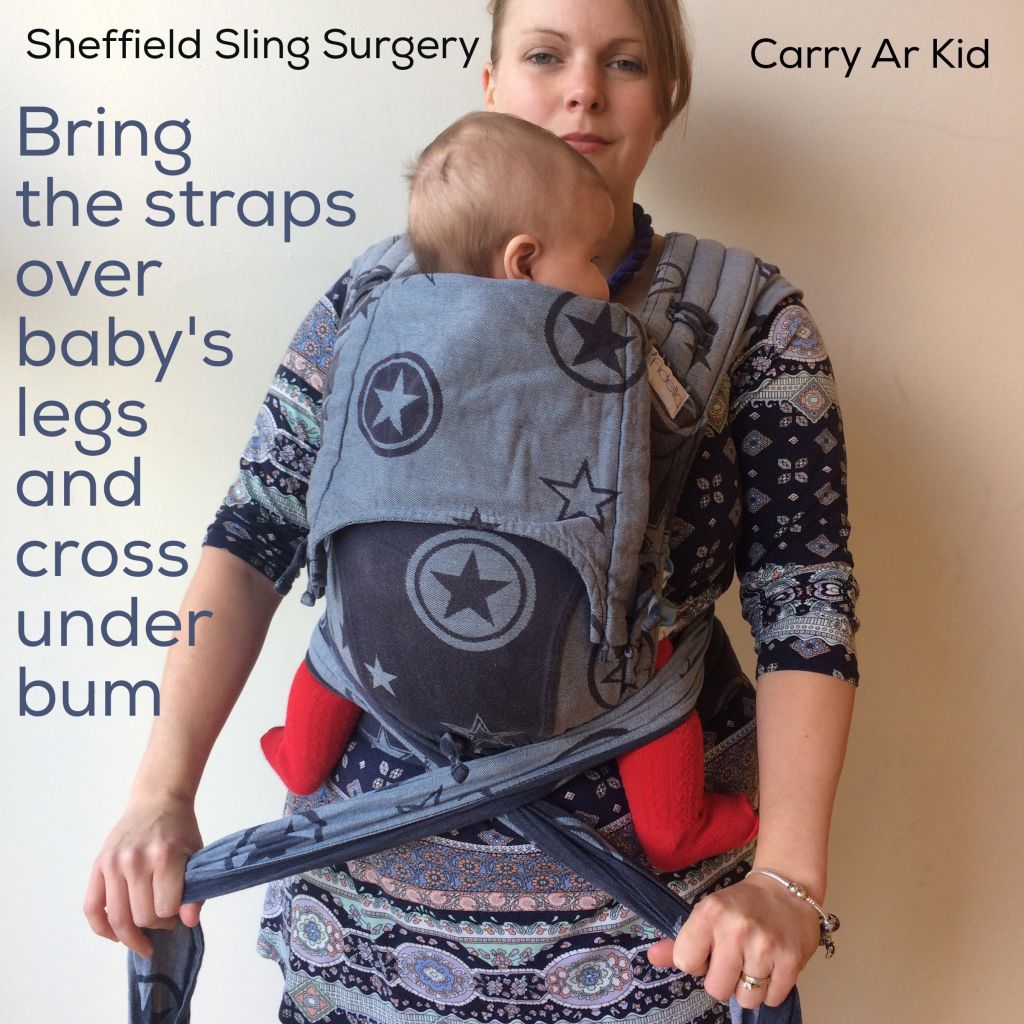
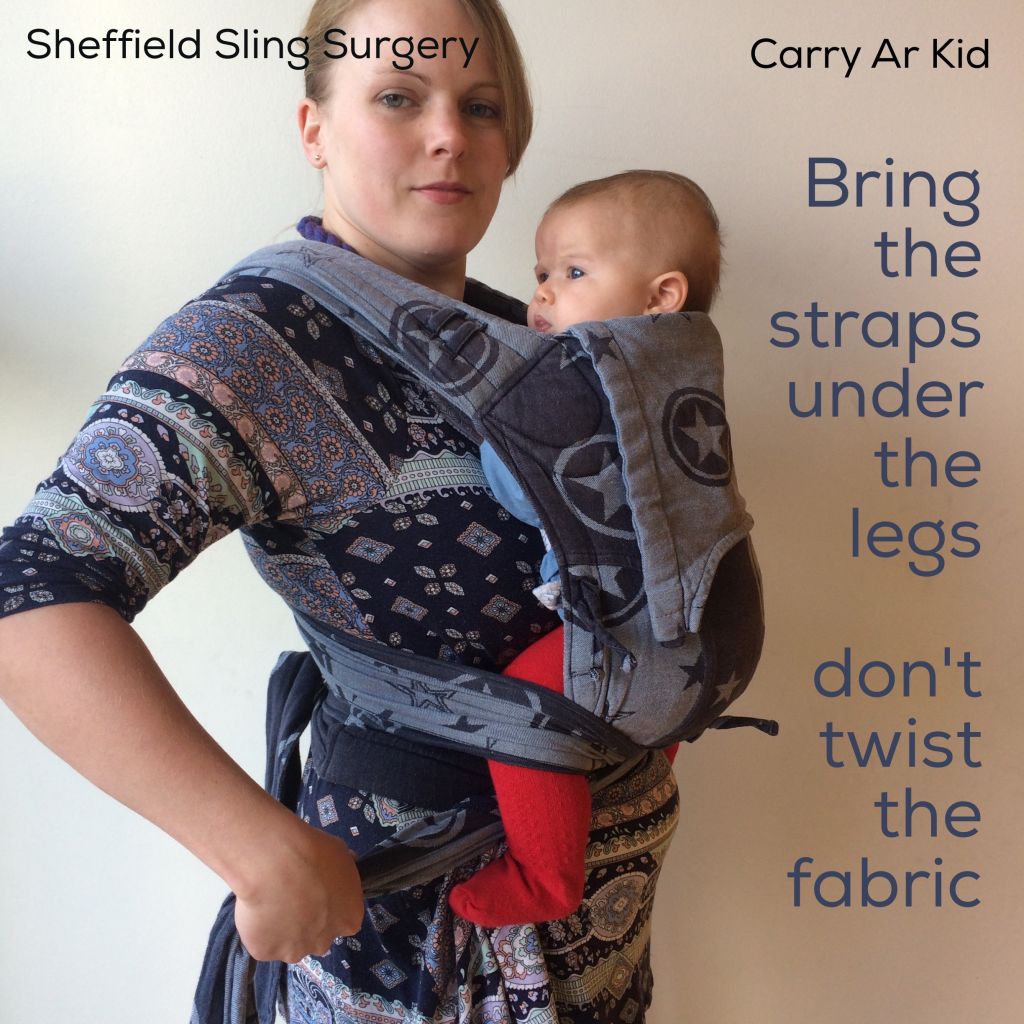
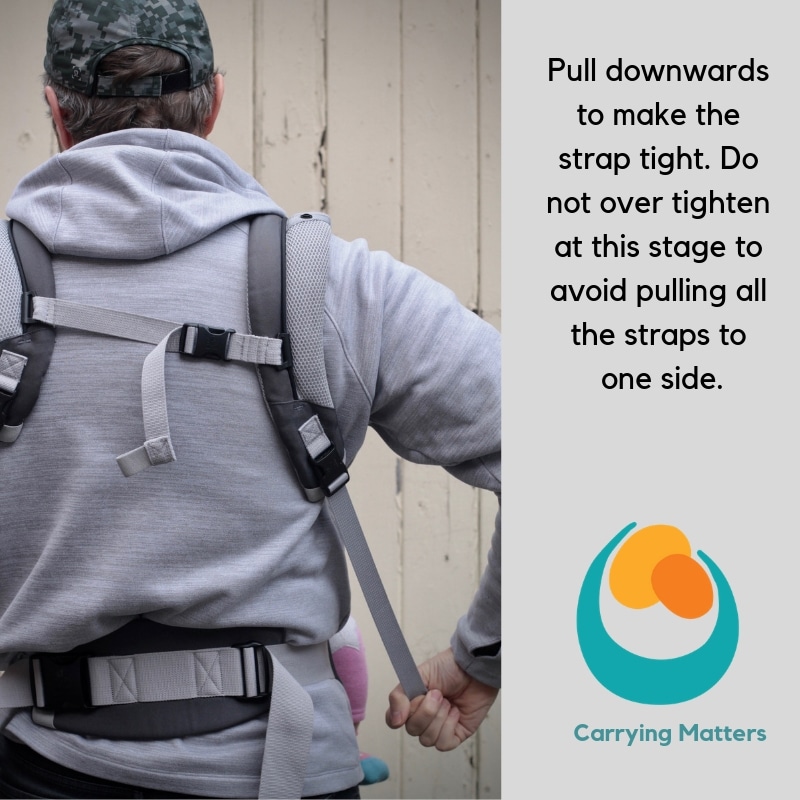
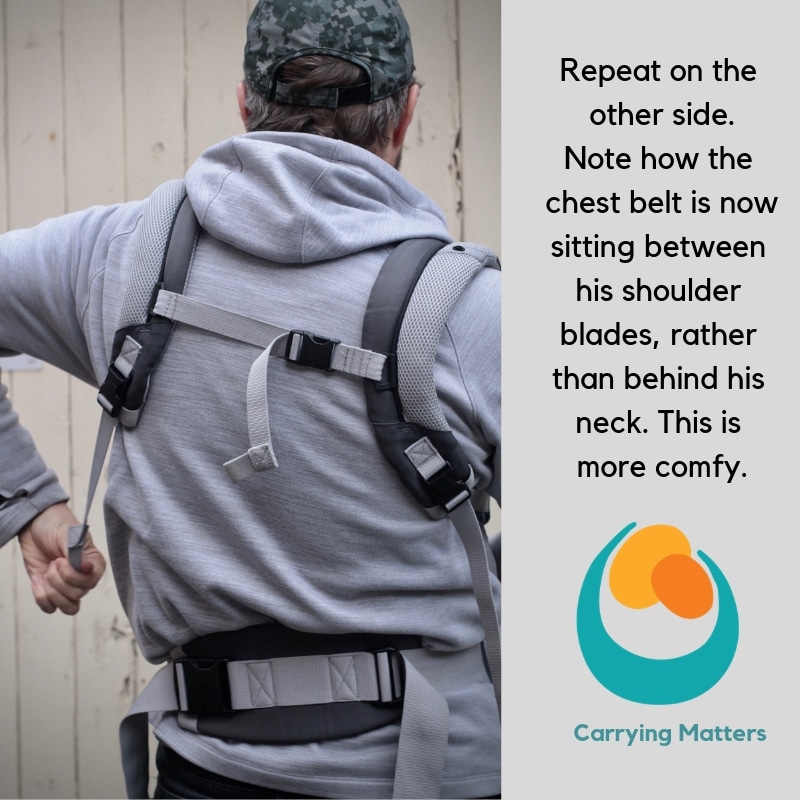
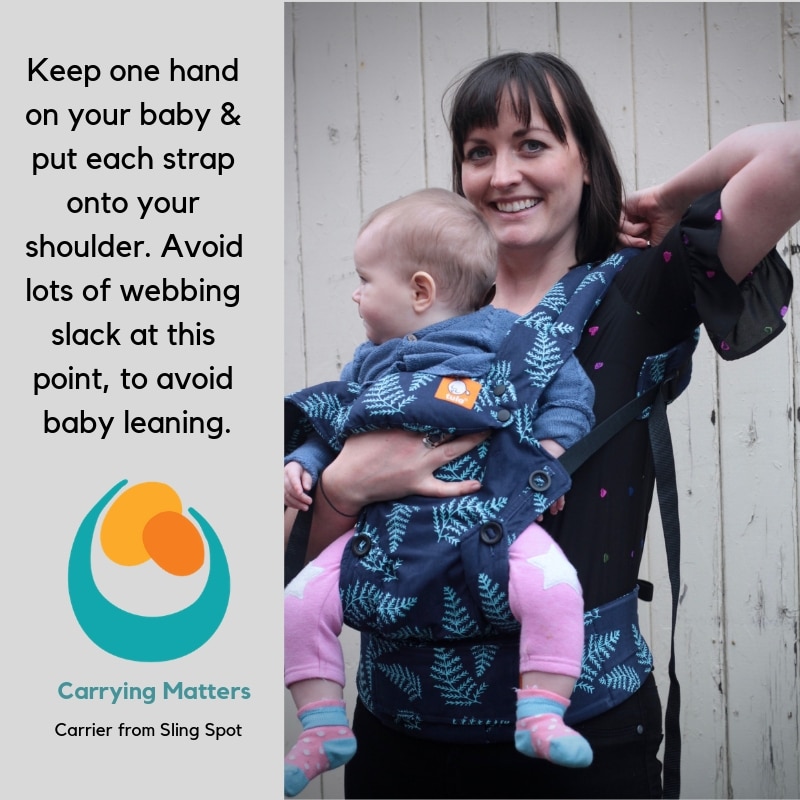
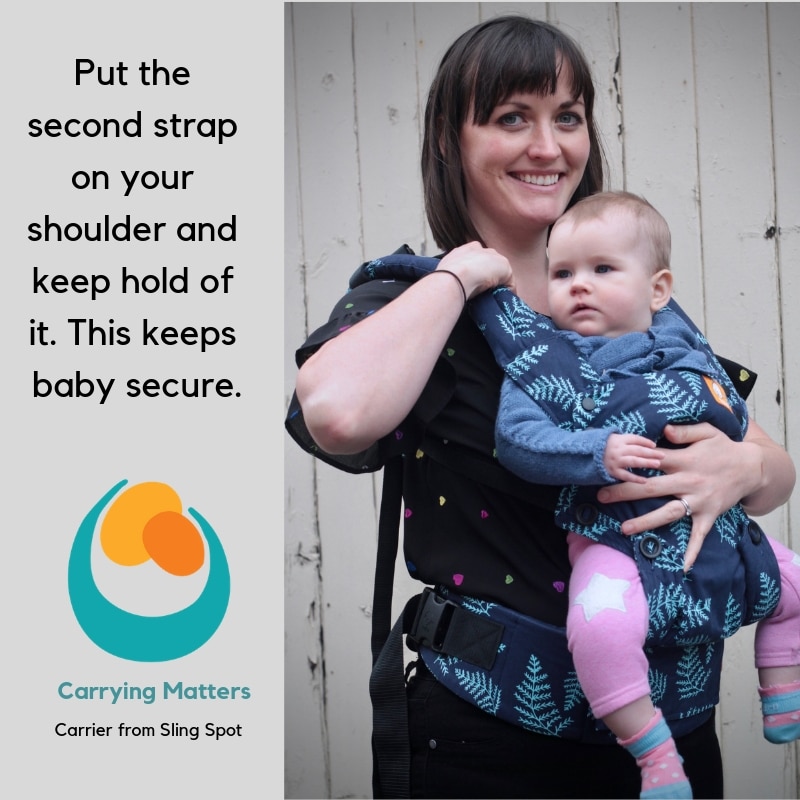
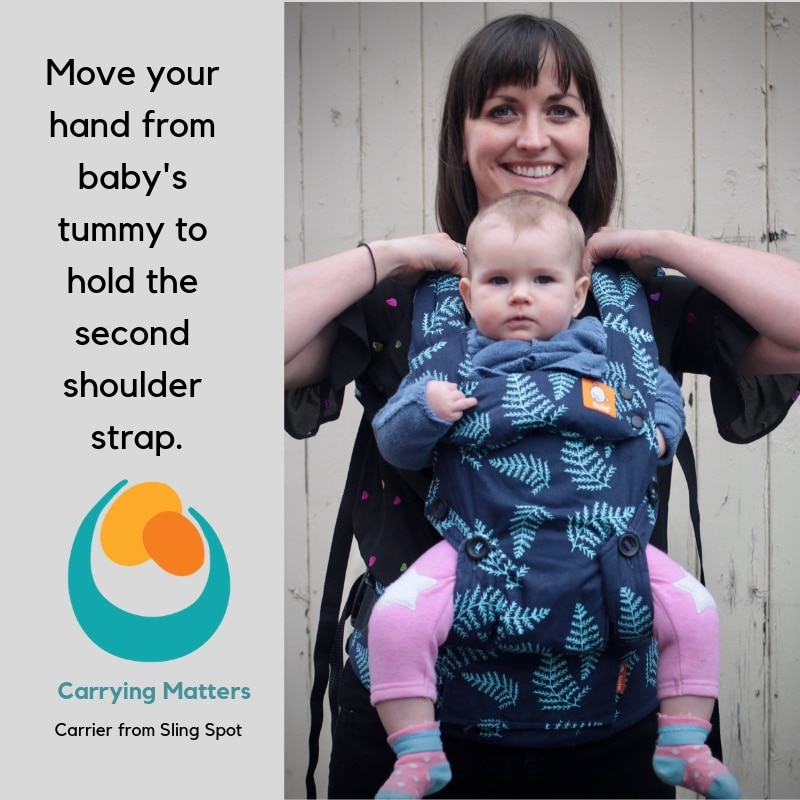
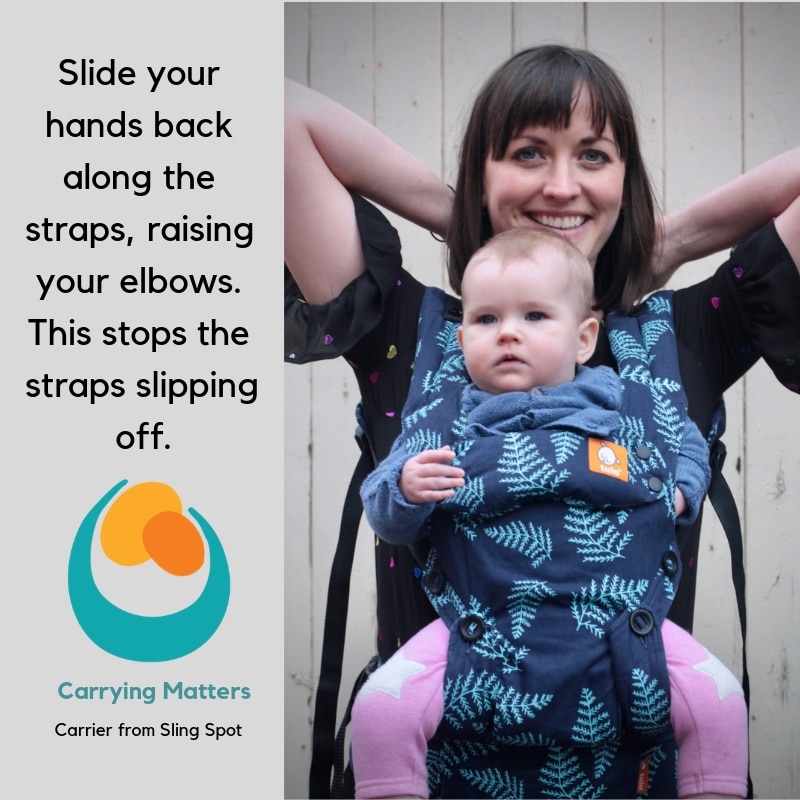
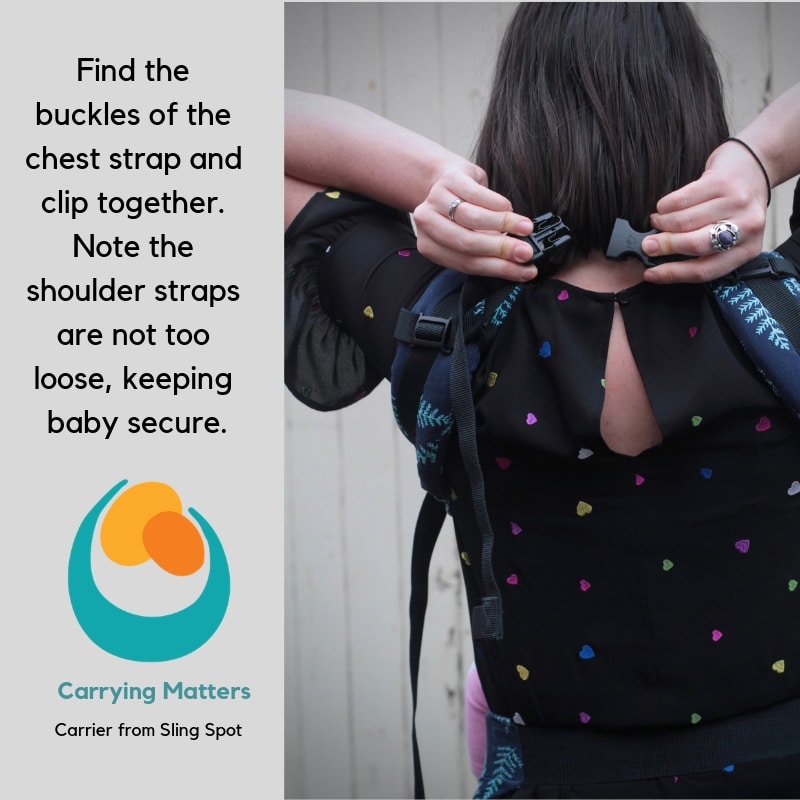
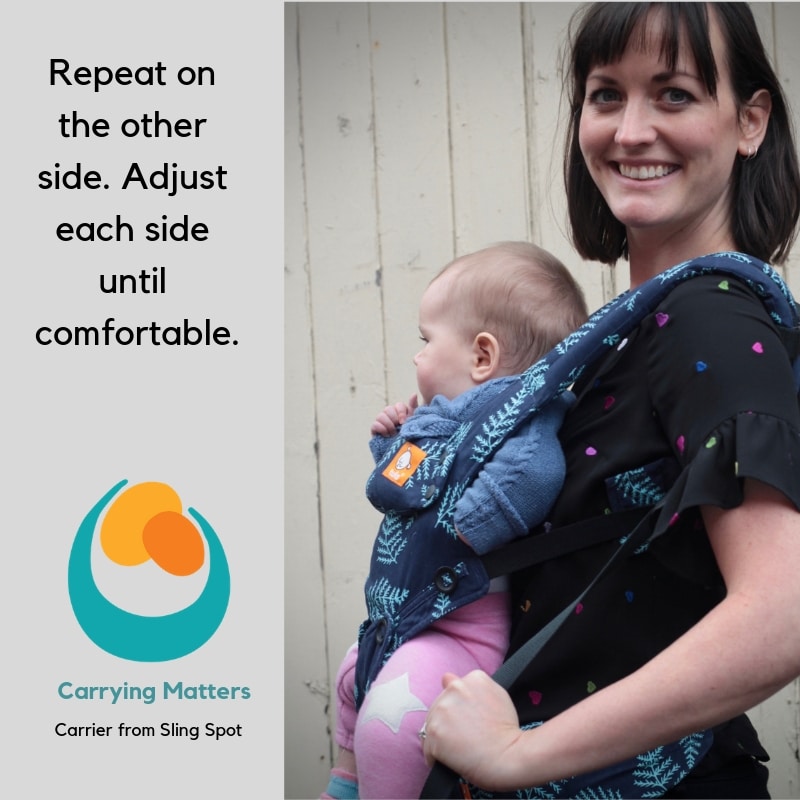
Back carry with a rucksack carrier photo tutorial - "One up One Down"
Learn how to safely do a back carry with a rucksack carrier with this one up one down (used to be known as the"walk like an Egyptian") method.
The straps are worn like a rucksack and the chest belt remains done up at all times. Each arm is threaded out of the shoulder straps one by one; first one comes up and forwards, the second comes down and back, “one up, one down” method. The chest belt is not a source of weight bearing support so please keep one hand on your baby at all times as seen in the photos.
Baby should be old enough for back carries in your buckle carrier that fits them well. Read more about this here.
Please see your local carrying consultant or sling library for help if you are unsure. It is wise to practice with some help and in front of a mirror the first few times!